No articles match your search.Ask us: support@buildcpq.com
Getting started
A quick tour of ShadeCPQ, the words we use, and what your customer sees.
Who can do this: Everyone. Catalog and Settings are for Admins only.
ShadeCPQ is where your shop prices awnings, builds quotes and gets them approved. You price a
fixed-frame awning in the configurator, put it on a quote with anything else the job needs,
and email the quote to your customer. They approve it from a link, with no account to set up.
Everything is at app.shadecpq.com, on a computer, tablet or phone.
Find your way around
Sign in at app.shadecpq.com. You land on your Dashboard.
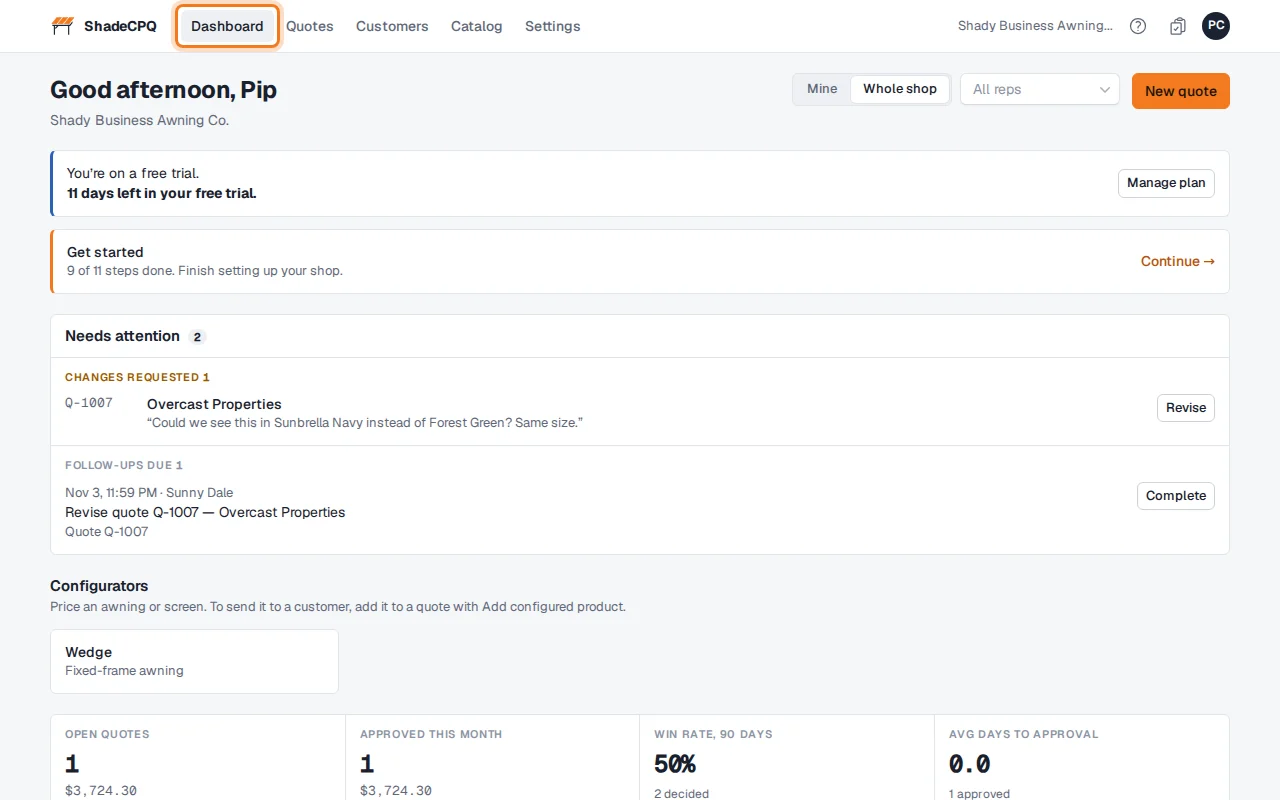
The Dashboard shows what needs you today: quotes where the customer asked for changes, quotes they viewed but haven't answered, and quotes about to expire, each with a button for the next step. Below are this month's numbers: open quotes, approved quotes, win rate and how many days approval takes. New quote is at the top.
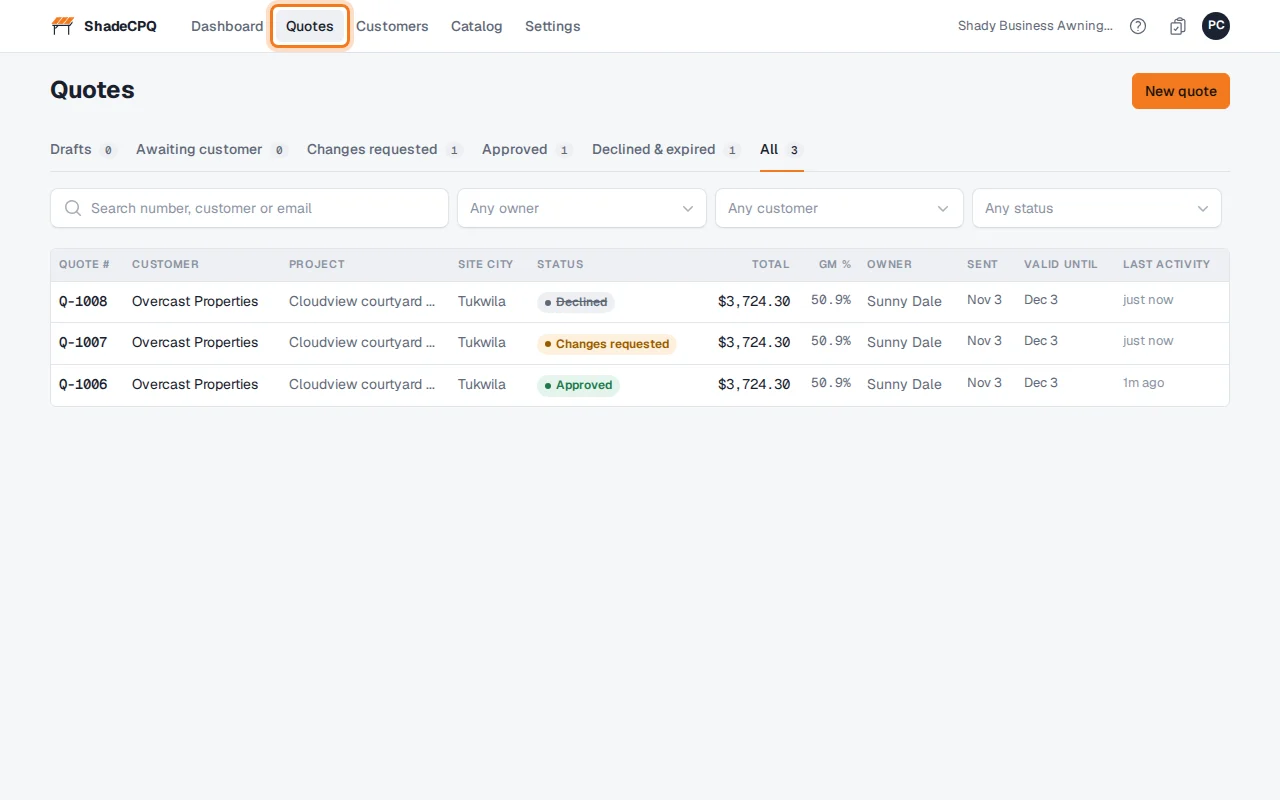
Quotes lists every quote with its customer, status and total. Use the tabs (Drafts, Awaiting customer, Changes requested, Approved…) and the search box to find one.
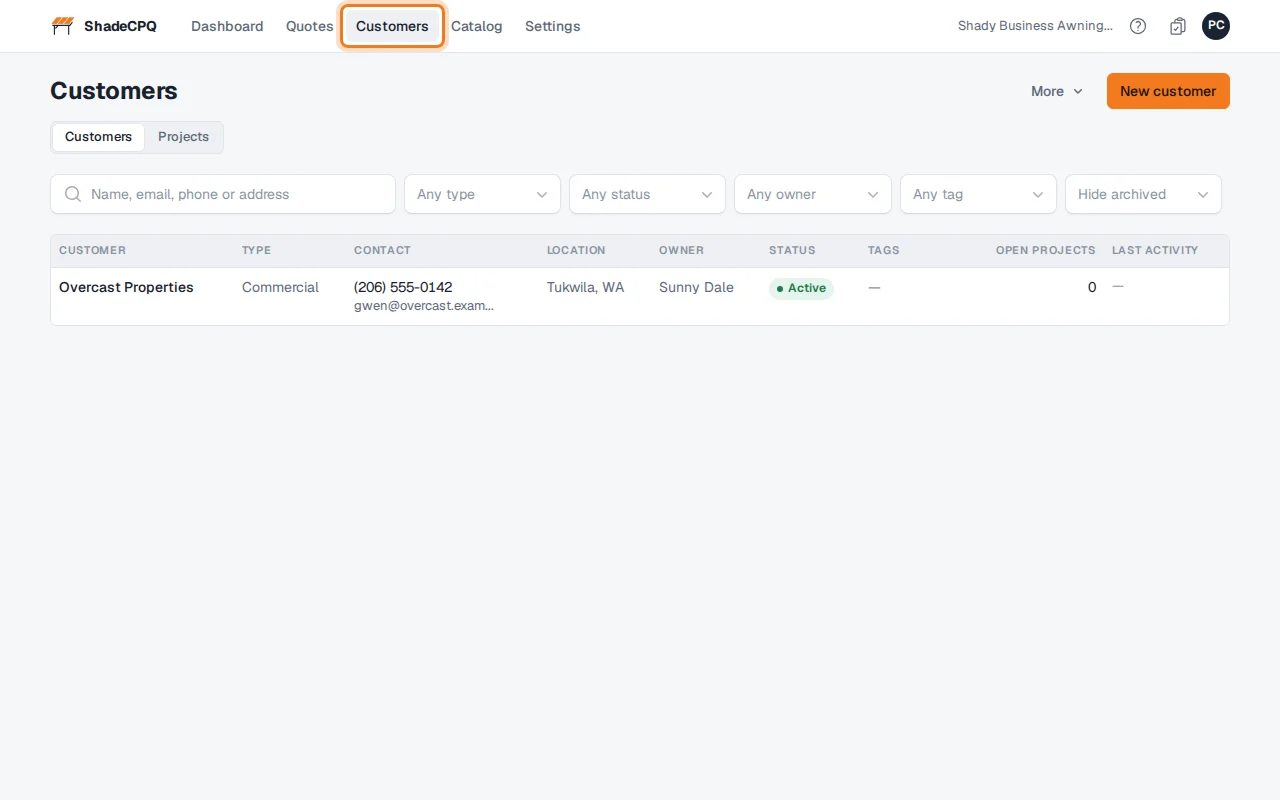
Customers lists the people and companies you quote, with their contacts, job sites and quotes.
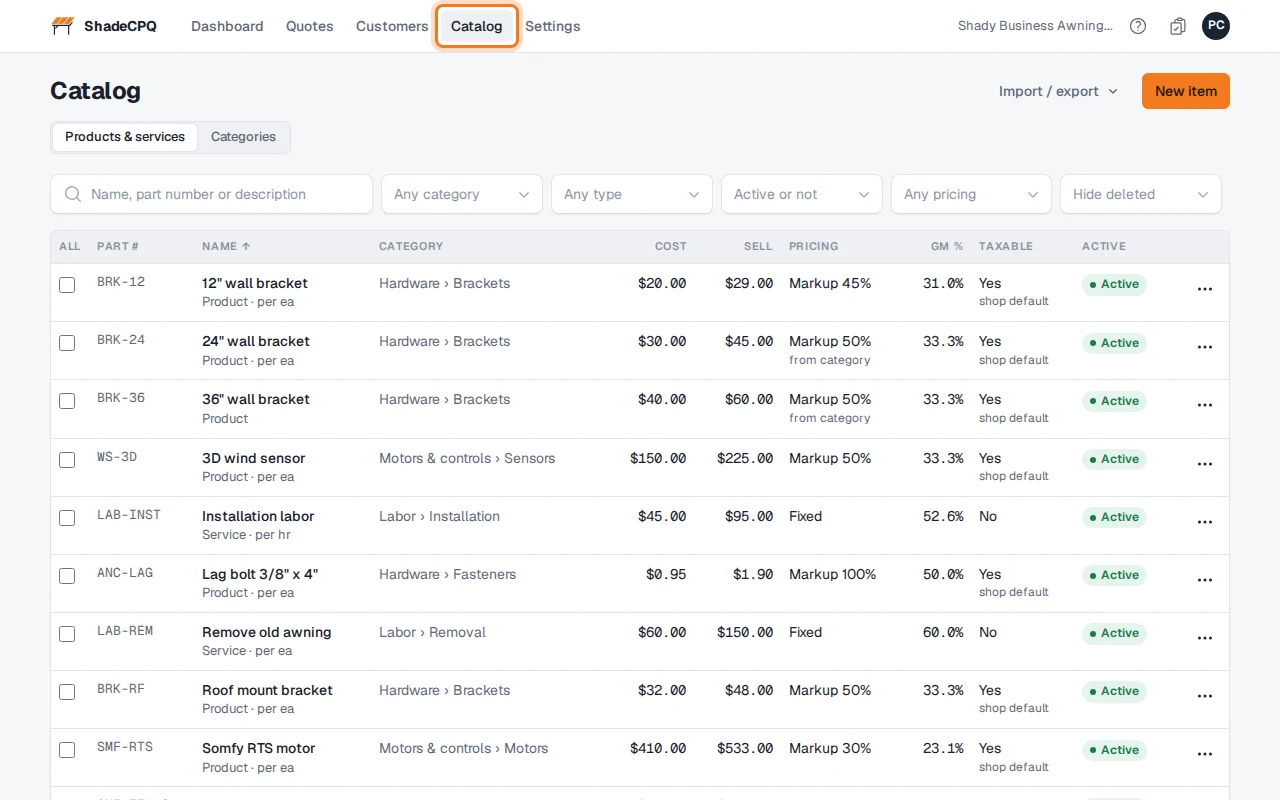
Catalog (Admins) is your list of products (brackets, motors) and services (labor, trip charges). Reps add them to quotes.
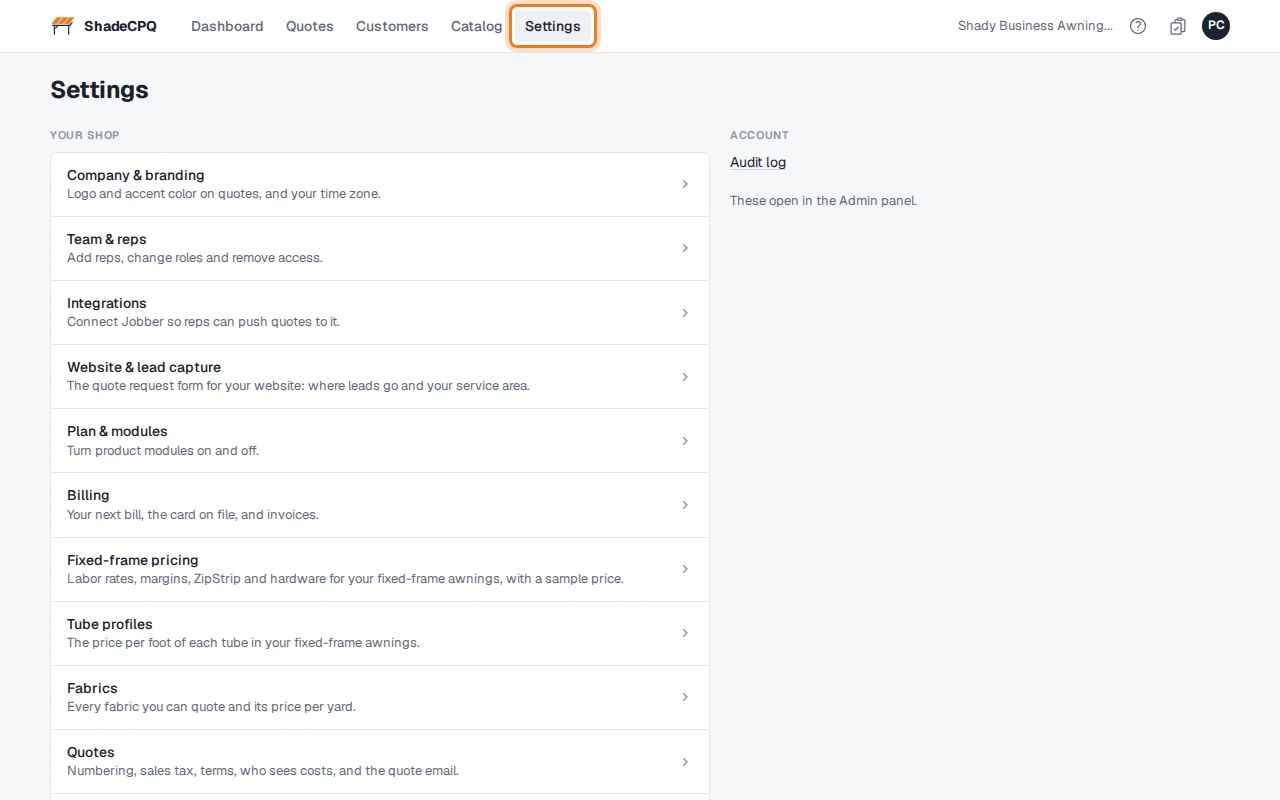
Settings (Admins) holds your logo, team, quote and tax settings. Pricing for fixed-frame awnings is linked from here too.
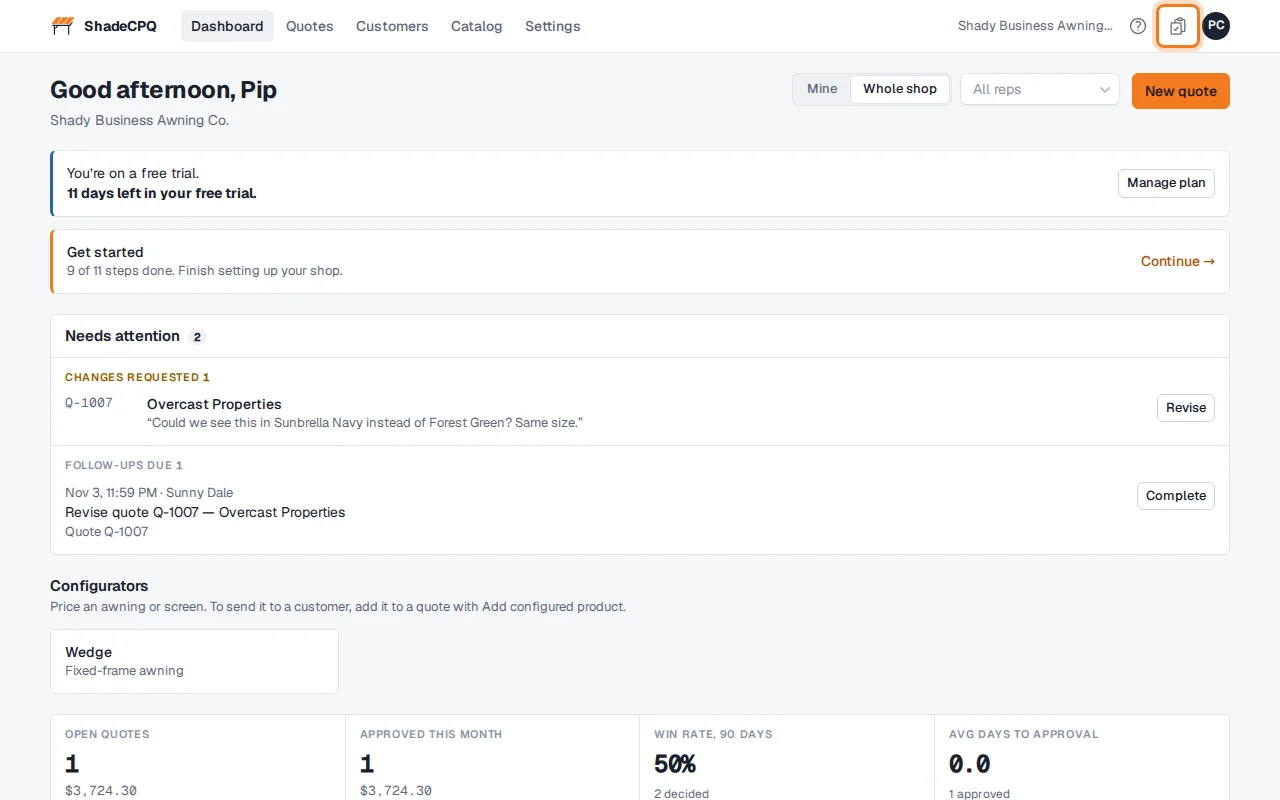
The clipboard icon at the top right is My follow-ups. The number is how many are due today or overdue.
Get your shop ready
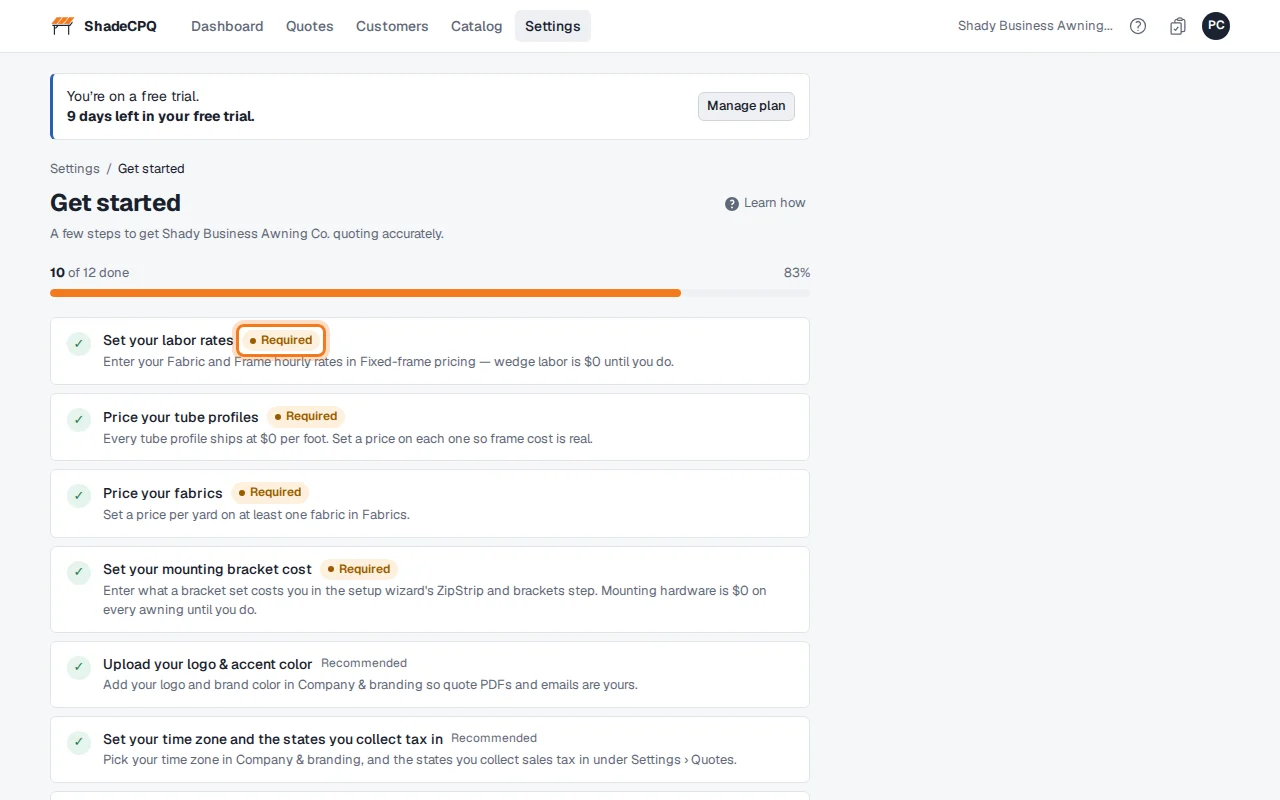
Until your shop is set up, Admins see a Get started card on the Dashboard with how many steps are done. Click it.
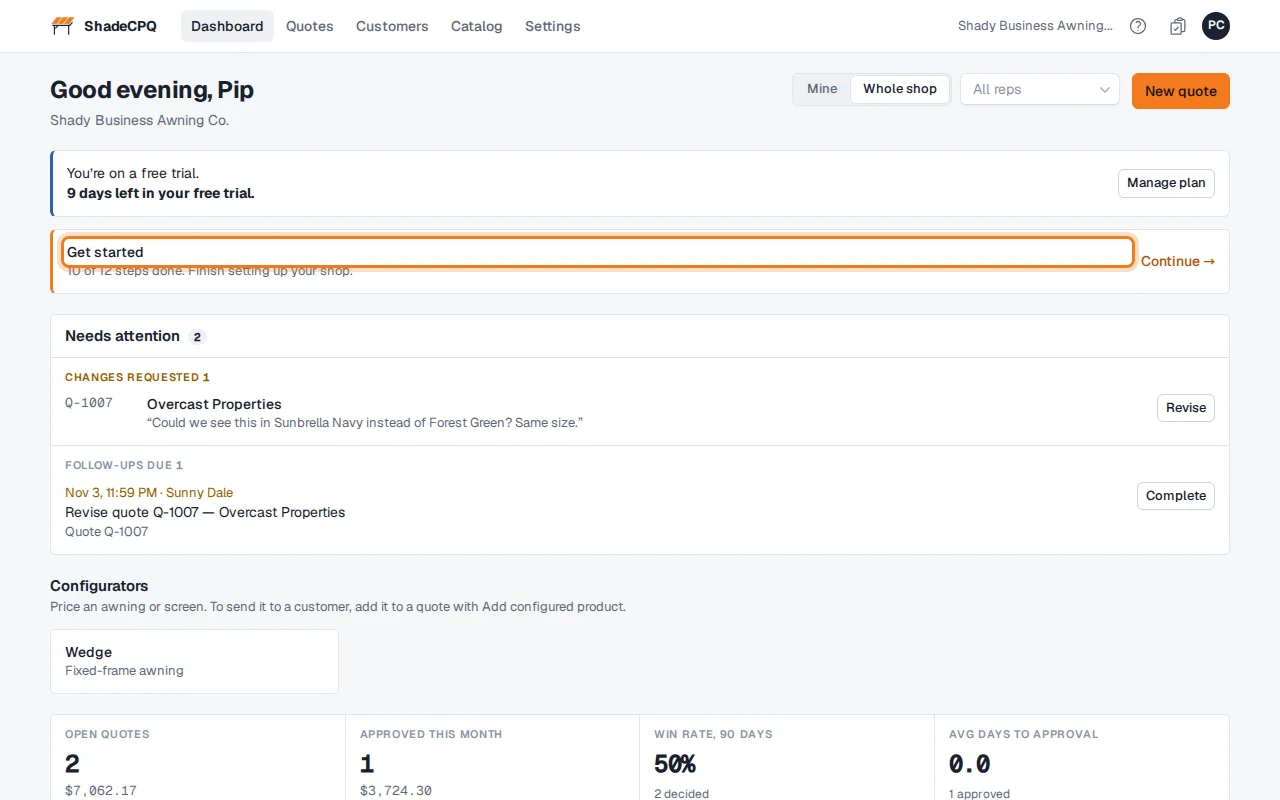
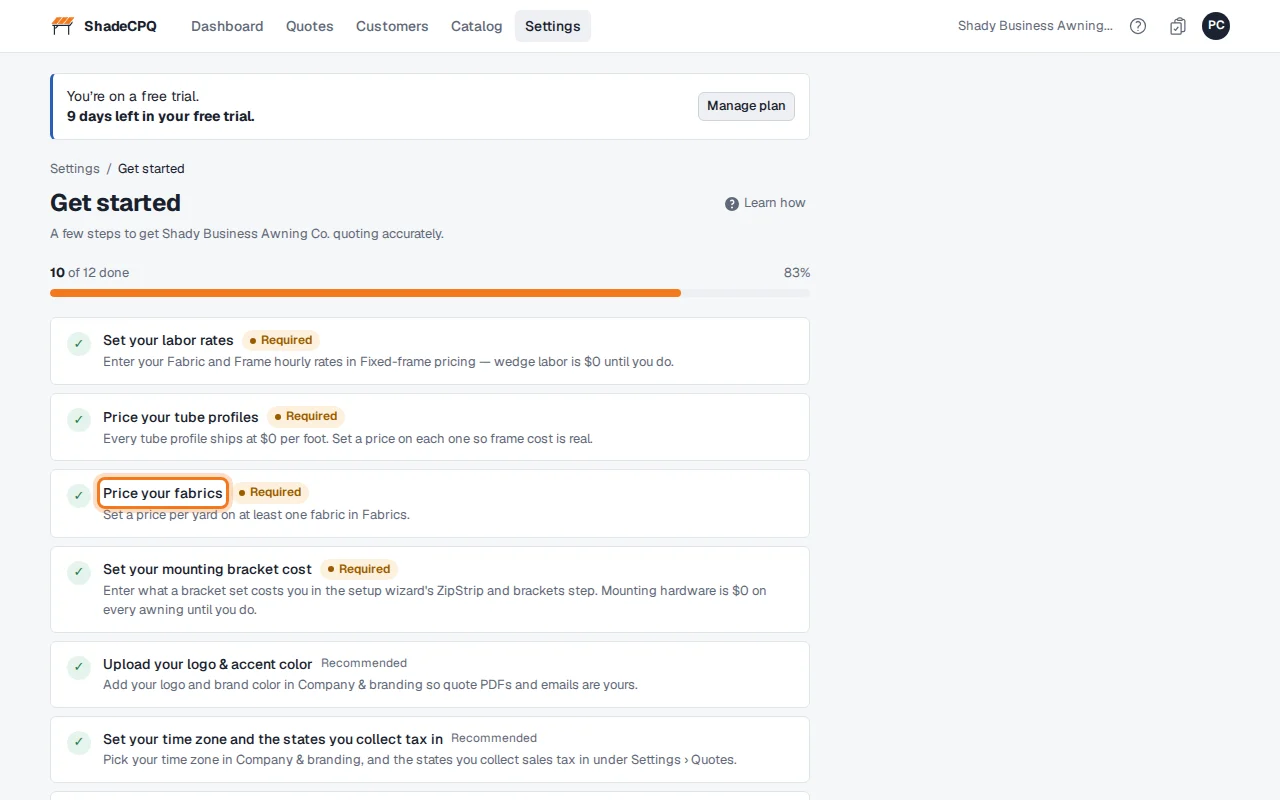
The list shows what's done and what's left. The Required steps are the costs the configurator prices from: labor rates, tubing and fabric. Until they're filled in, awning prices come out too low. The other steps are recommended.
Words we use
| Word | What it means |
|---|
| Fixed-frame awning | An awning on a welded frame your shop builds. You price it in the configurator. Some screens still call it a wedge. |
| Configurator | Where you design a fixed-frame awning (size, frame, fabric) and get its price. |
| Saved configuration | A priced awning design you've saved. Each fixed-frame line on a quote has one. |
| Quote | What your customer gets: the lines, sales tax, a total, and a link to approve. When you change a sent quote you make a new version (v1, v2…). |
| Customer, contact | The customer is the person or company you quote. Contacts are the people there; quotes are emailed to a contact. |
| Job site | Where the work happens. Sales tax is worked out for this address. The billing address is where invoices go. |
| Project | One job for a customer. Its quotes are grouped under it. |
| Product, service | The two kinds of catalog item. A product is something you sell (a motor); a service is work or a charge (installation, a trip charge). |
| Markup, margin | Markup is added to your cost: 50% markup on $30 is $45. Margin is your profit as a share of the price: $15 of $45 is a 33.3% margin. Catalog items use markup; fixed-frame awnings use a target margin. See Pricing. |
| Recover | A new cover on a customer's existing frame. The frame isn't charged. |
| Build sheet | The shop's copy of a fixed-frame awning: cut list, fabric pieces, ZipStrip and drawings, with no prices. See Build sheets. |
| ZipStrip | The plastic strip stapled in after the fabric on a staple frame. Colors you stock are charged by the foot; other colors are a special order and come by the whole roll. |
What your customer sees
They see
Your logo and color, the quote number, their name and job site, each line with its description and price, the estimated sales tax and the total, your terms, and buttons to approve, request changes or decline. A fixed-frame awning shows its size, slope, fabric, how it's attached and a drawing.
They never see
Your costs, margin or GM %, labor times, the cut list and build sheet, internal notes, or the awning's shop spec (roll width, ZipStrip footage, bars). Part numbers only if you turn them on in Settings.
Good to know
- Reps see Dashboard, Quotes and Customers. Admins also see Catalog and Settings.
- Some pricing pages (labor rates, tubing, fabric) open in the Admin panel, which looks different. To get back, open the menu at the top right and click Dashboard.
Next: Setting up your shop
Setting up your shop
Your logo and color, time zone, shop address, quote numbers, sales tax and approval emails.
Who can do this: Admins only.
Do this once, before you send your first quote. Your logo and color go on every quote, PDF and email.
Logo, color and time zone
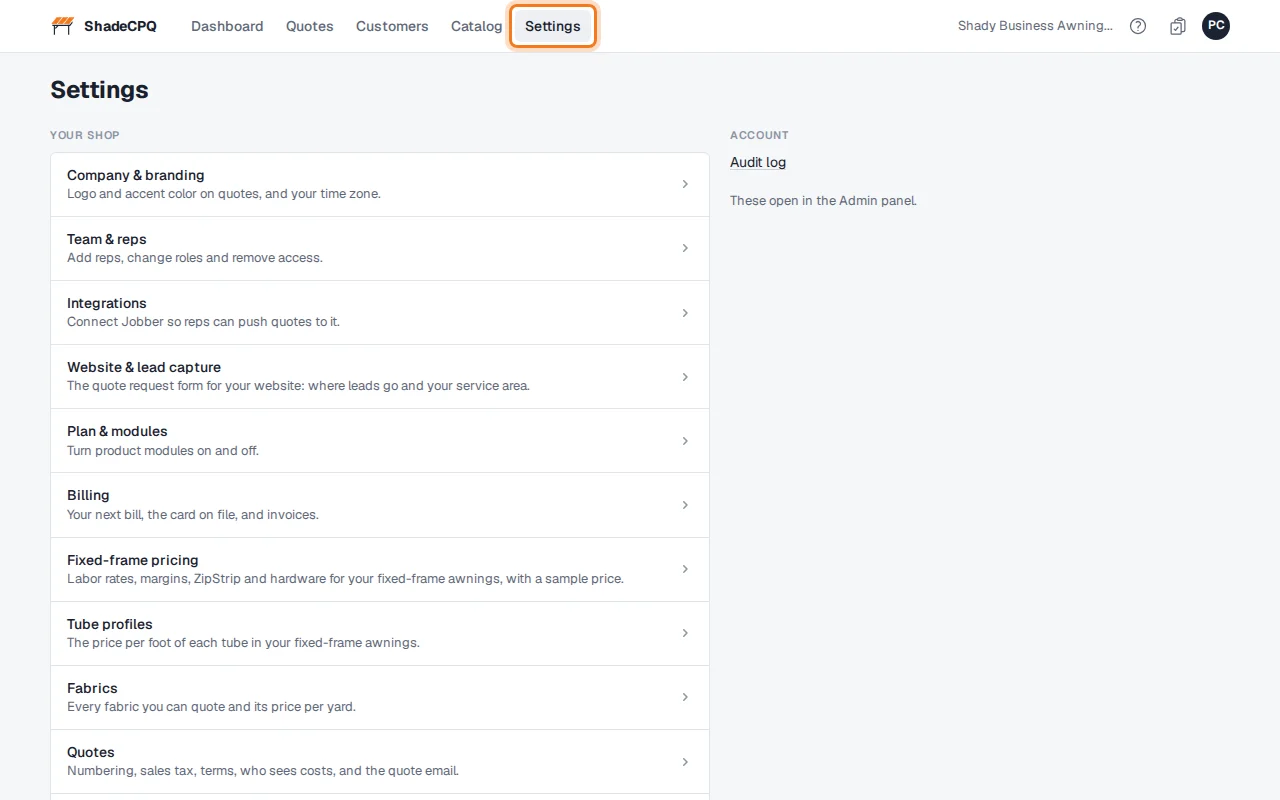
Click Settings at the top of the page. The left side lists your shop's settings. The right side links to pages that open in the Admin panel: the audit log and pricing setup.
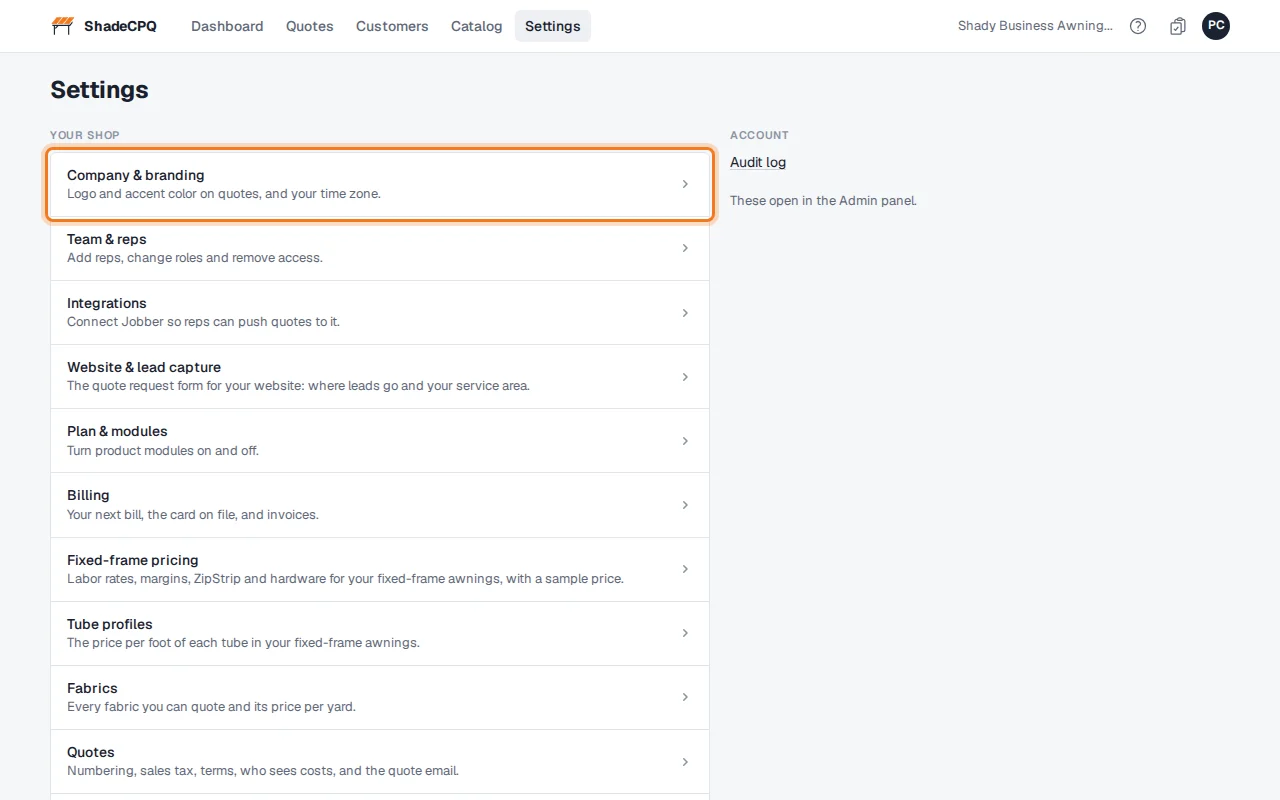
Click Company & branding.
Under Logo, click Upload logo and choose your logo file: PNG, JPG, SVG or WebP, up to 2 MB. Once you have one, the button reads Replace logo.
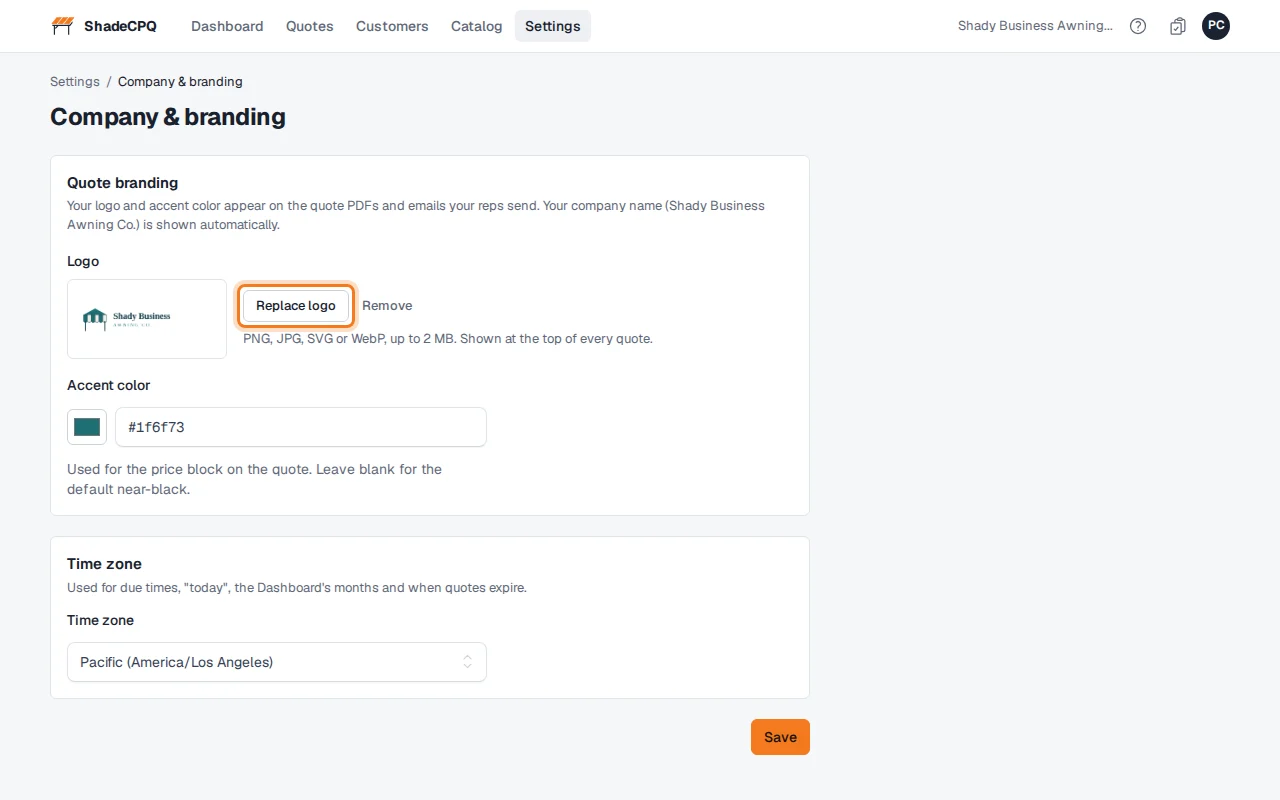
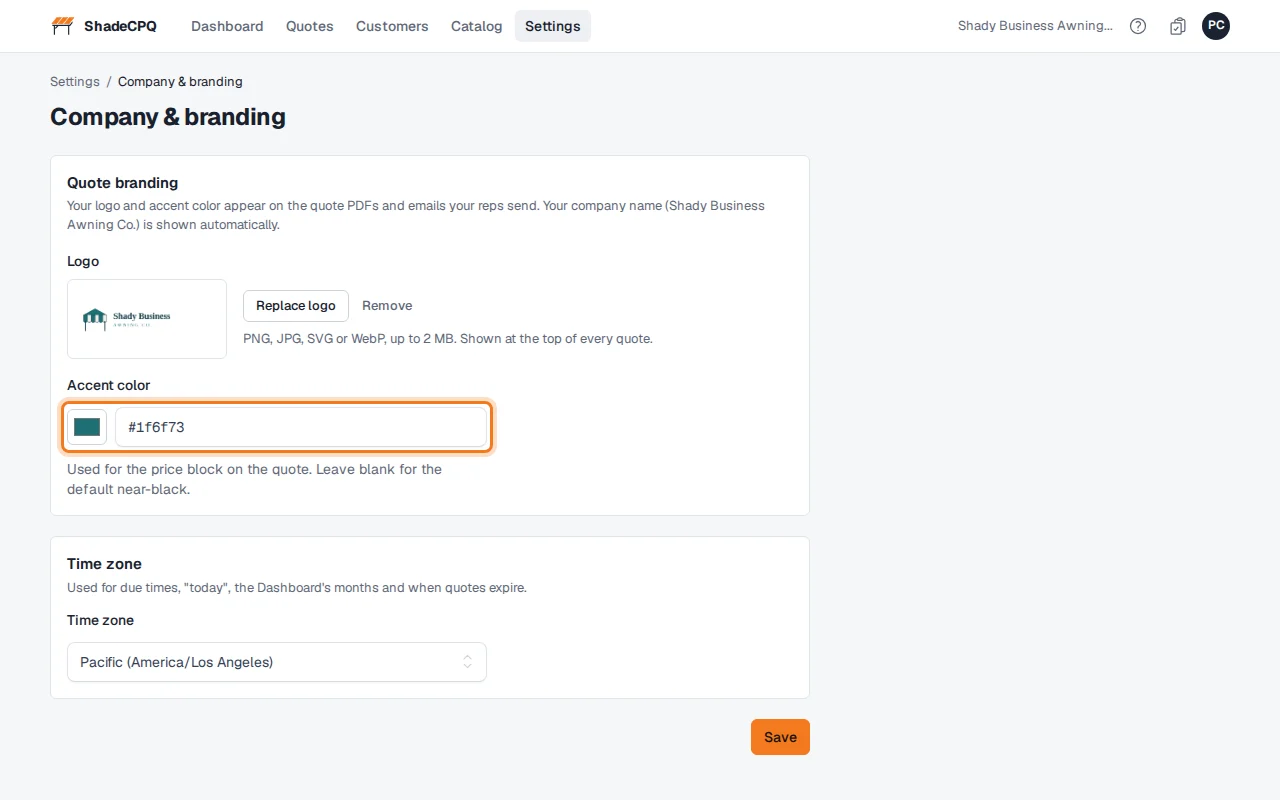
Pick your Accent color, or type its code (such as #1f6feb). It colors the price on your quotes and the Approve button your customer clicks.
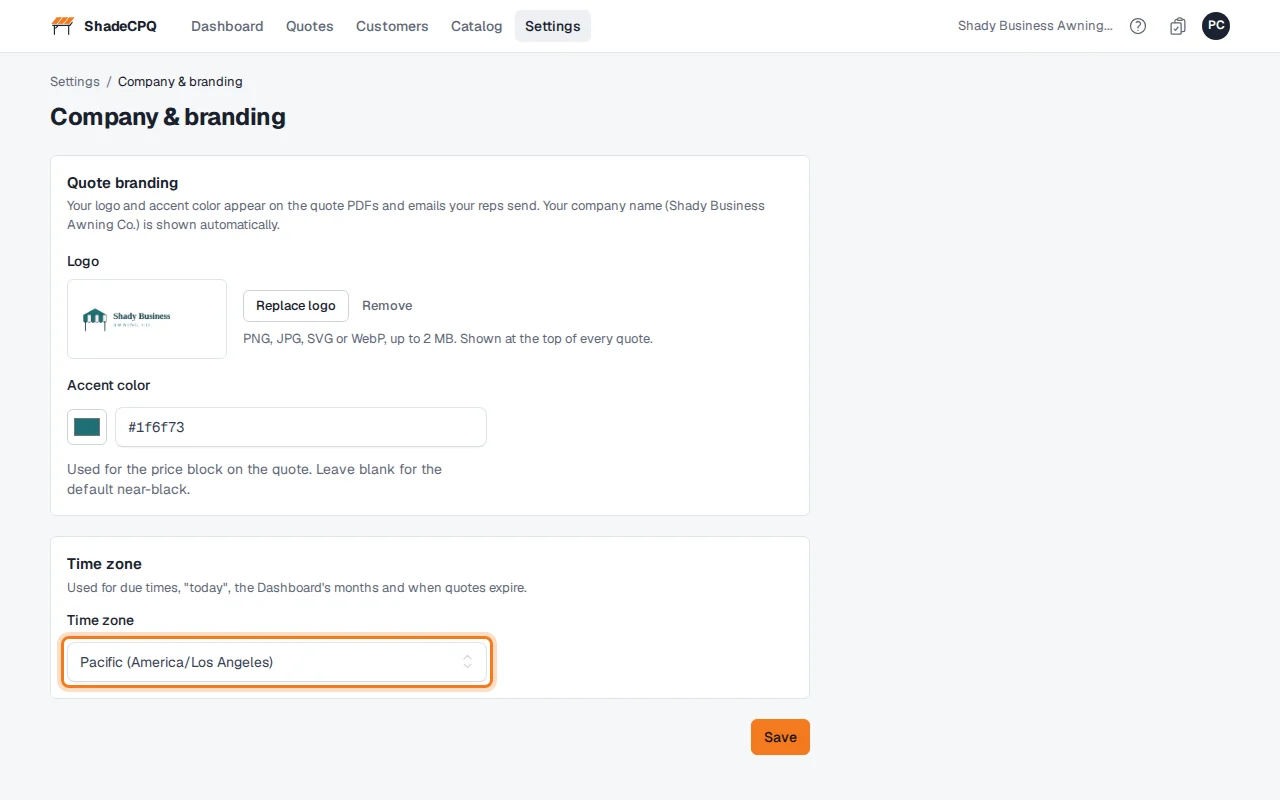
Choose your Time zone. It sets when "today" starts, the Dashboard's months, and when quotes expire.
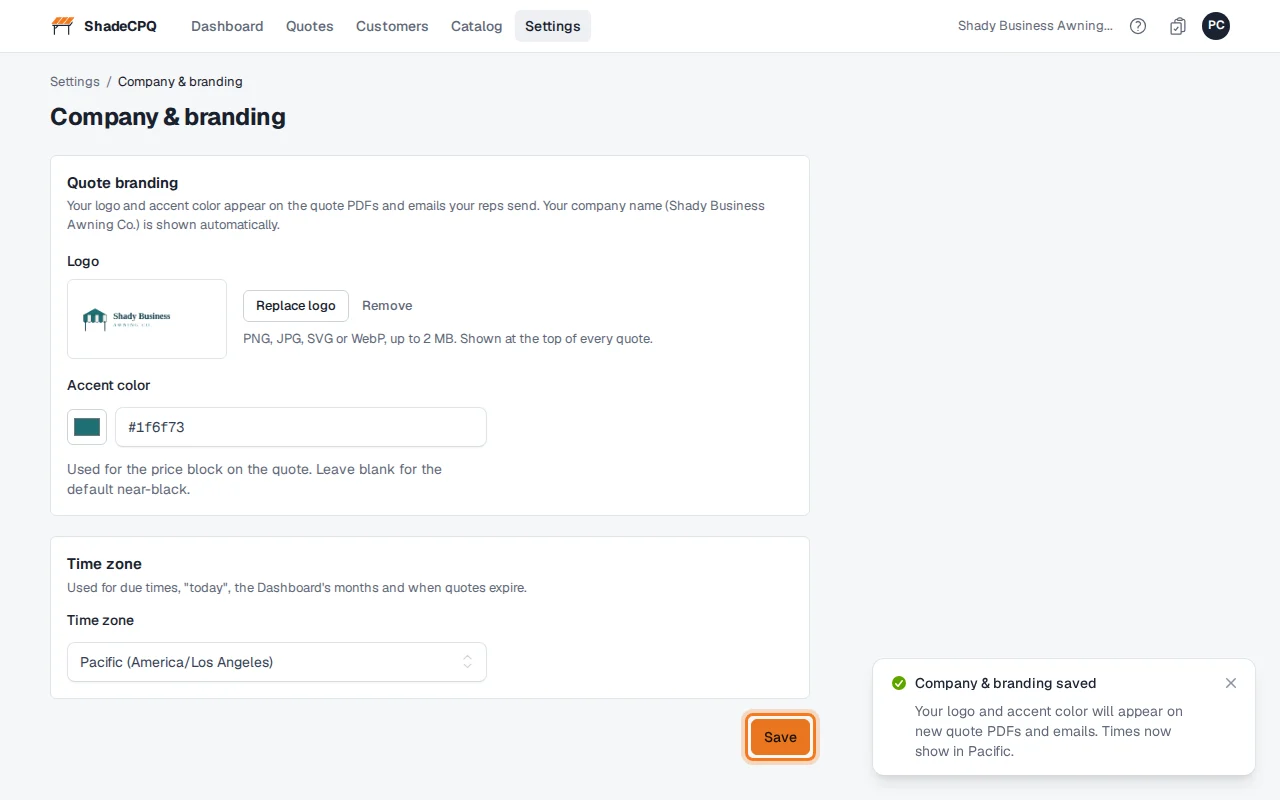
Click Save.
Your shop address
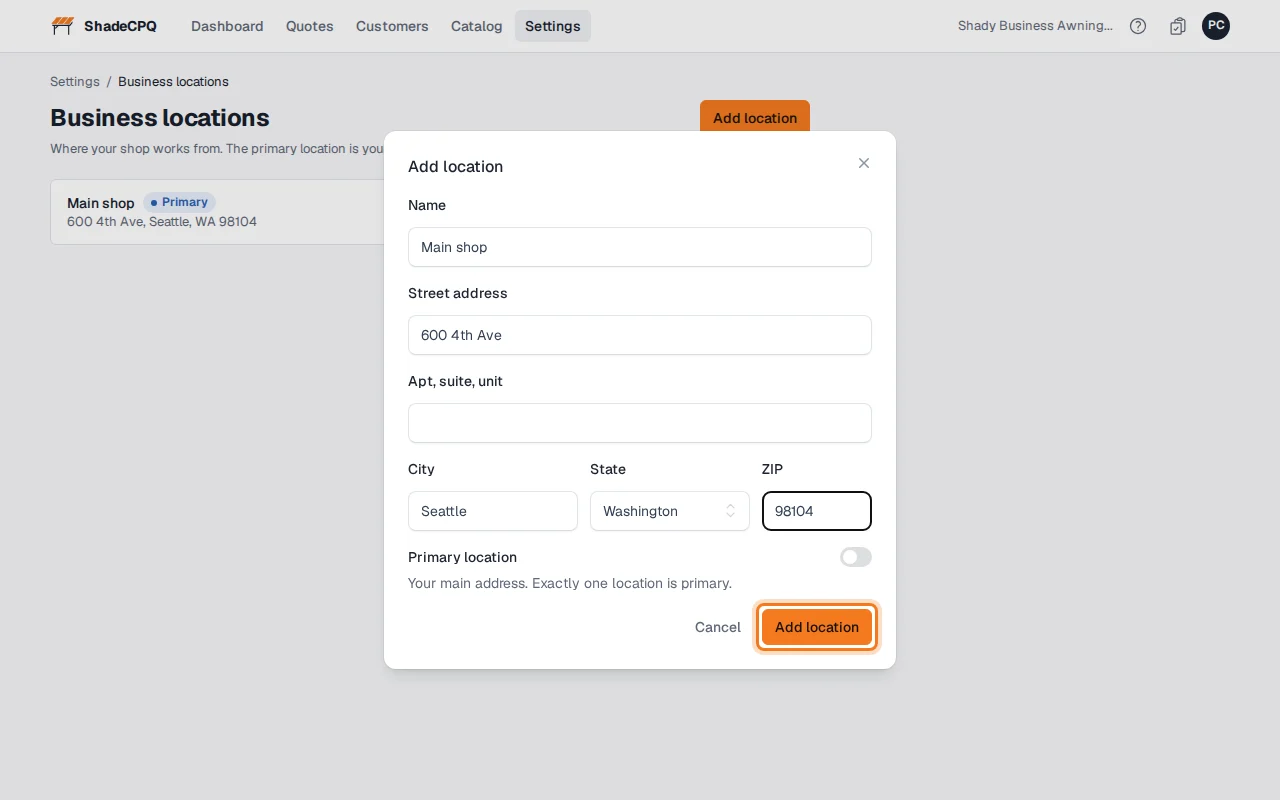
Go back to Settings and click Business locations, then Add location.
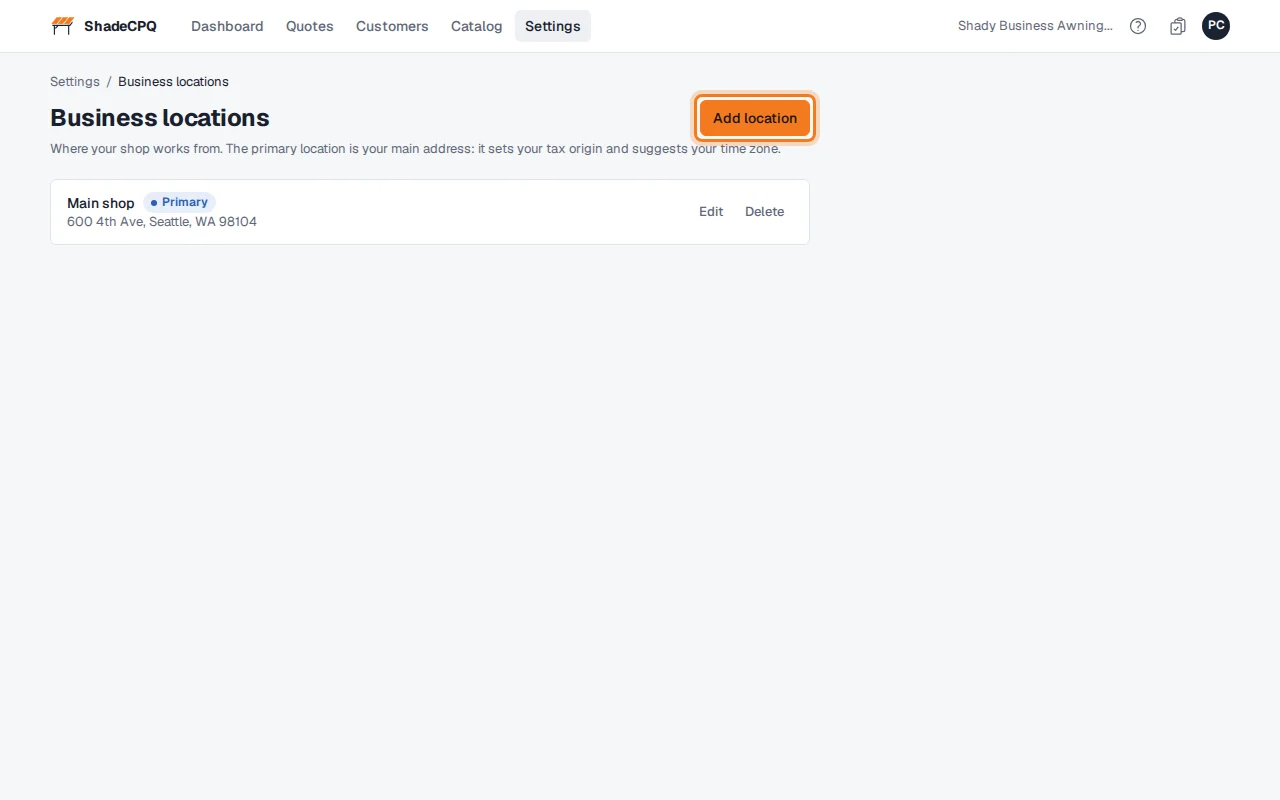
Type a Name (Main shop) and the address, and choose the State from the list. Your first location becomes the primary one. When you add another, Primary location starts off; turn it on only if the new one should replace it. Click Add location.
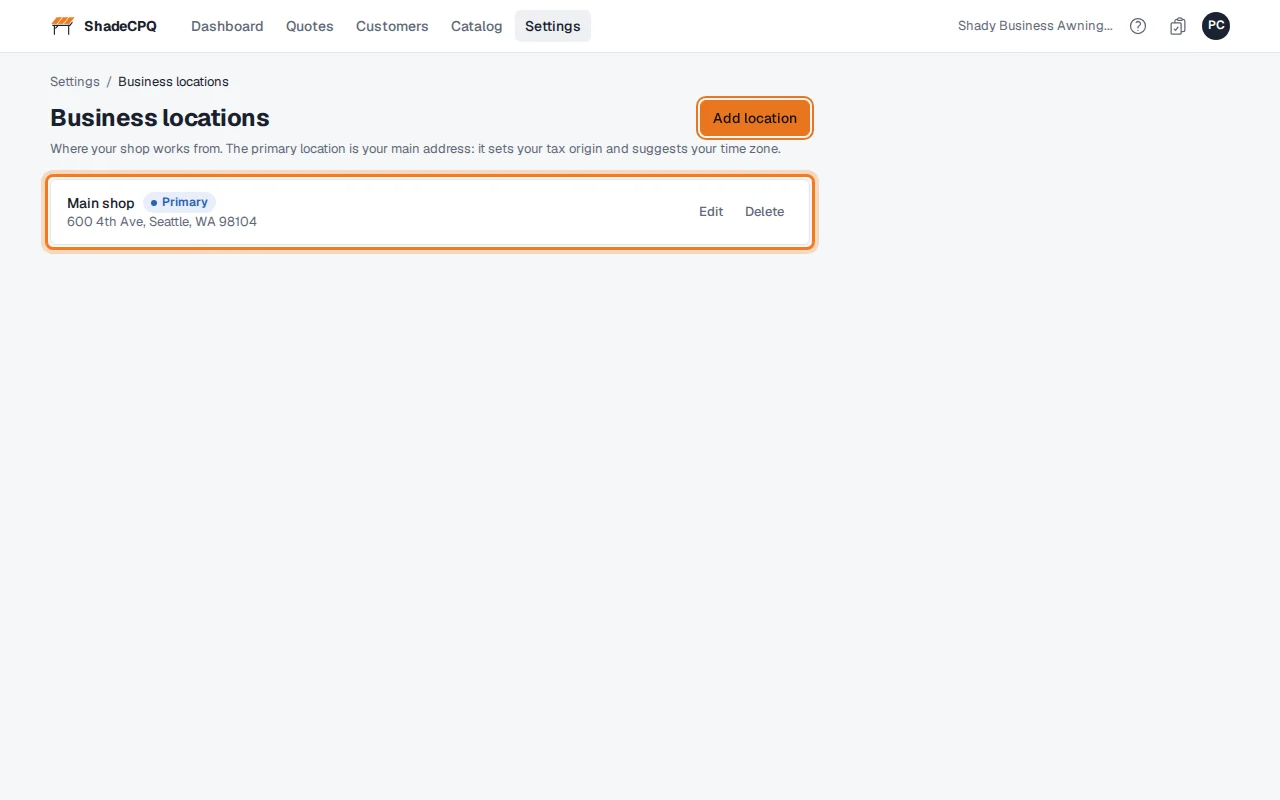
Your shop address is saved and marked Primary. If your time zone wasn't set yet, ShadeCPQ sets it from your state.
Quote numbers, sales tax and approvals
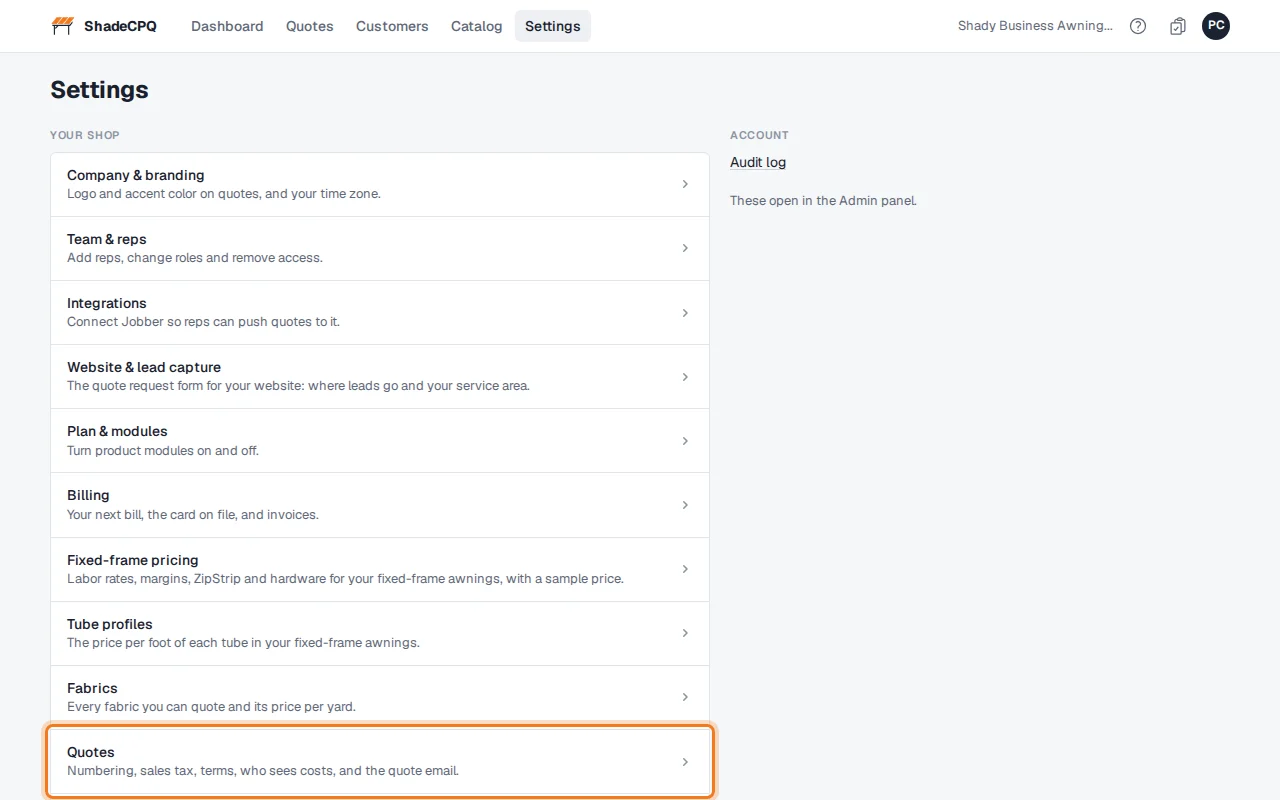
Go back to Settings and click Quotes.
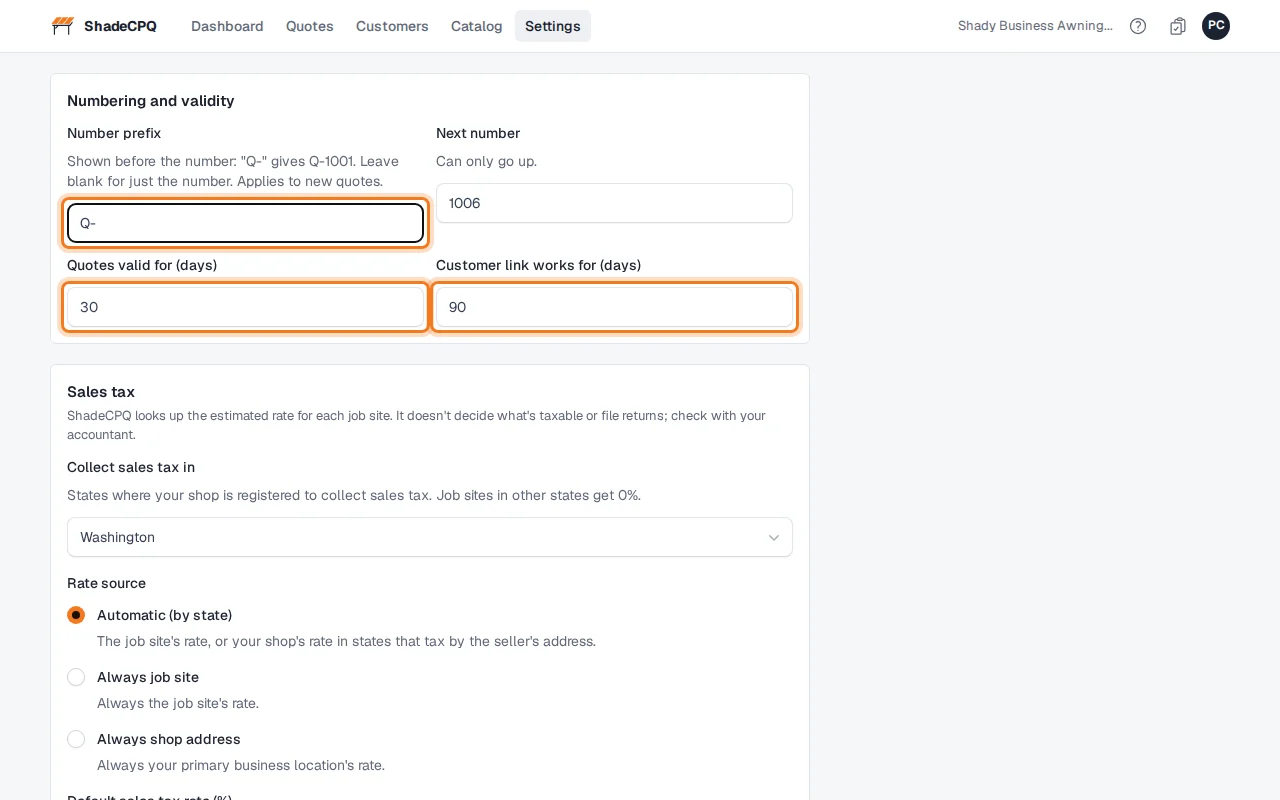
Under Numbering and validity, the Number prefix goes in front of every quote number. New shops start with "Q-" (Q-1001, Q-1002…). Change it to anything you like, or clear it for plain numbers. Quotes valid for is how long a customer can approve a quote after you send it (30 days). Customer link works for is how long the link in their email opens at all (90 days), so they can still look back at an expired or approved quote.
Under Sales tax, check the states you collect tax in (your shop's state is filled in) and add any others where you're registered. Leave Rate source on Automatic. Type a Default sales tax rate to use when a rate can't be looked up.
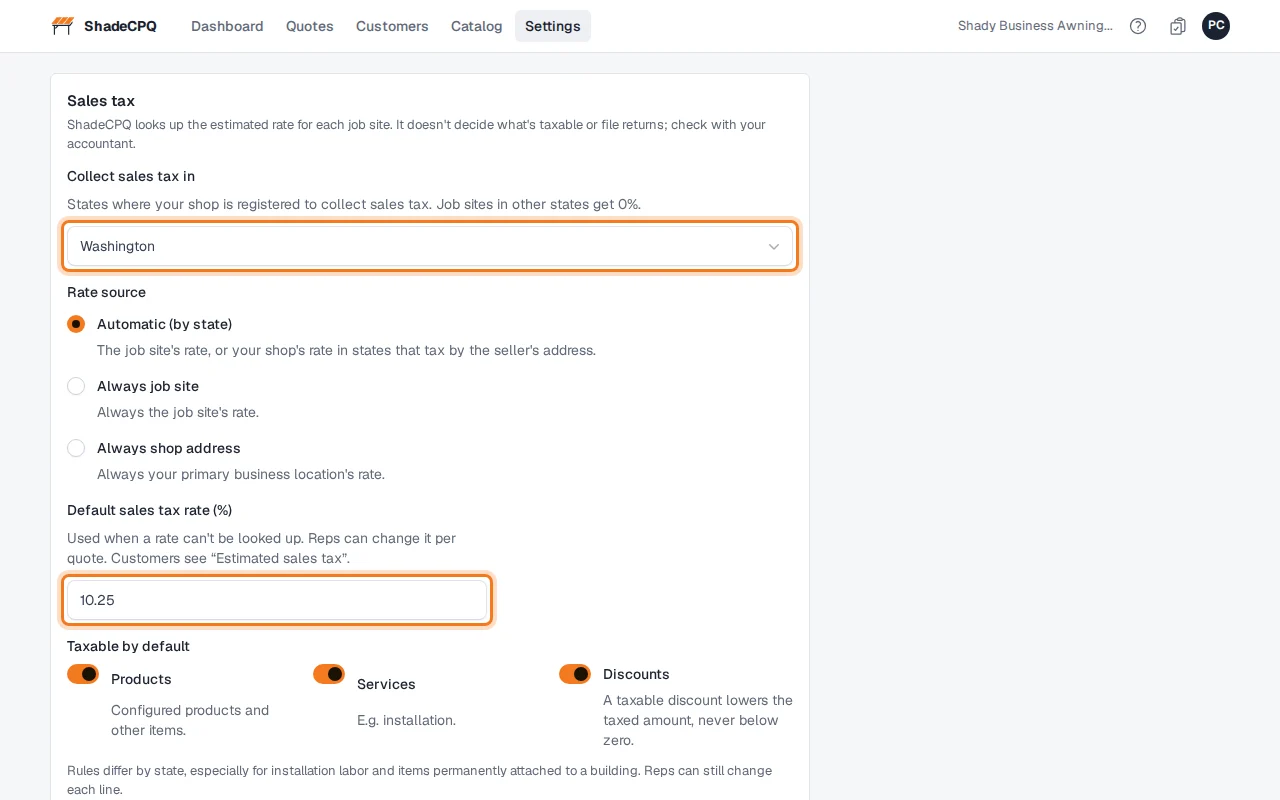
Under Taxable by default, choose which kinds of line are taxed: Products, Services and Discounts. Rules differ by state, so ask your accountant. Reps can still change any line.
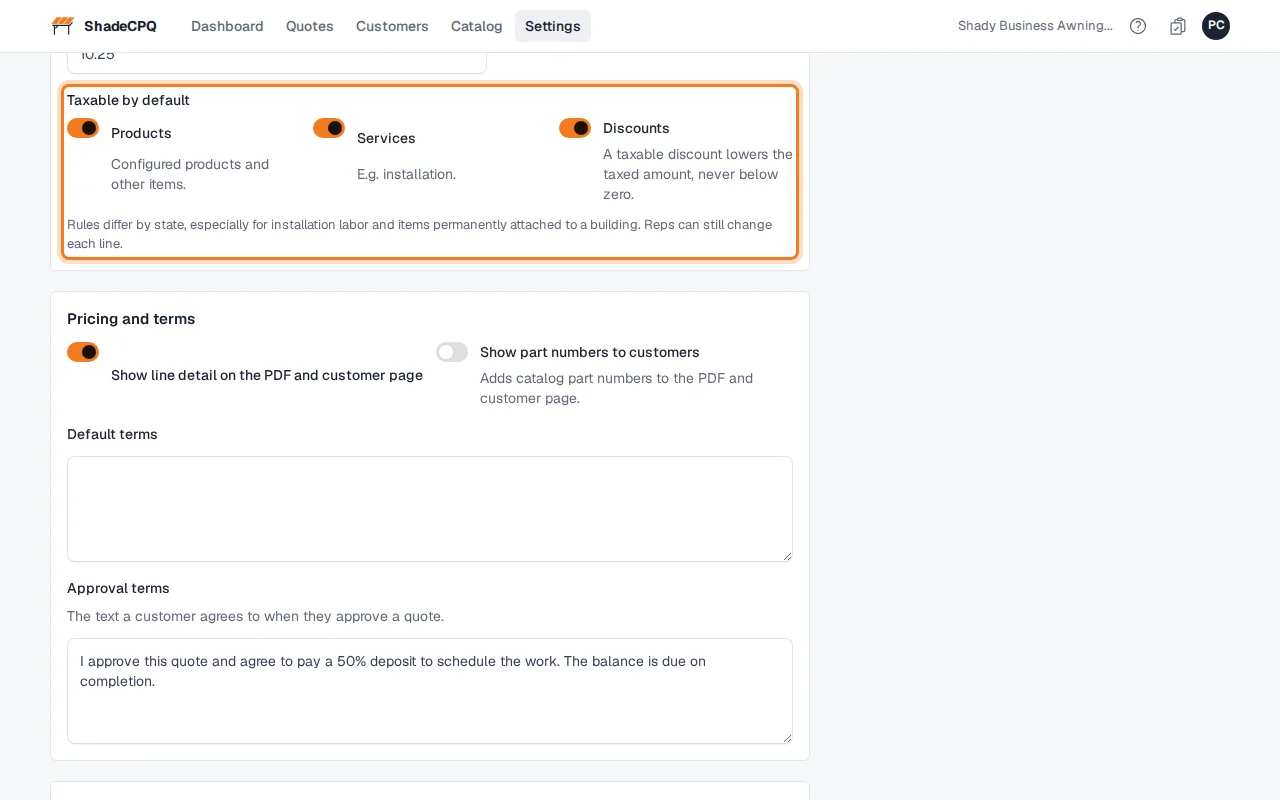
Under Pricing and terms, Default terms print on every new quote. A new shop starts with thirteen numbered terms (scope, payment and deposit, custom products, acceptance, site conditions, permits and more). They're starting text only: edit them to match your business, and add any disclosures your state requires for contractors, such as Washington's RCW 18.27.114 notice. Approval terms are what your customer agrees to when they type their name and approve. A new shop starts with: "By typing my name and approving, I accept this quote and its terms, authorize the work described, and agree to pay the total shown, including the deposit due now." Changing either one affects new quotes only.
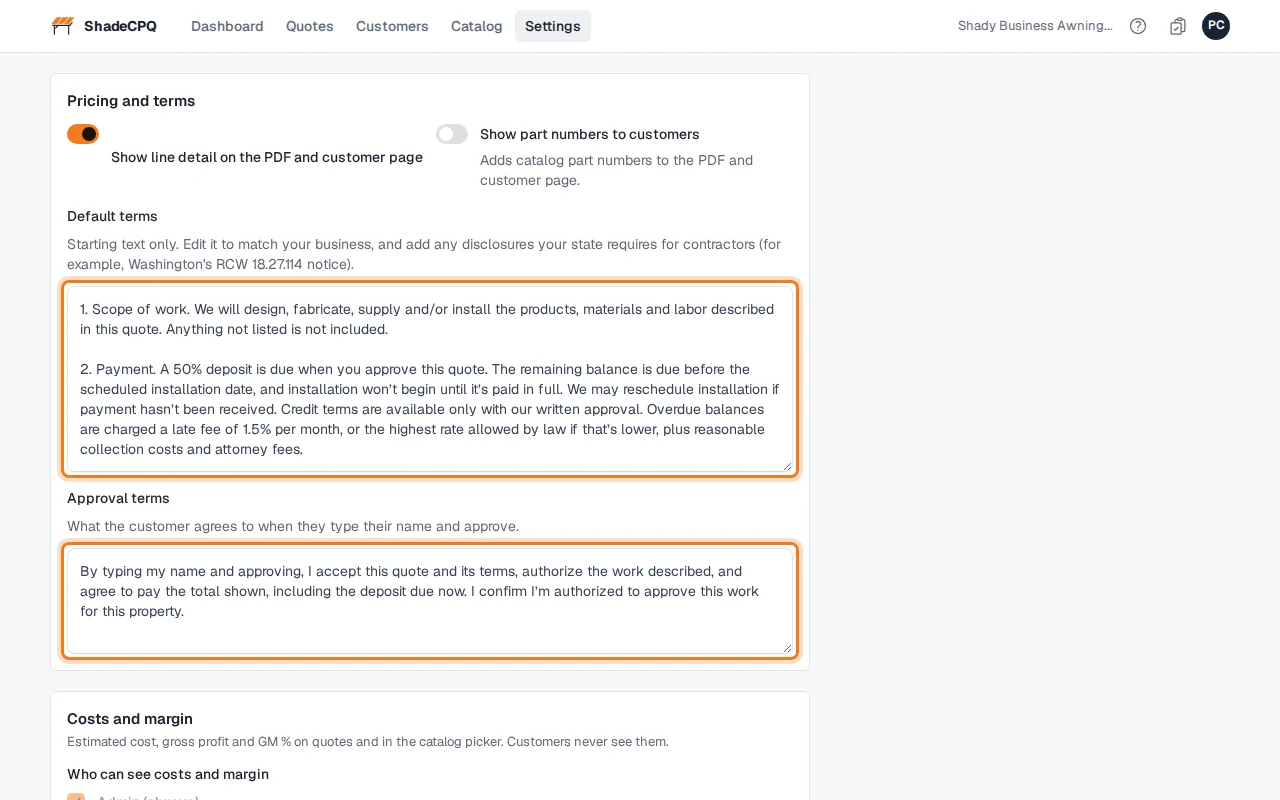
Under Costs and margin, choose who besides Admins can see costs, gross profit and GM % on quotes.
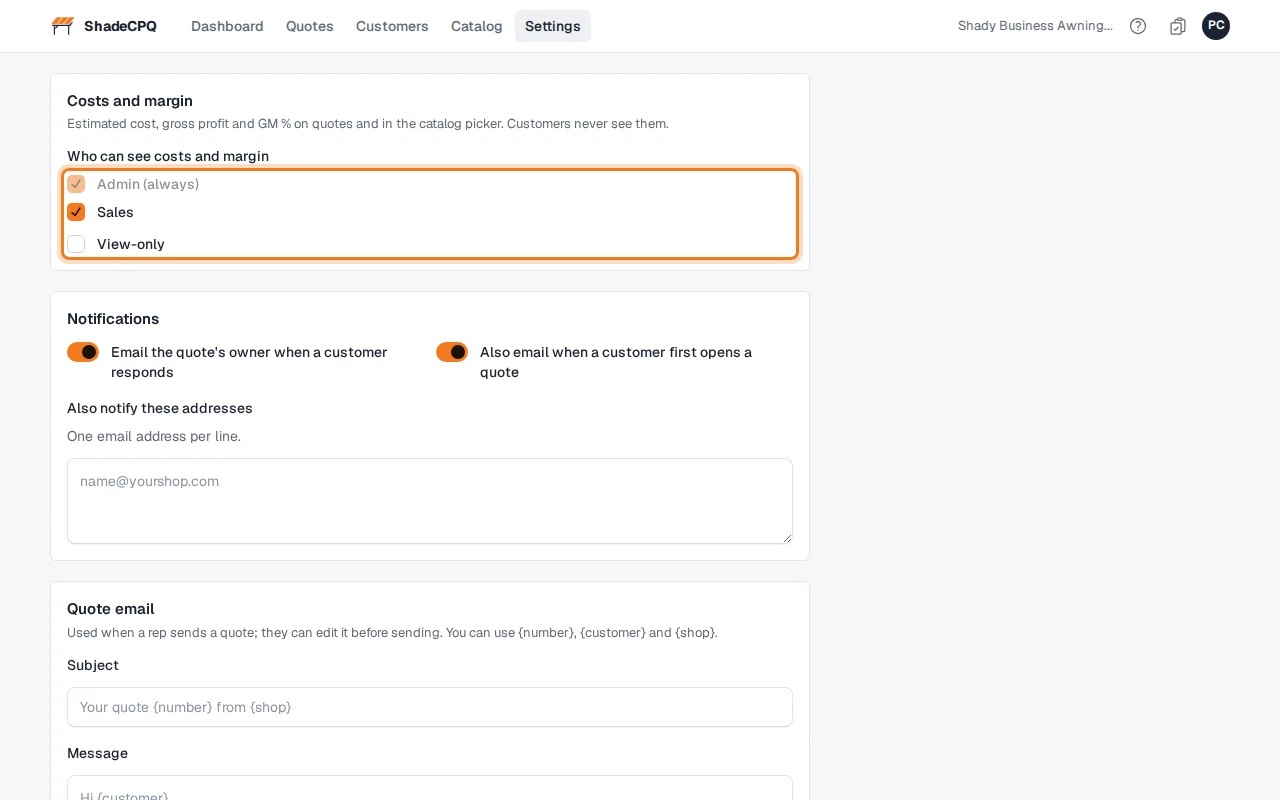
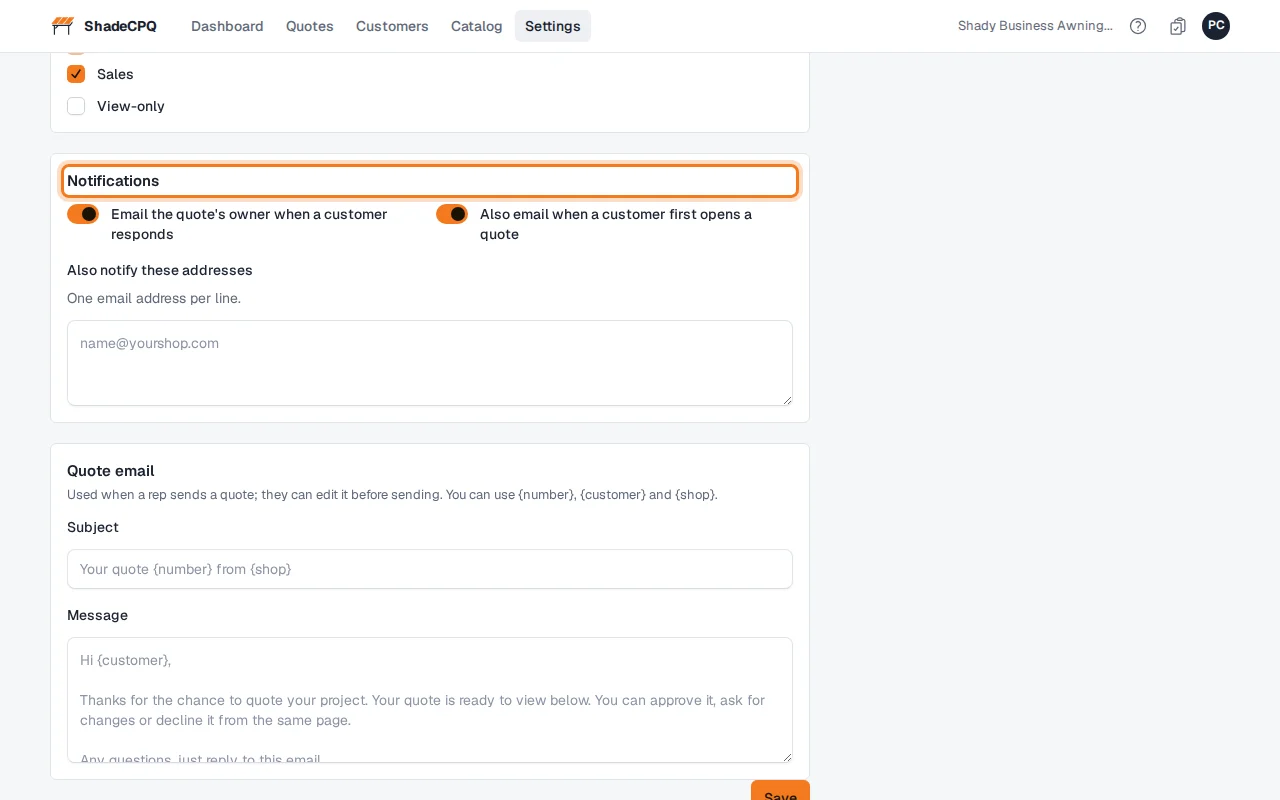
Under Notifications, choose who is emailed when a customer responds, and whether to email when they first open a quote.
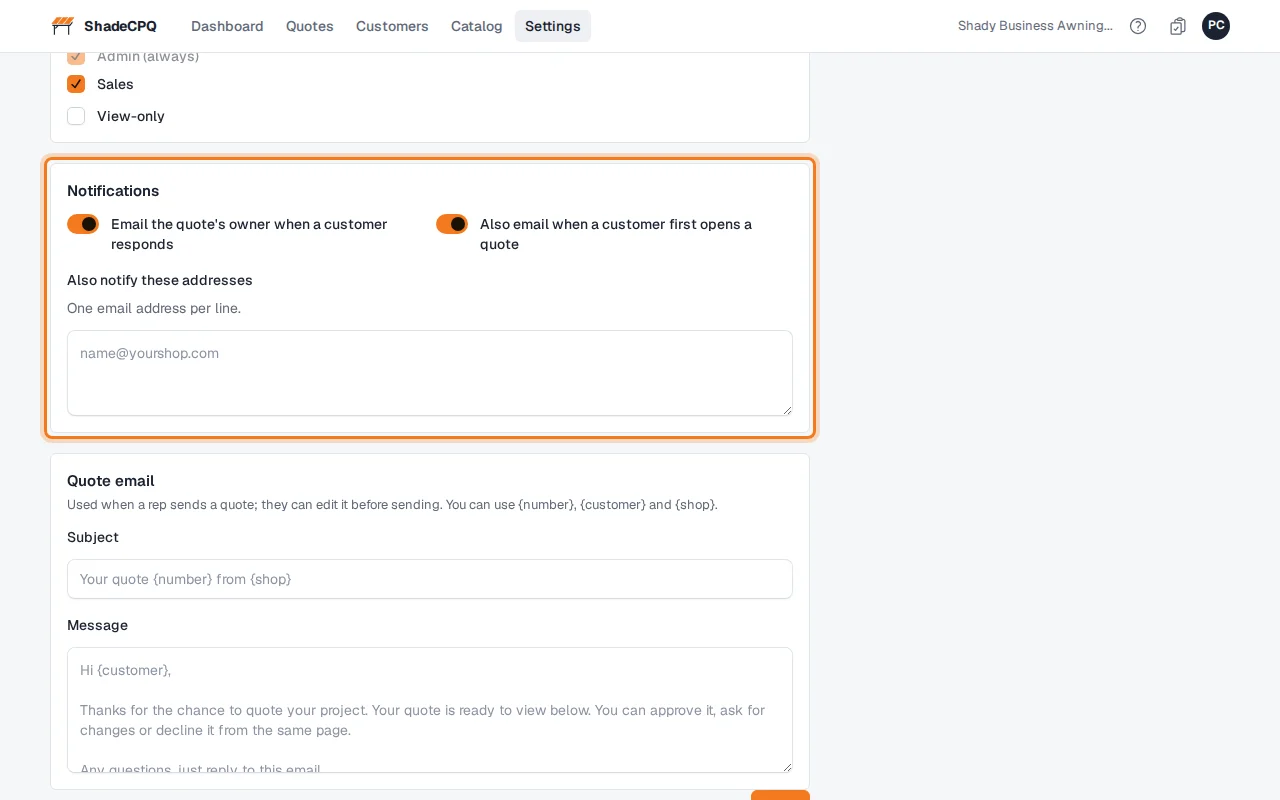
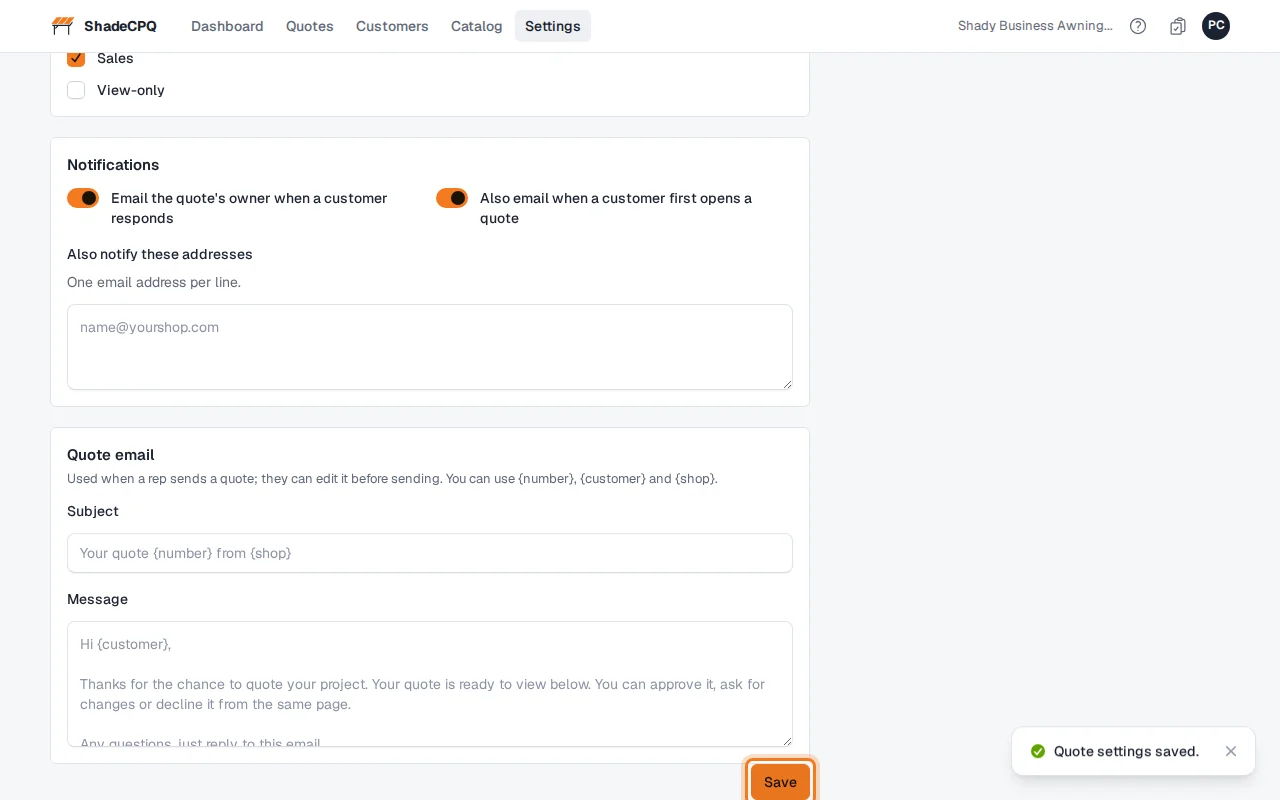
Click Save.
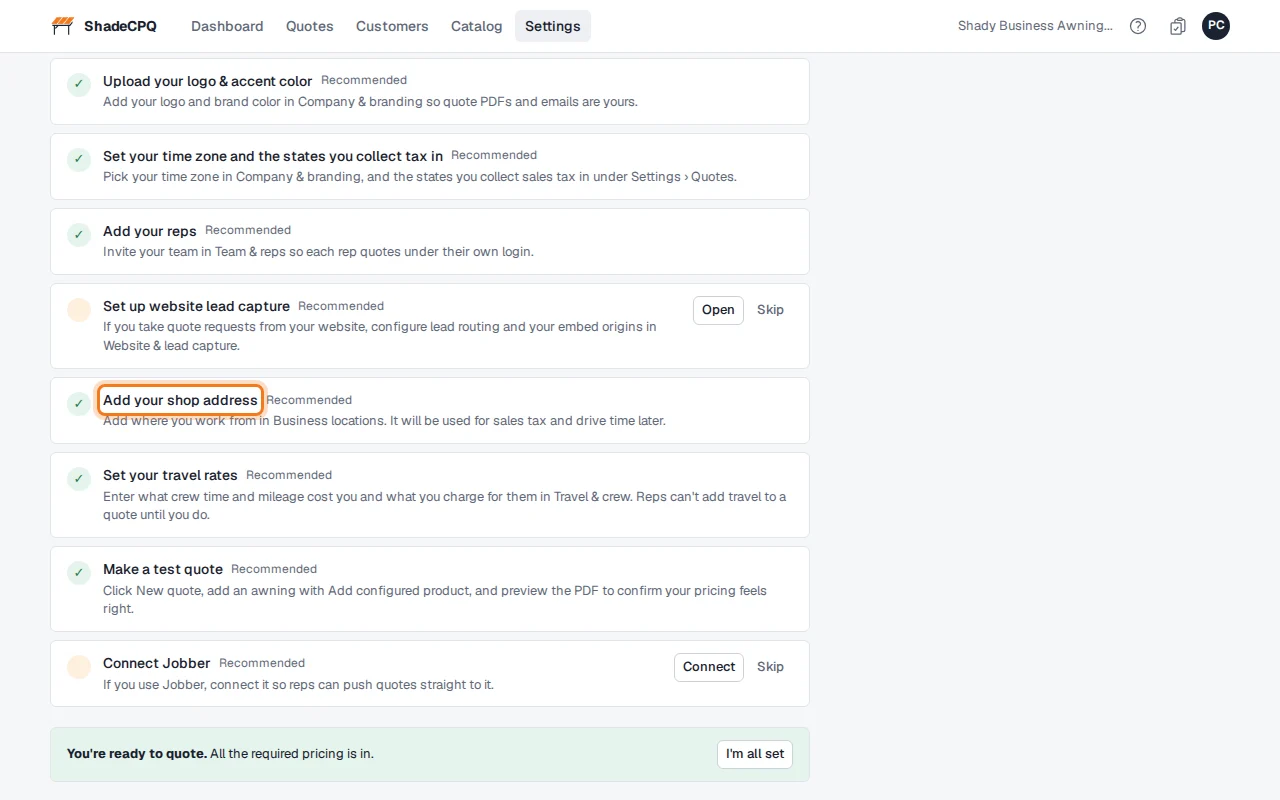
On Get started, the logo, address and tax steps are now ticked.
Good to know
- ShadeCPQ looks up the sales tax rate for each job site. It doesn't decide what's taxable or file returns.
- A new prefix applies to new quotes only. Quotes you've already numbered keep their numbers.
- The Quote email section at the bottom of Settings › Quotes sets the subject and message reps start from when they send a quote.
- Adding your team is in Adding your team.
Next: Fabrics, tubing and labor rates
Fabrics, tubing and labor rates
Set the costs the fixed-frame configurator prices from. Required before your first awning quote.
Who can do this: Admins only.
The configurator works out an awning's price from what it costs you to make: the labor to build the frame
and sew the cover, the tubing in the frame (priced per foot), the fabric (priced per yard) and the
ZipStrip. A new shop starts with all of these at $0, so awning prices come out too low until you fill
them in. The Get started page marks them Required.
How labor is priced: each job is broken into operations (cutting a tube, welding a joint, sewing a
seam). ShadeCPQ adds up the time for every operation and charges it at the hourly rate for that kind of work. You
set the rates; the times start at sensible values you can tune later. Pricing walks through
a full example.
Open them from Settings or from Get started. On a new shop, Set up your pricing on Get started walks you through them one step at a time. Each step is saved when you click Save and continue, and the last one shows what a sample awning sells for.
Labor rates
Click Settings, then Fixed-frame pricing. (Get started links here too.)
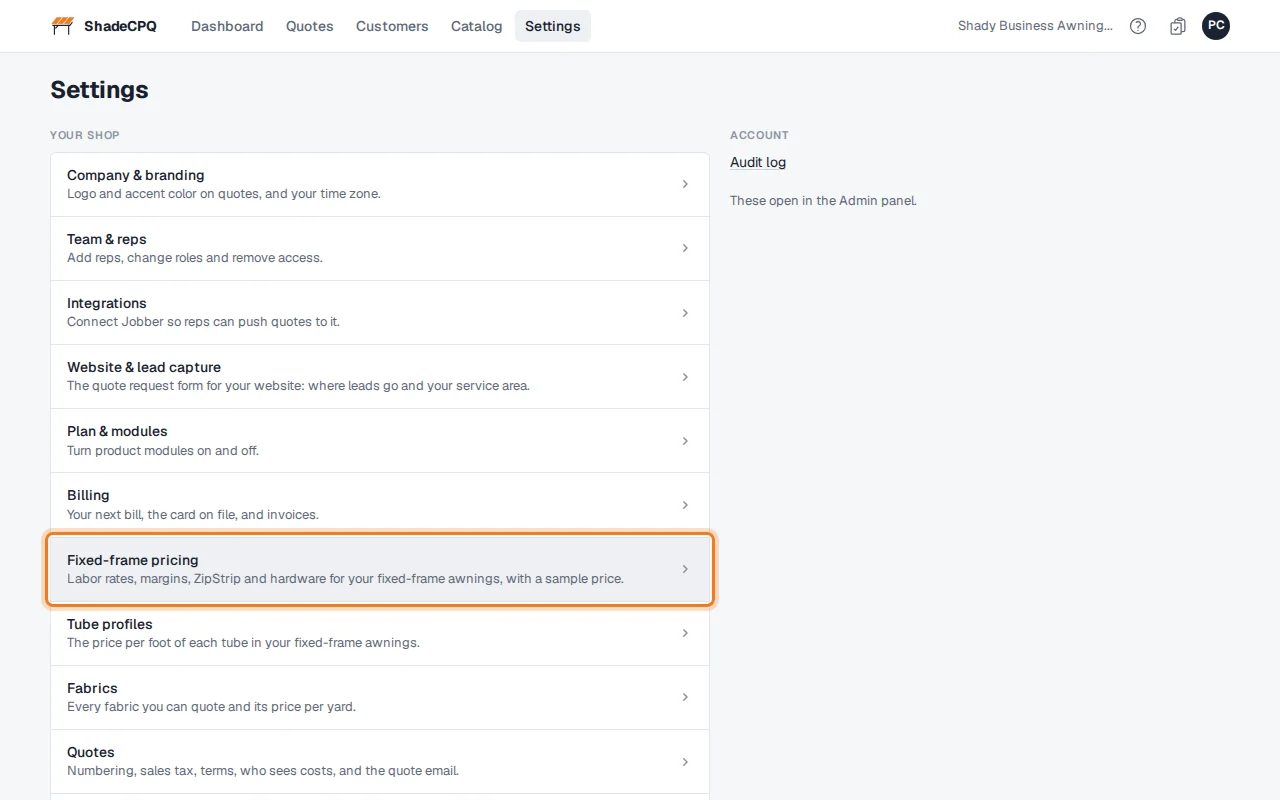
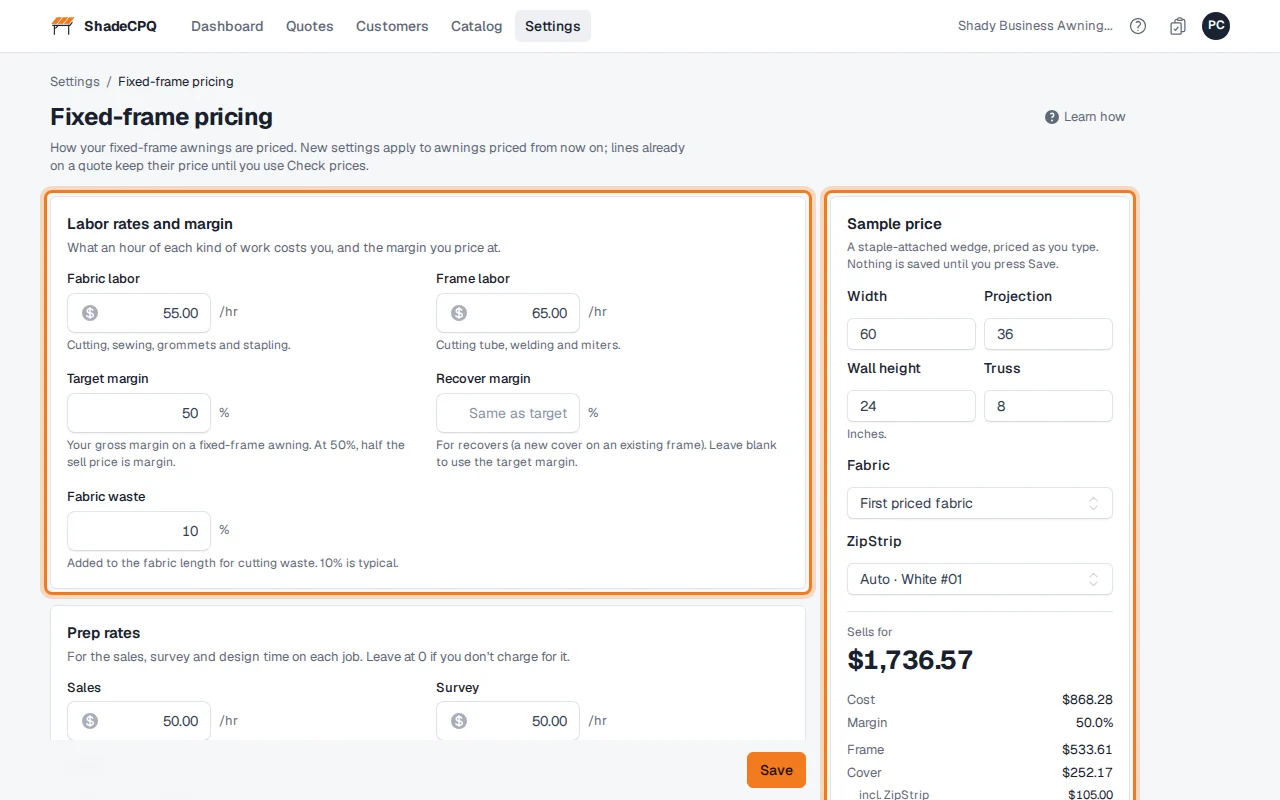
Under Labor rates and margin, type what an hour of each kind of work costs you: Fabric labor (sewing, $55) and Frame labor (cutting and welding, $65). Target margin is the margin your awnings are priced at (50%). Recover margin is used for recovers; leave it blank to use the target margin. Fabric waste is extra fabric added for cutting (10%). The Sample price beside the form shows what a sample awning would sell for as you type, before you save. Change its size or fabric to try your own.
Open Shop times and details for the time each operation takes. Under Frame labor times, Per tube is charged once for every tube piece in the frame (7 minutes), and Per weld once for every joint (7 minutes). Under Fabric labor times, the times are per panel and per inch of seam or stapling. Leave them as they are to start.
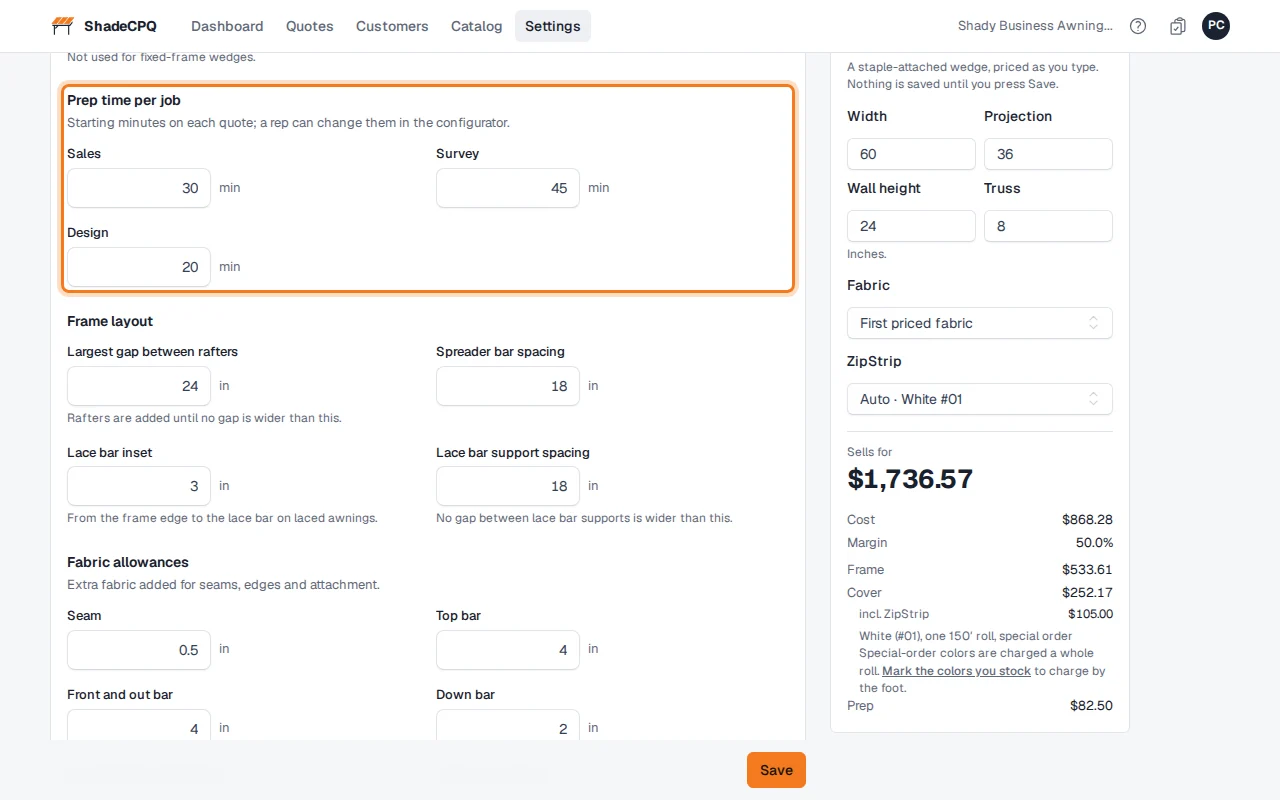
Under Prep time per job, type the usual minutes for Sales, Survey and Design on a job (30, 45 and 20 here). Reps can change these on each awning. Their hourly rates are under Prep rates.
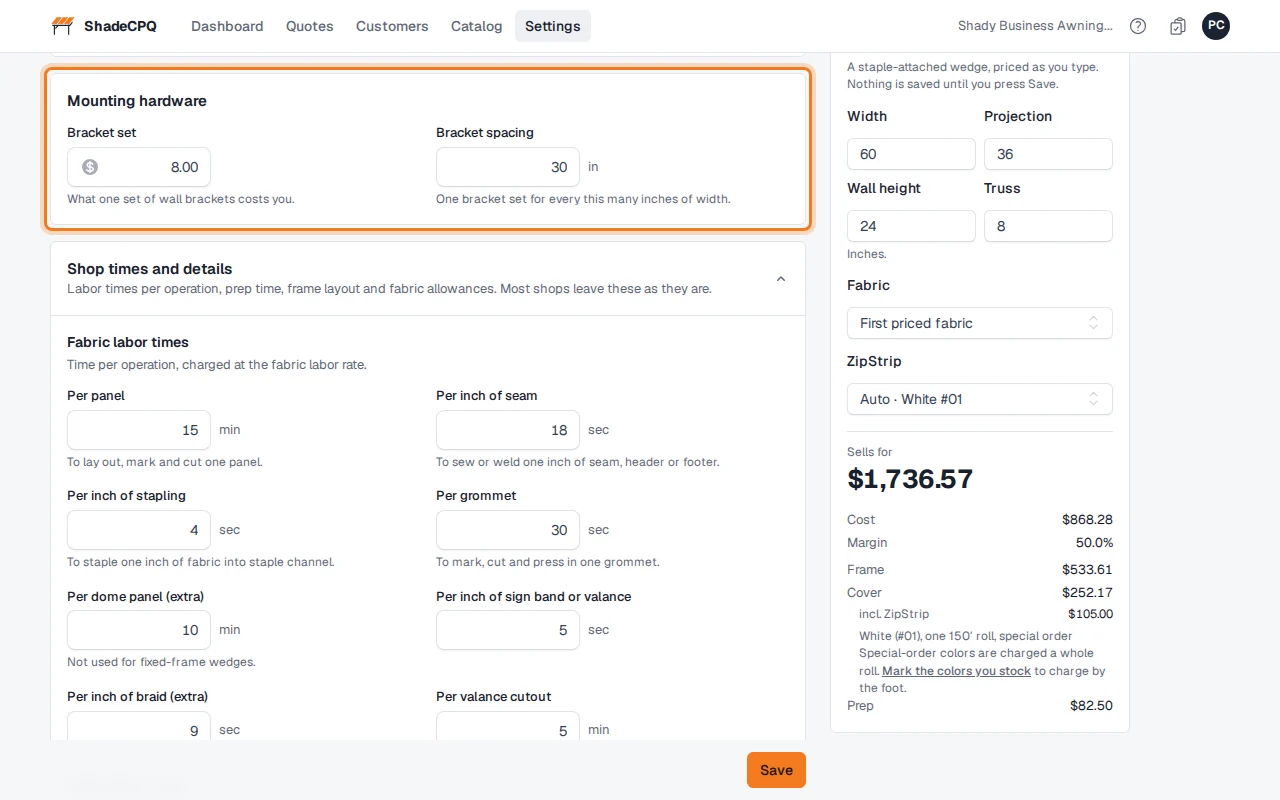
Under Mounting hardware, type your Bracket set cost ($8) and how far apart brackets go.
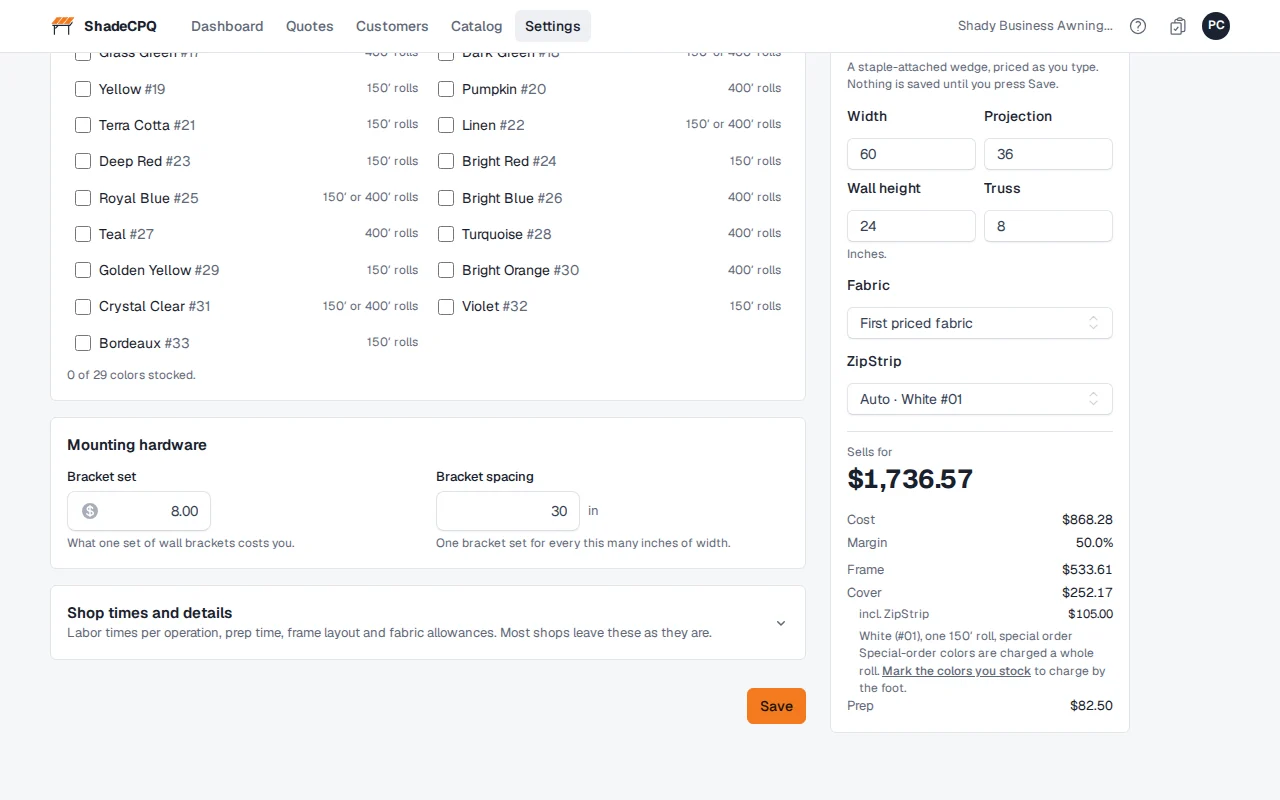
Under ZipStrip, type your Price per foot ($0.70) and the Waste on stocked colors (10%). Tick the colors you keep in stock. Those are charged by the foot used plus the waste. Every other color is a special order, charged by the whole 150′ or 400′ roll.
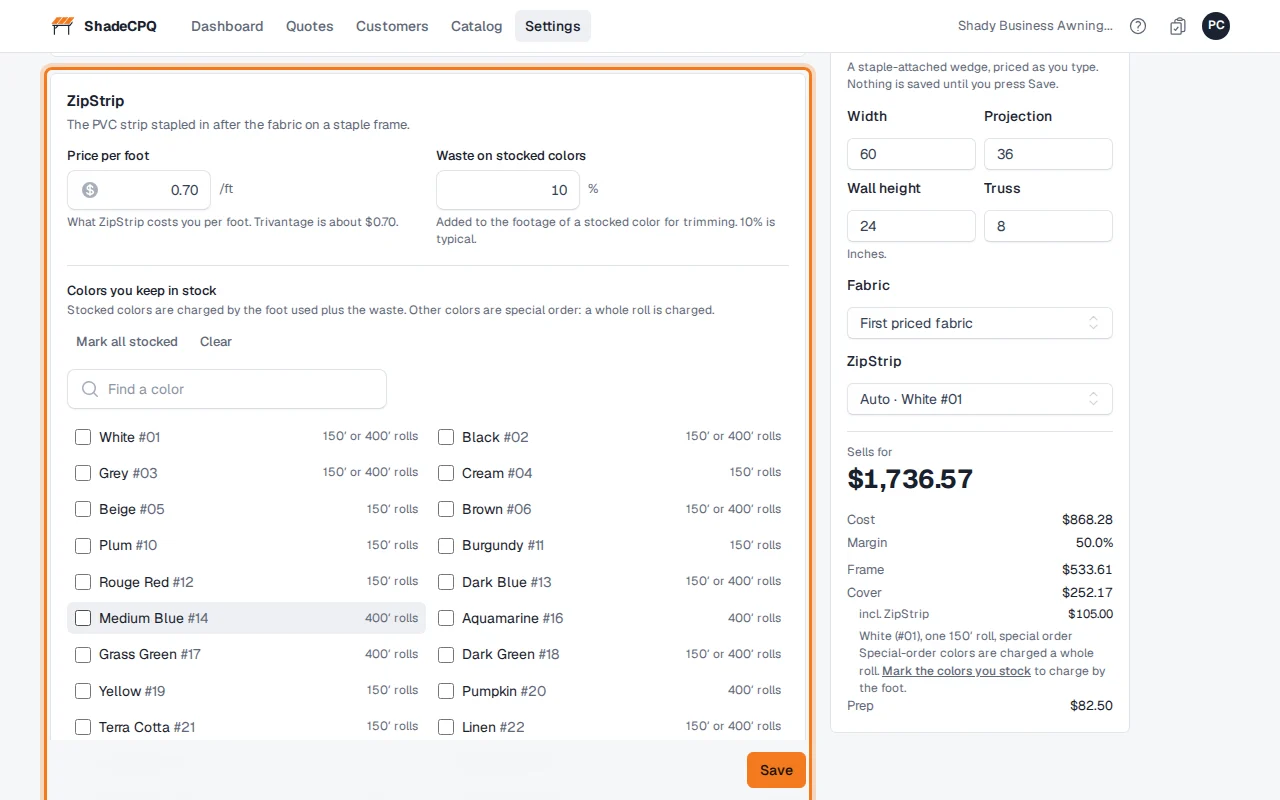
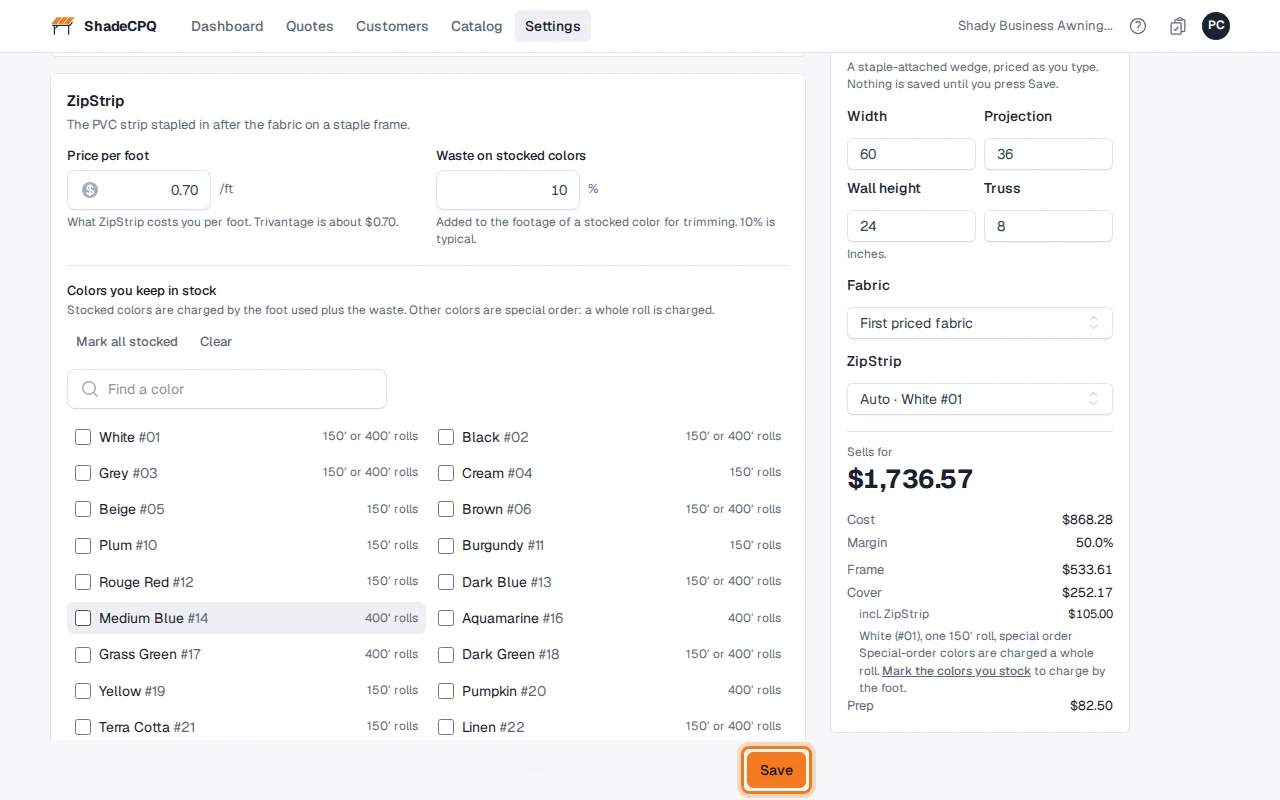
Click Save. Only the settings you changed are saved.
Tubing
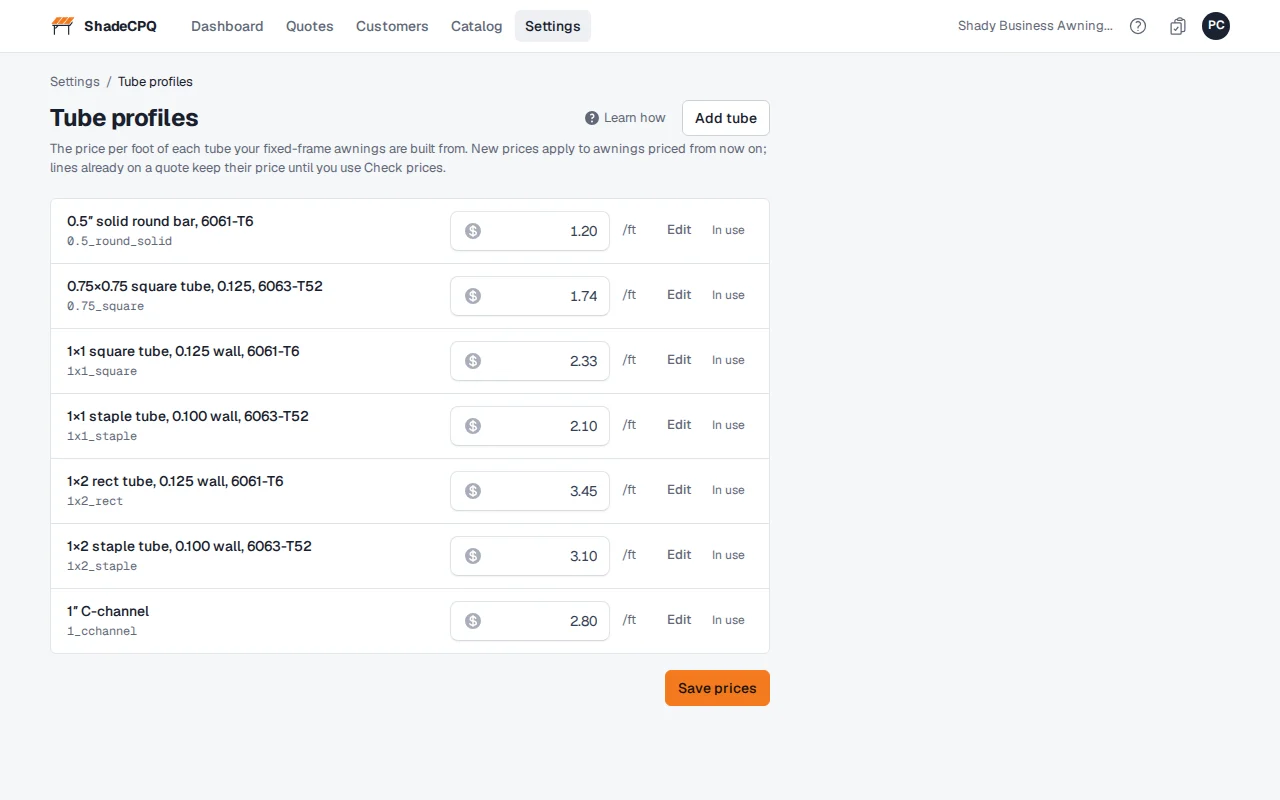
Click Settings, then Tube profiles. Every tube starts at $0.00 per foot.
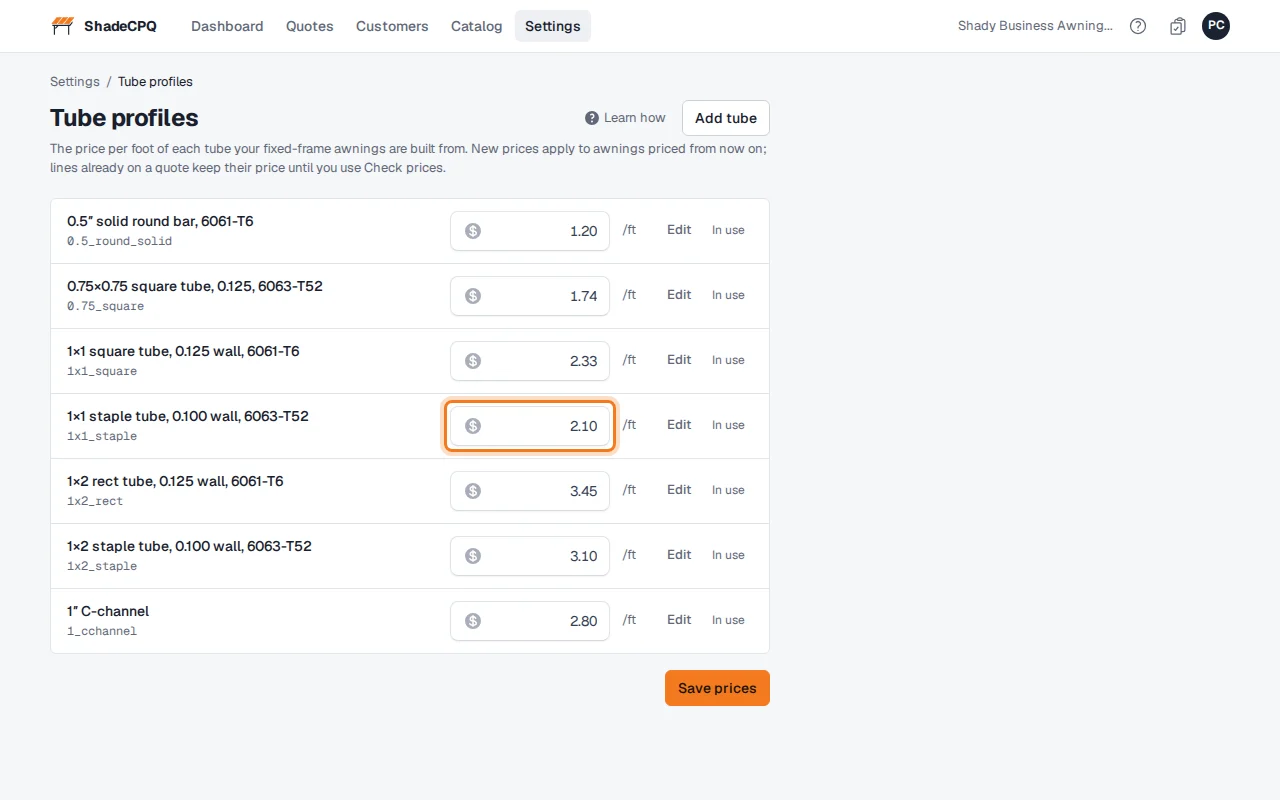
In each tube's row, type the price per foot you pay ($2.10 for 1×1 staple tube), then click Save prices. Tubes marked In use are the ones fixed-frame pricing needs, so they can't be deleted.
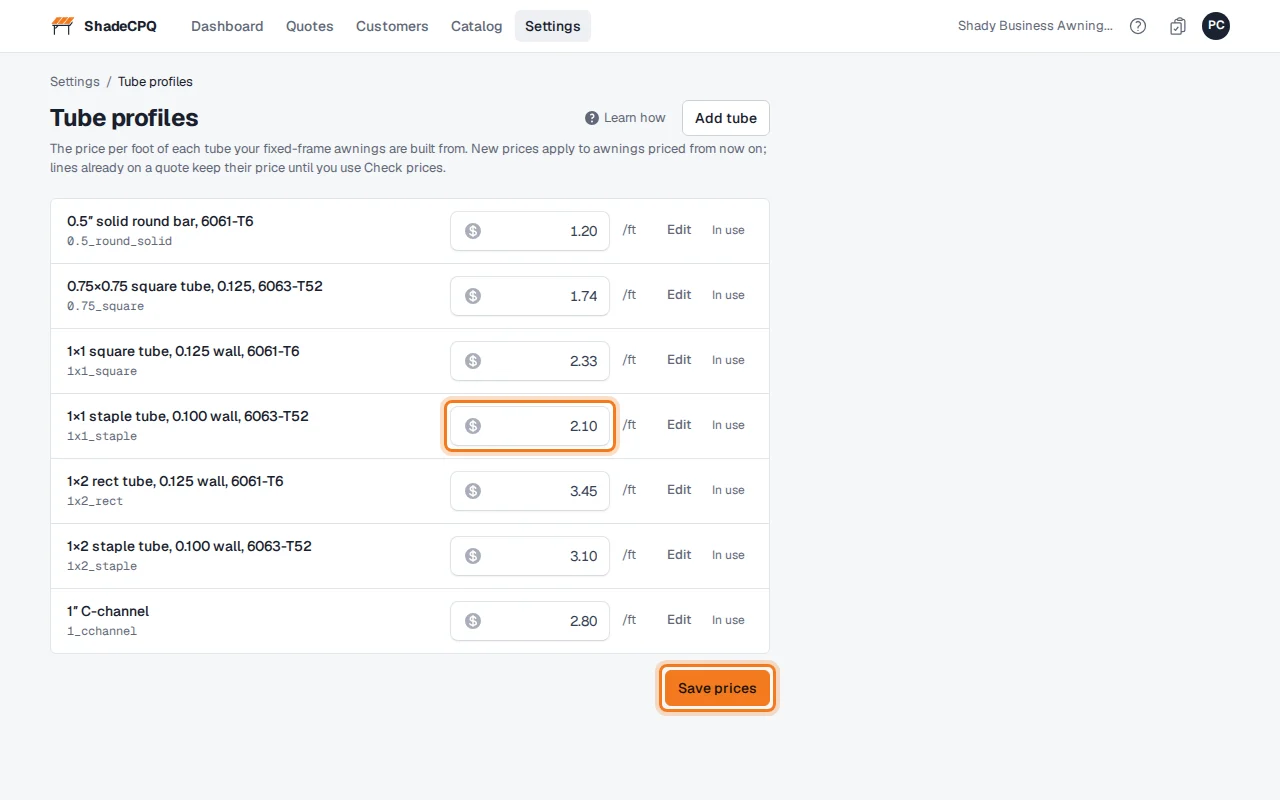
When every tube is priced, the warning at the top of the page goes away.
Fabric
Click Settings, then Fabrics. It lists every fabric you offer and the price per yard it charges on a quote. Anything still at $0.00 is flagged at the top.
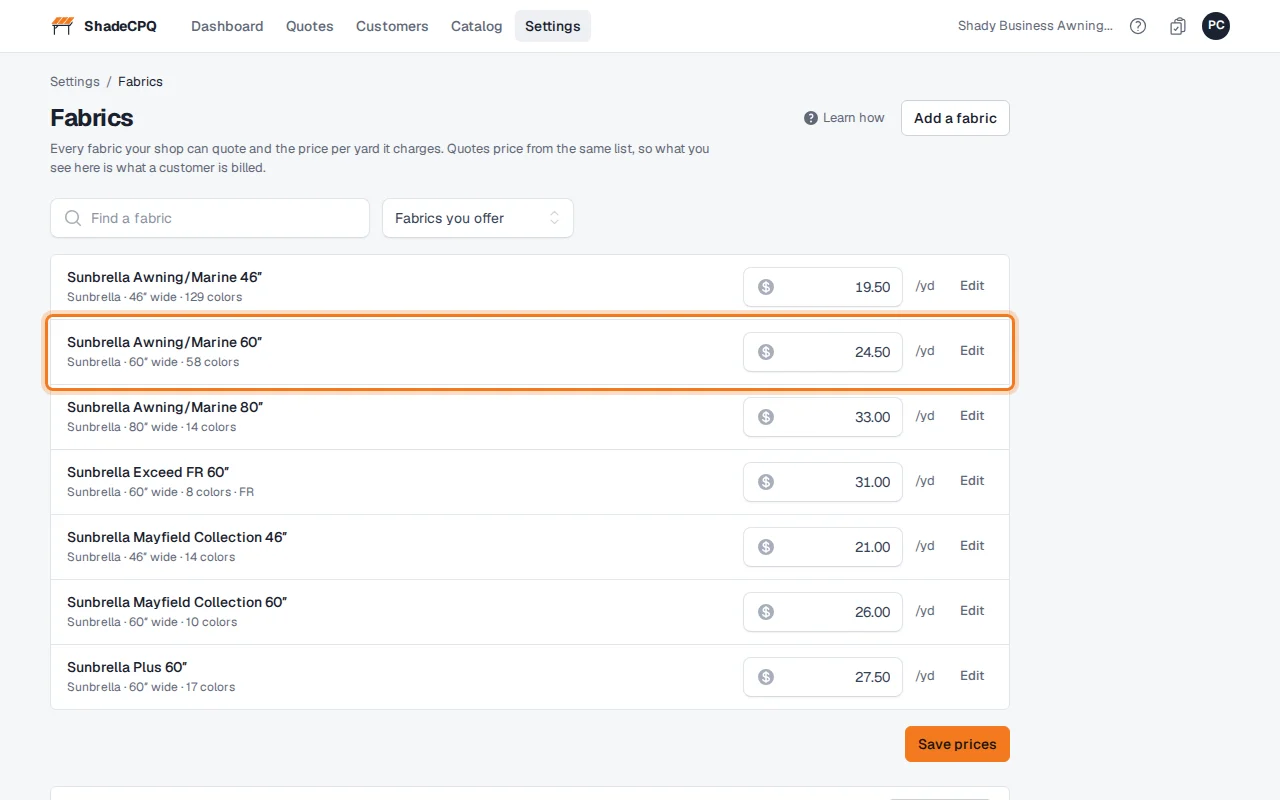
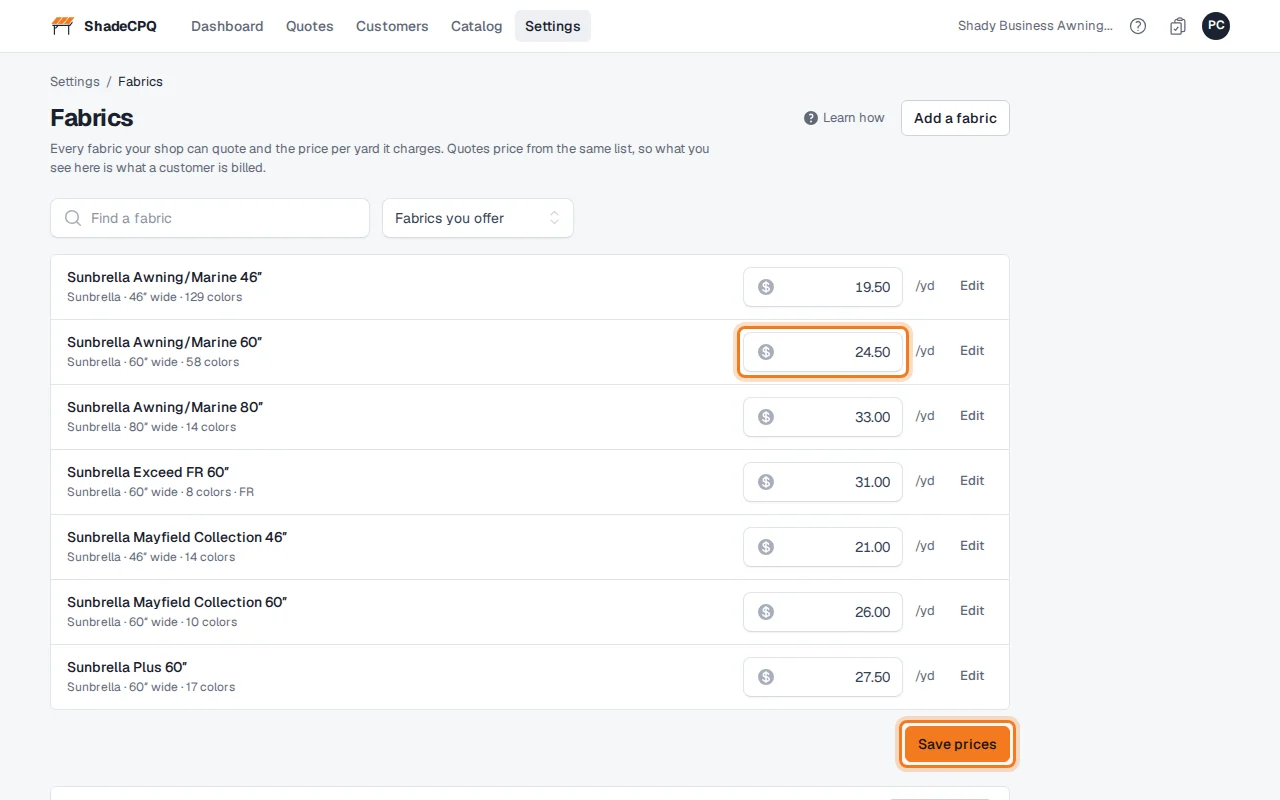
In each fabric's row, type the price per yard you pay ($24.50 for Sunbrella Awning/Marine 60″), then click Save prices. Only the prices you changed are saved.
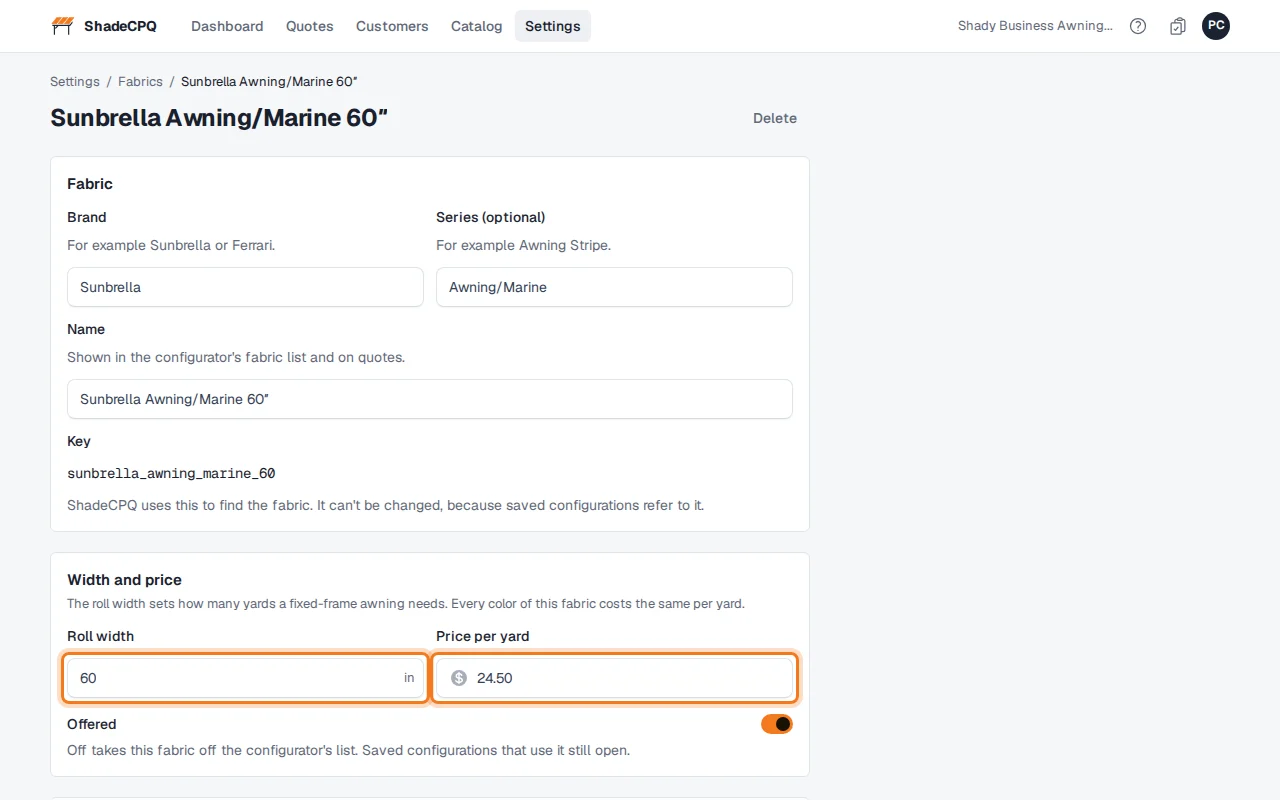
Click a fabric's name to check its Roll width, add or change its colors, or stop offering it. To offer a fabric again, choose Not offered above the list and click Offer.
Back on Get started, the three required steps are ticked. Your shop is ready to quote.
Good to know
- A quote can't use a fabric that still costs $0.00 a yard. If a customer supplies their own fabric, the rep switches on Customer-Supplied Fabric in the configurator instead.
- Fabric you buy through a supplier account (Sunbrella, Phifer…) can be priced from your discount and markup: on Fabrics, click Add a supplier. Every fabric then prices from your suppliers instead of your own list, and you can pin any one of them at a fixed price per yard.
- Changing a rate changes new prices only. Quotes you've already made keep their prices until you use Check prices on a draft.
Next: Importing your products and services
Importing your products and services
Add your whole price list at once from a spreadsheet.
Who can do this: Admins only.
Your catalog is the list of products (brackets, motors, remotes) and services (installation, removal,
trip charges) you sell. Reps pick from it when they build a quote.
Already keep your items in QuickBooks Online or Jobber? Export your products & services from there and
upload that file as it is. ShadeCPQ understands their column names.
Before you start
Building your own file
Save your spreadsheet as a CSV file, one row per item. You can leave a cell empty when it doesn't apply.
| Column | What to put in it | Example |
|---|
| sku | Your part number | SMF-RTS |
| name | Item name (required) | Somfy RTS motor |
| description | Shown to the customer under the name | Radio motor with built-in receiver |
| type | product or service | product |
| category, subcategory | Where it's filed. New ones are created for you | Motors & controls, Motors |
| unit | How you sell it | ea, hr, ft |
| cost | What it costs you. Never shown to customers | 410 |
| pricing | fixed or markup (empty means fixed) | markup |
| price | Sell price, for fixed items | 129 |
| markup_pct | Markup %, for markup items | 30 |
| taxable | yes, no, or empty for your shop's default | no |
| active | yes or no (empty means yes) | yes |
Want a starting point? Download the example file used in this guide
(10 items), or click Download template on the import page.
Show the example file
sku,name,description,type,category,subcategory,unit,cost,pricing,price,markup_pct,taxable,active
SMF-RTS,Somfy RTS motor,Radio motor with built-in receiver,product,Motors & controls,Motors,ea,410,markup,,30,,yes
SMF-TEL1,Telis 1 remote,Single-channel handheld remote,product,Motors & controls,Remotes,ea,48,fixed,99,,,yes
SMF-TEL4,Telis 4 remote,4-channel handheld remote,product,Motors & controls,Remotes,ea,62,fixed,129,,,yes
WS-3D,3D wind sensor,Retracts the awning in high wind,product,Motors & controls,Sensors,ea,140,markup,,50,,yes
BRK-12,"12"" wall bracket",Powder-coated steel wall bracket,product,Hardware,Brackets,ea,20,markup,,45,,yes
BRK-RF,Roof mount bracket,For awnings with no wall to mount on,product,Hardware,Brackets,ea,32,markup,,50,,yes
ANC-LAG,"Lag bolt 3/8"" x 4""",For wood framing,product,Hardware,Fasteners,ea,0.95,markup,,100,,yes
LAB-INST,Installation labor,"Per installer, per hour on site",service,Labor,Installation,hr,45,fixed,95,,no,yes
LAB-REM,Remove old awning,Take down and haul away an existing awning,service,Labor,Removal,ea,60,fixed,150,,no,yes
TRIP,Trip charge,Travel outside our service area,service,Fees,,trip,,fixed,85,,no,yes
Upload the file
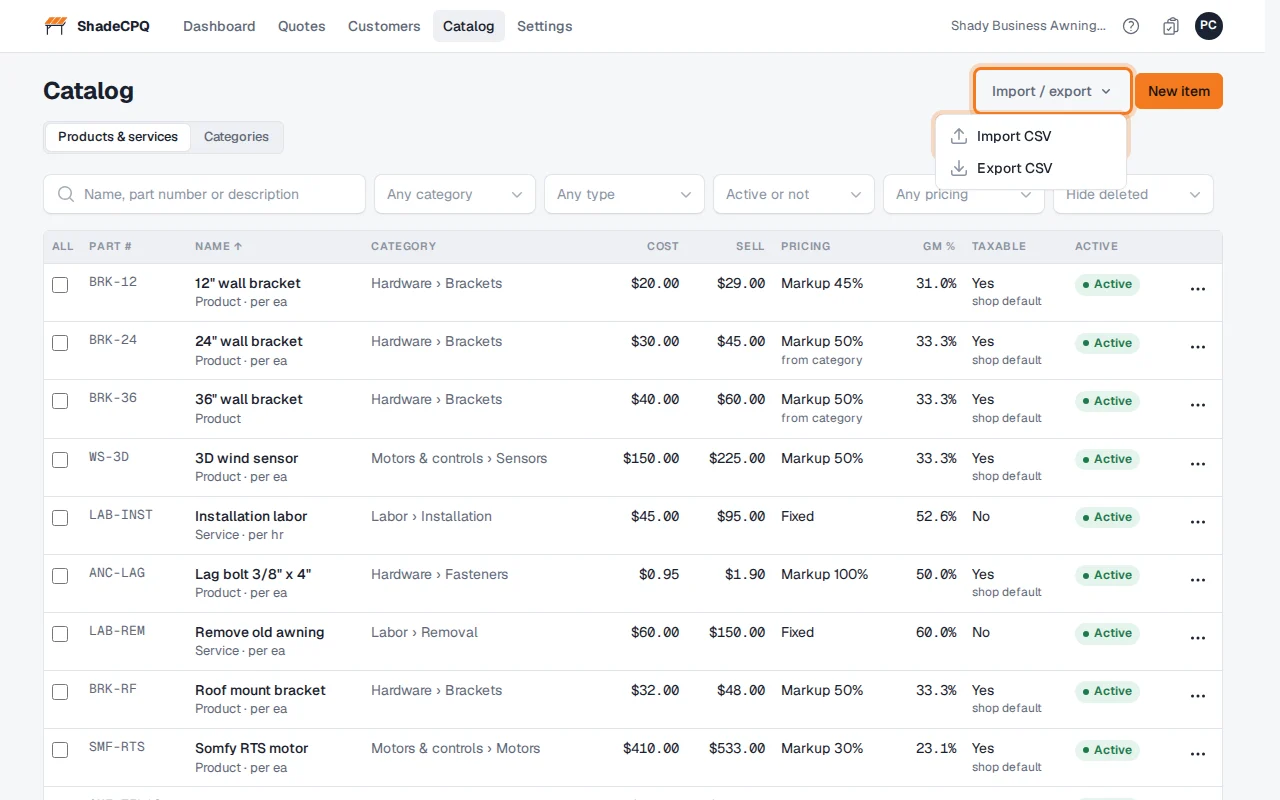
Click Catalog at the top, then Import / export → Import CSV.
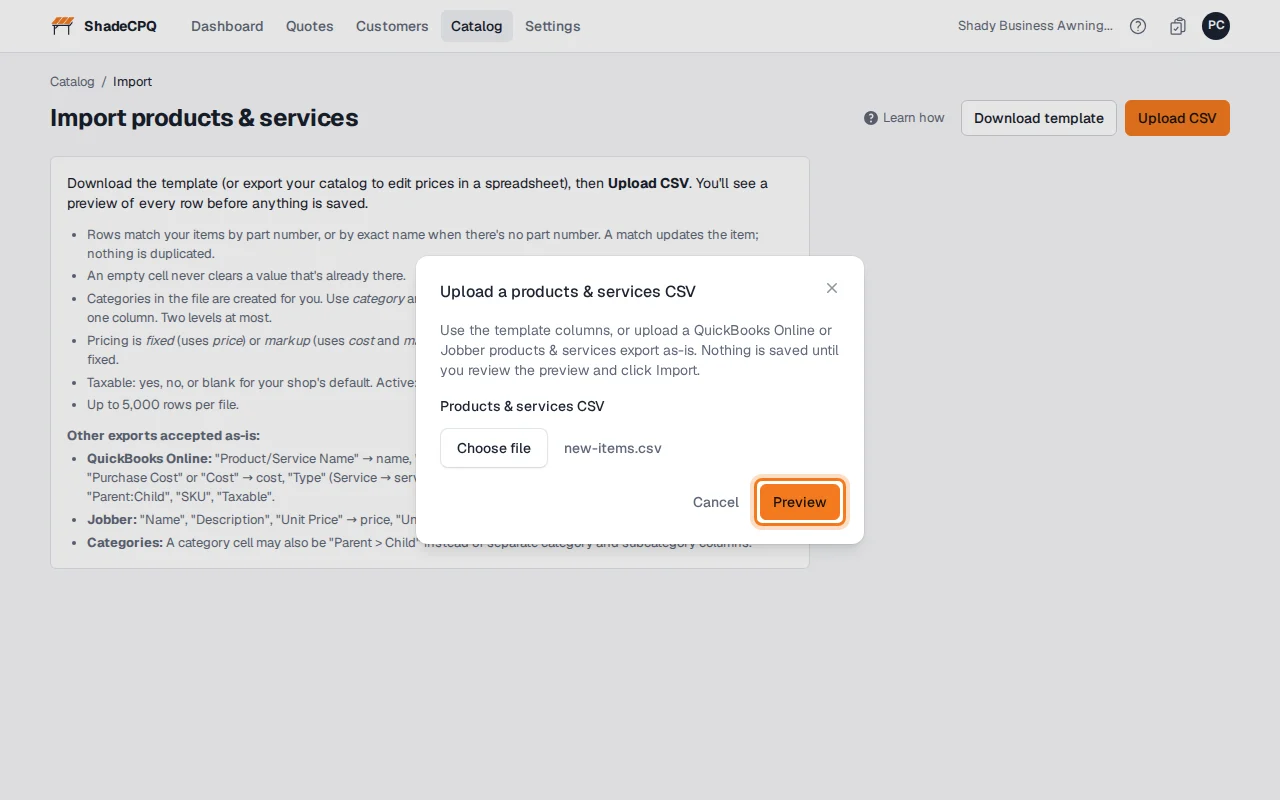
Click Upload CSV, choose your file and click Preview. Nothing is saved yet.
Check and import
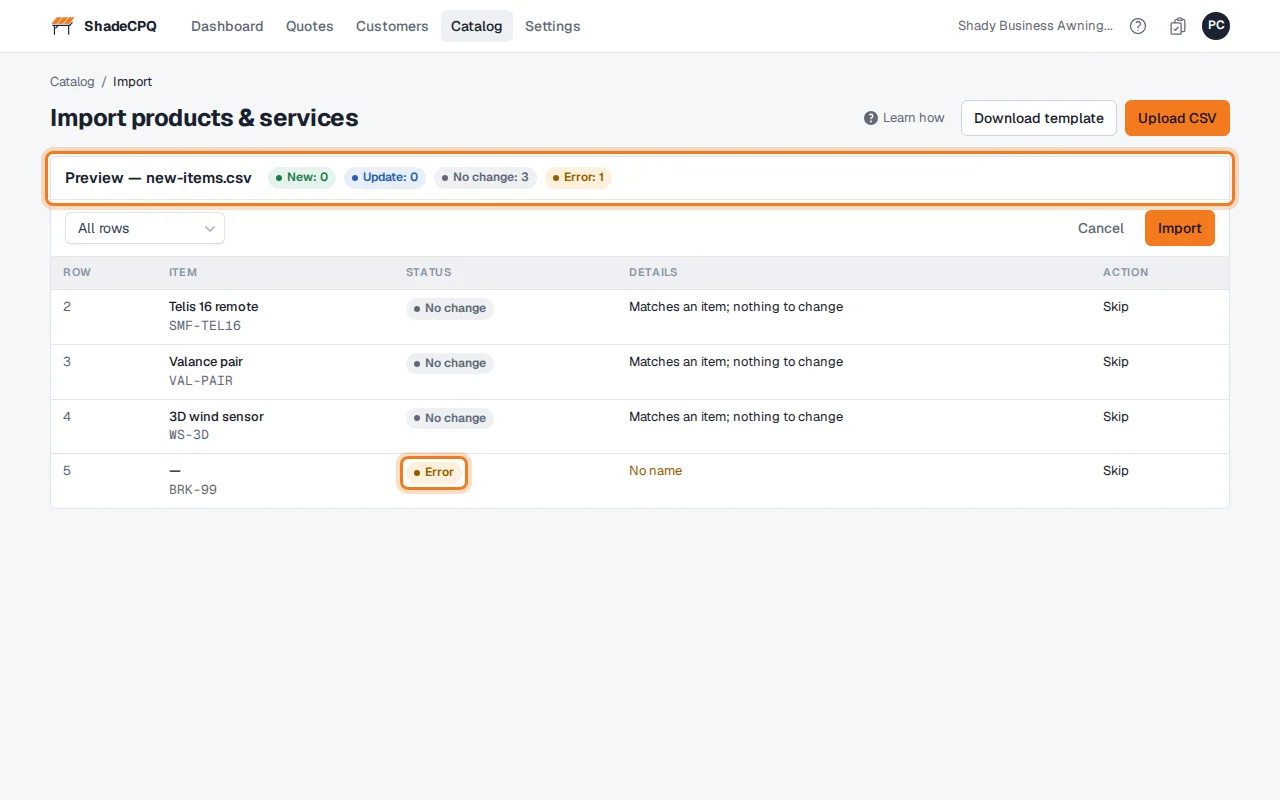
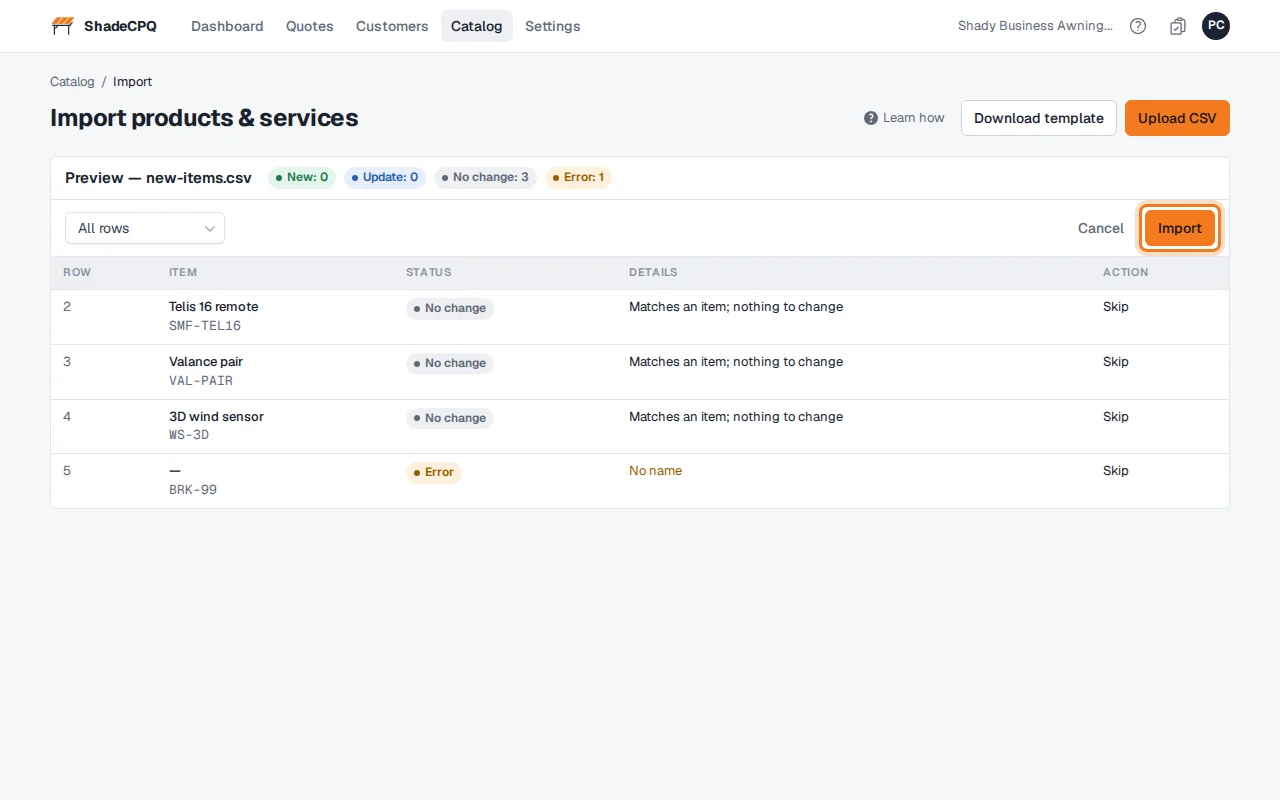
Check the preview. The counts at the top show how many rows are New, Update, No change and Error. An Error row says what's wrong under Details; the most common ones are a missing name, or a part number used twice in the file. Fix it in your spreadsheet and upload again, or import now and the error rows are skipped.
Click Import.
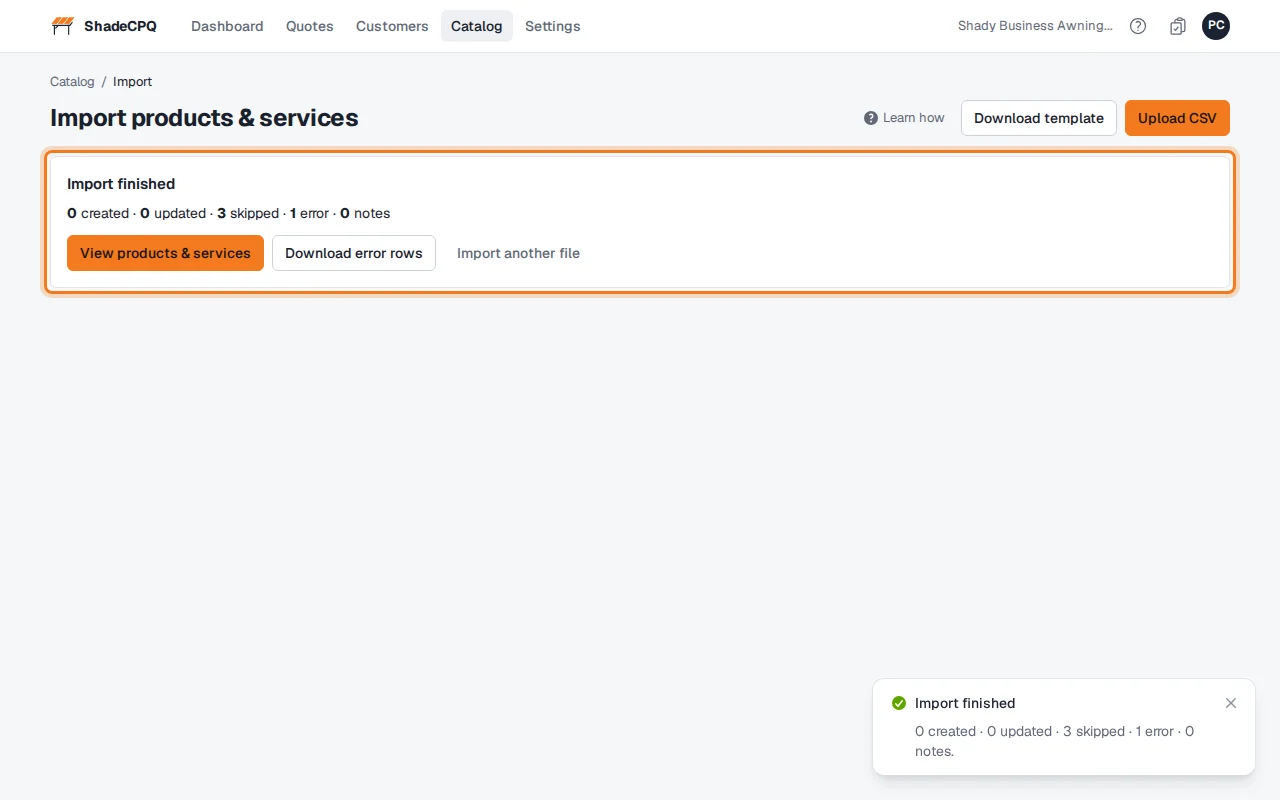
You'll see Import finished with how many items were created and updated. If any rows were skipped, Download error rows gives you just those to fix. Click View products & services.
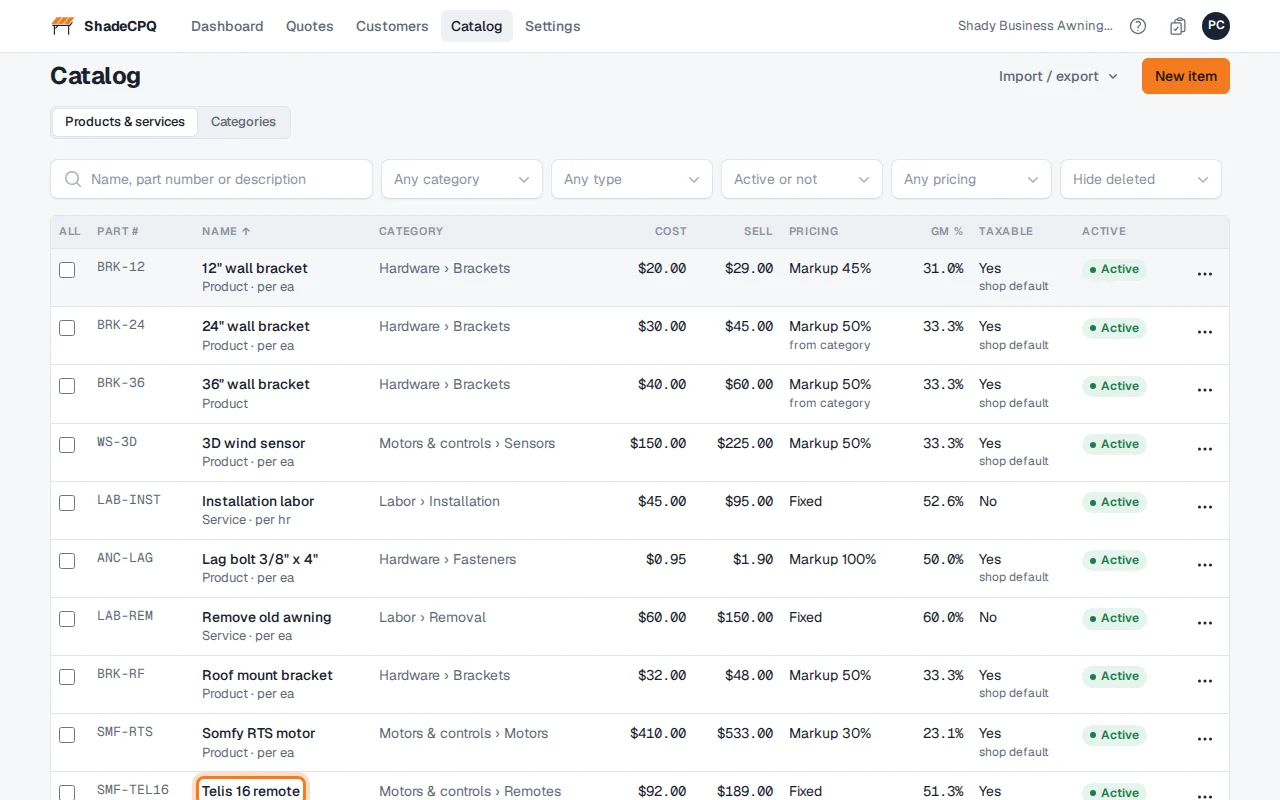
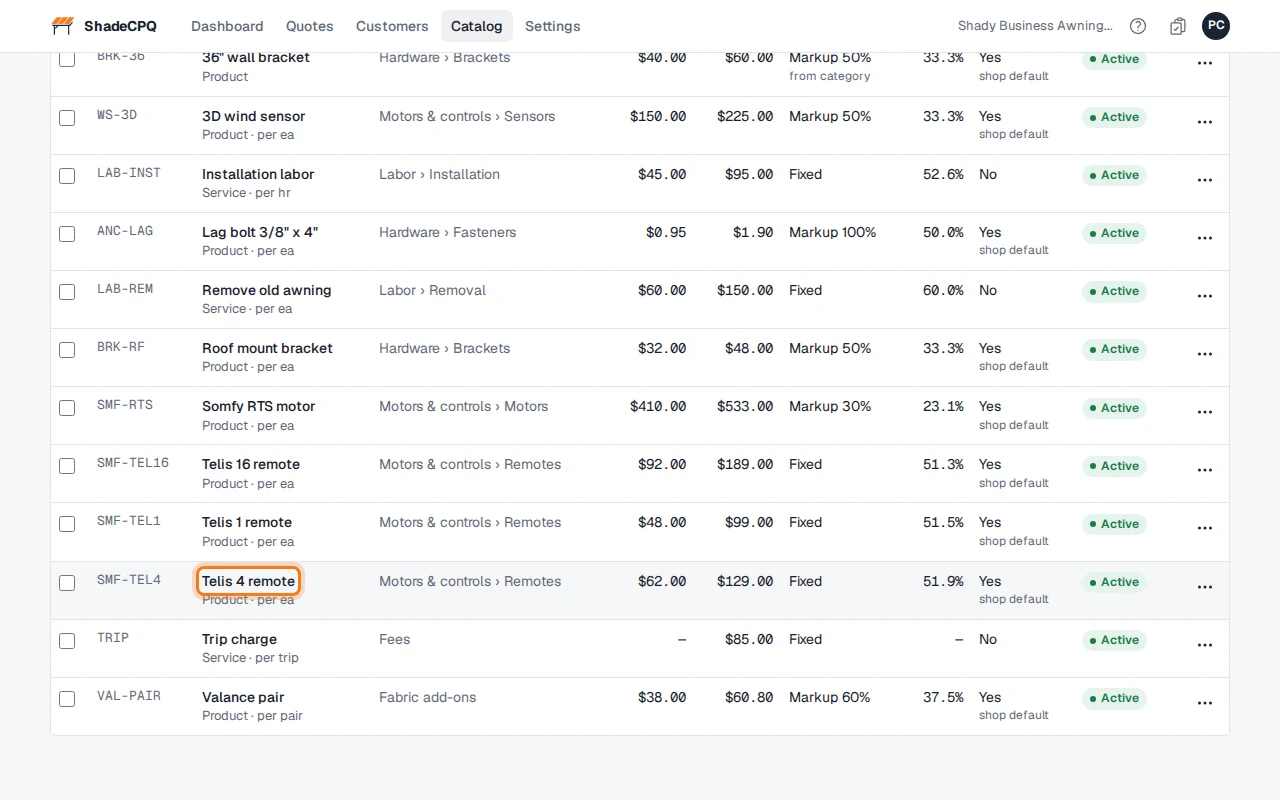
Your items are in the catalog, each with its cost, sell price, pricing method and GM % (your gross margin).
Good to know
- Importing again is safe. Rows are matched to your items by part number (or by exact name when there's no part number). A match updates the item; nothing is duplicated.
- An empty cell never wipes out a value that's already saved.
- To change prices in bulk, click Export CSV, edit the prices in your spreadsheet, and import the file again.
- Up to 5,000 rows per file.
Next: Pricing: catalog items and fixed-frame awnings
Pricing: catalog items and fixed-frame awnings
Fixed price and markup for catalog items, and how an awning's price is built.
Who can do this: Admins only.
ShadeCPQ prices two kinds of thing differently. Catalog items (a motor, a bracket, installation) are
bought or done at a known cost, so you set a price or a markup. Fixed-frame awnings are made in your
shop, so ShadeCPQ adds up what each one costs you to make and prices it from your target margin.
Catalog items: fixed price or markup
Fixed price
You type the sell price. It stays the same until you change it.
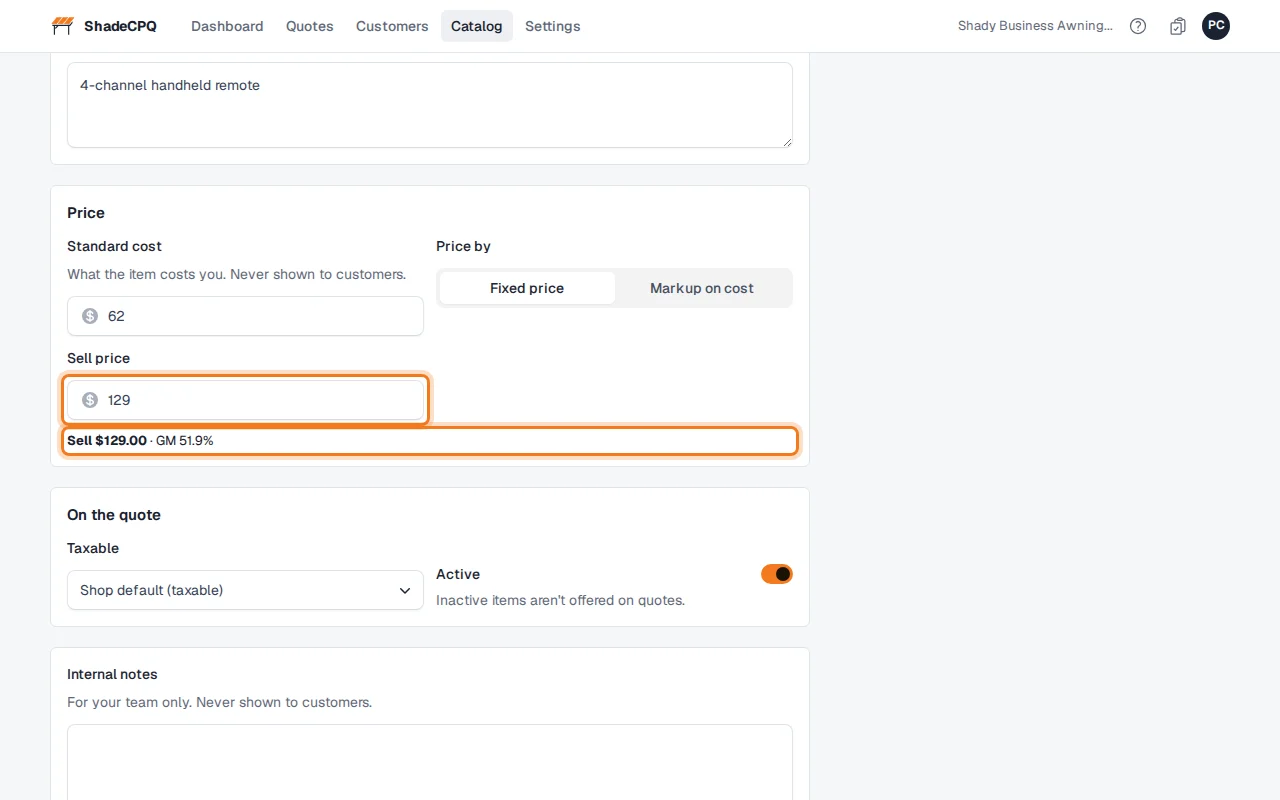
Example, Telis 4 remote:
Standard cost $62.00, Sell price $129.00
The customer pays $129.00.
GM % = (129 − 62) ÷ 129 = 51.9%
Markup on cost
You type your cost and a markup %. ShadeCPQ works out the sell price:
sell = cost × (1 + markup ÷ 100), rounded to the cent.
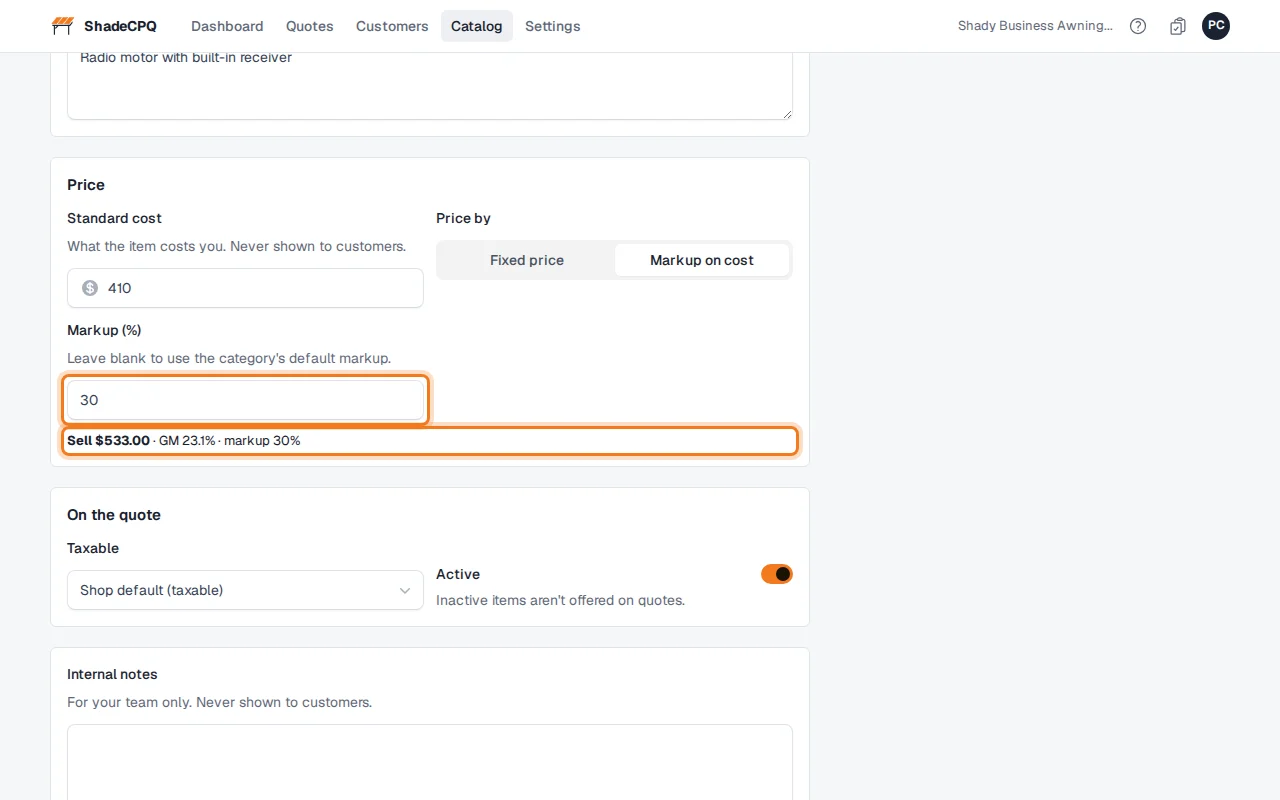
Example, Somfy RTS motor:
Standard cost $410.00, Markup 30%
410 × 1.30 = $533.00
GM % = (533 − 410) ÷ 533 = 23.1%
Markup is not the same as margin. A 50% markup on a $30 item gives $45.00, but your margin (GM %) is
$15 ÷ $45 = 33.3%. The item page always shows both, so you can check.
Where a markup comes from. If you leave Markup empty on a markup item, it uses its subcategory's
Default markup, or else its category's. Set a default once on a category and every item in it can use it.
Items with their own markup, and fixed-price items, never change when you change a category's default.
A fixed-price item
In Catalog, click the item's name. Here, Telis 4 remote.
Under Price, Fixed price is selected. The Sell price is what the customer pays ($129). Standard cost ($62) is only used to show your margin: GM 51.9%.
A markup item
Open Somfy RTS motor. Markup on cost is selected. Cost $410 with a 30% markup gives Sell $533.00, GM 23.1%. Change the cost or the markup and the sell price updates as you type.
Give a category a default markup
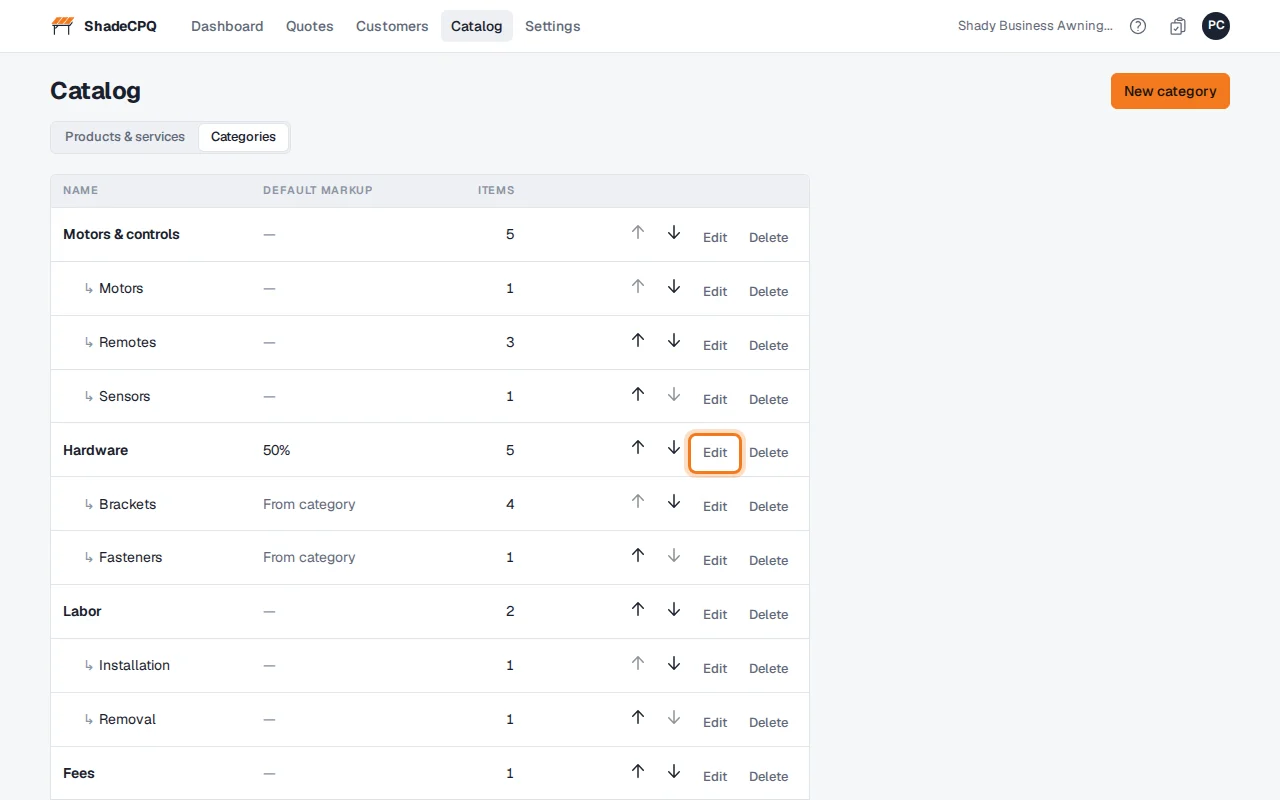
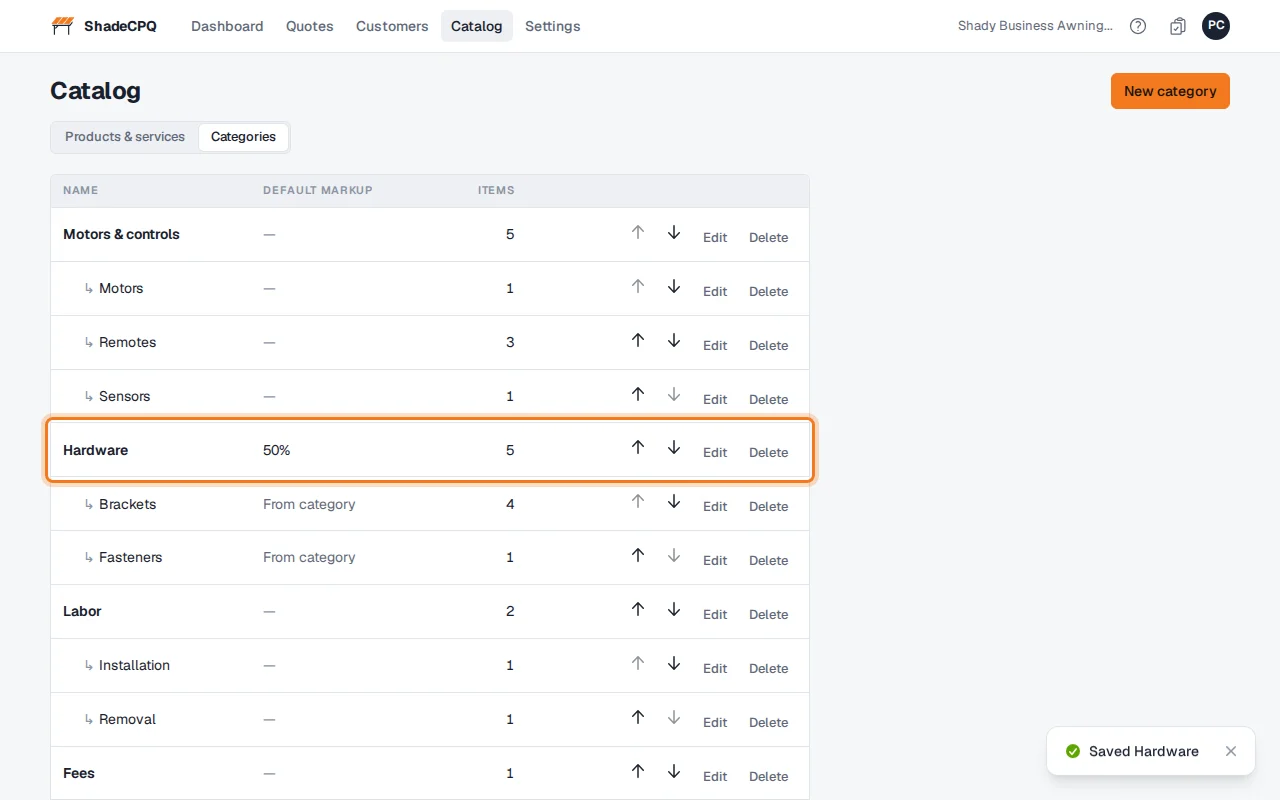
In Catalog, click Categories, then Edit next to the category. Here, Hardware.
Type the Default markup (50). If any items already use the category's markup, the form lists how each price will change, and the button says how many: Save and change 1 price. Click it.
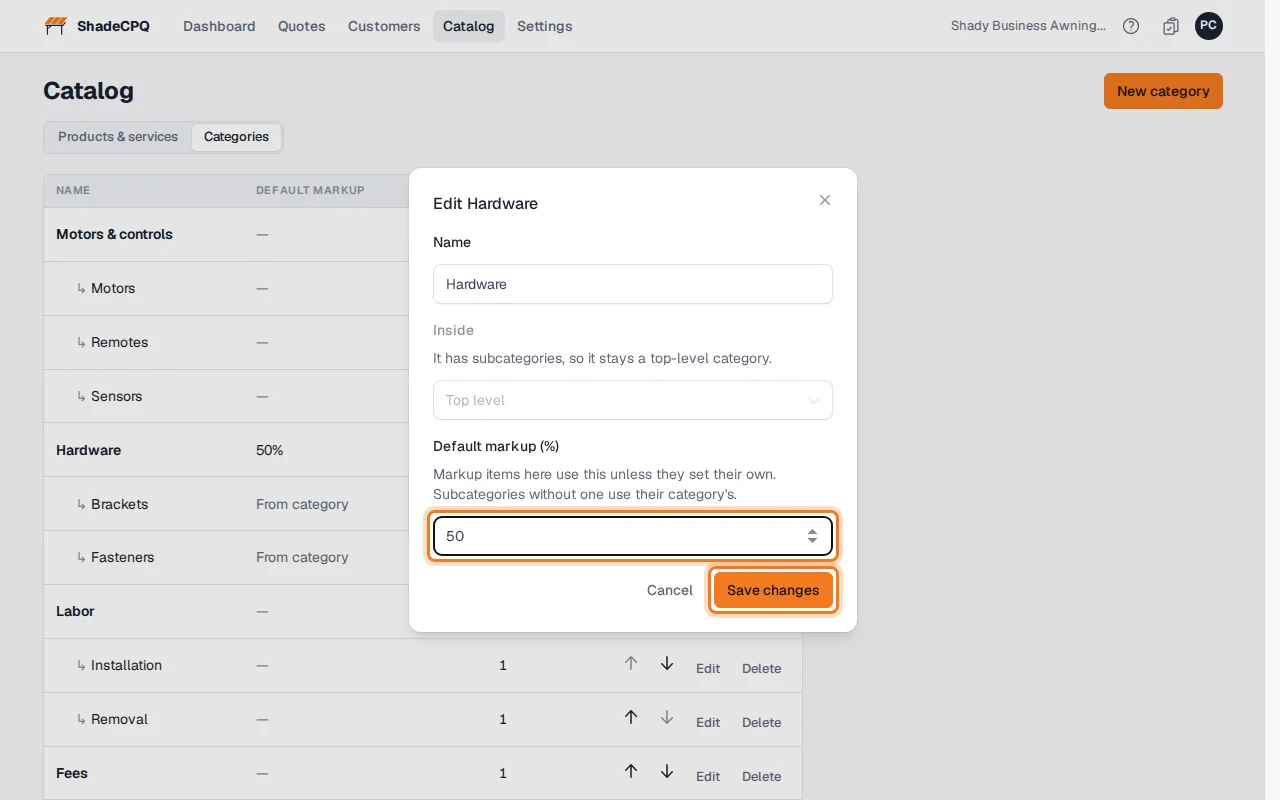
The category now shows 50%. Its subcategories (Brackets, Fasteners) show From category: they use Hardware's markup too.
Add an item that uses the category's markup
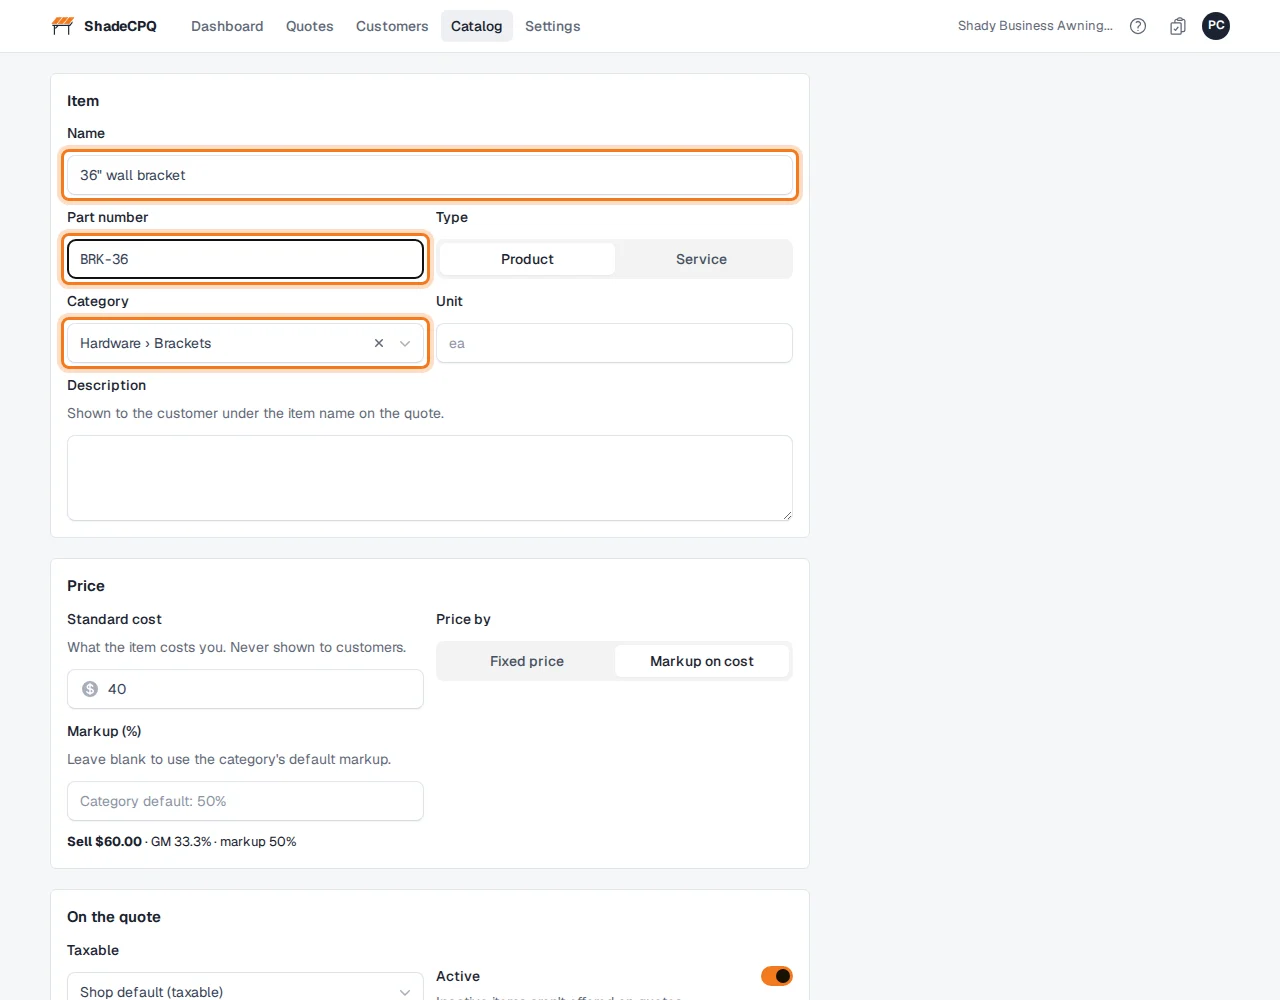
In Catalog, click New item. Type the Name (36" wall bracket) and Part number (BRK-36), and pick the Category (Hardware › Brackets).
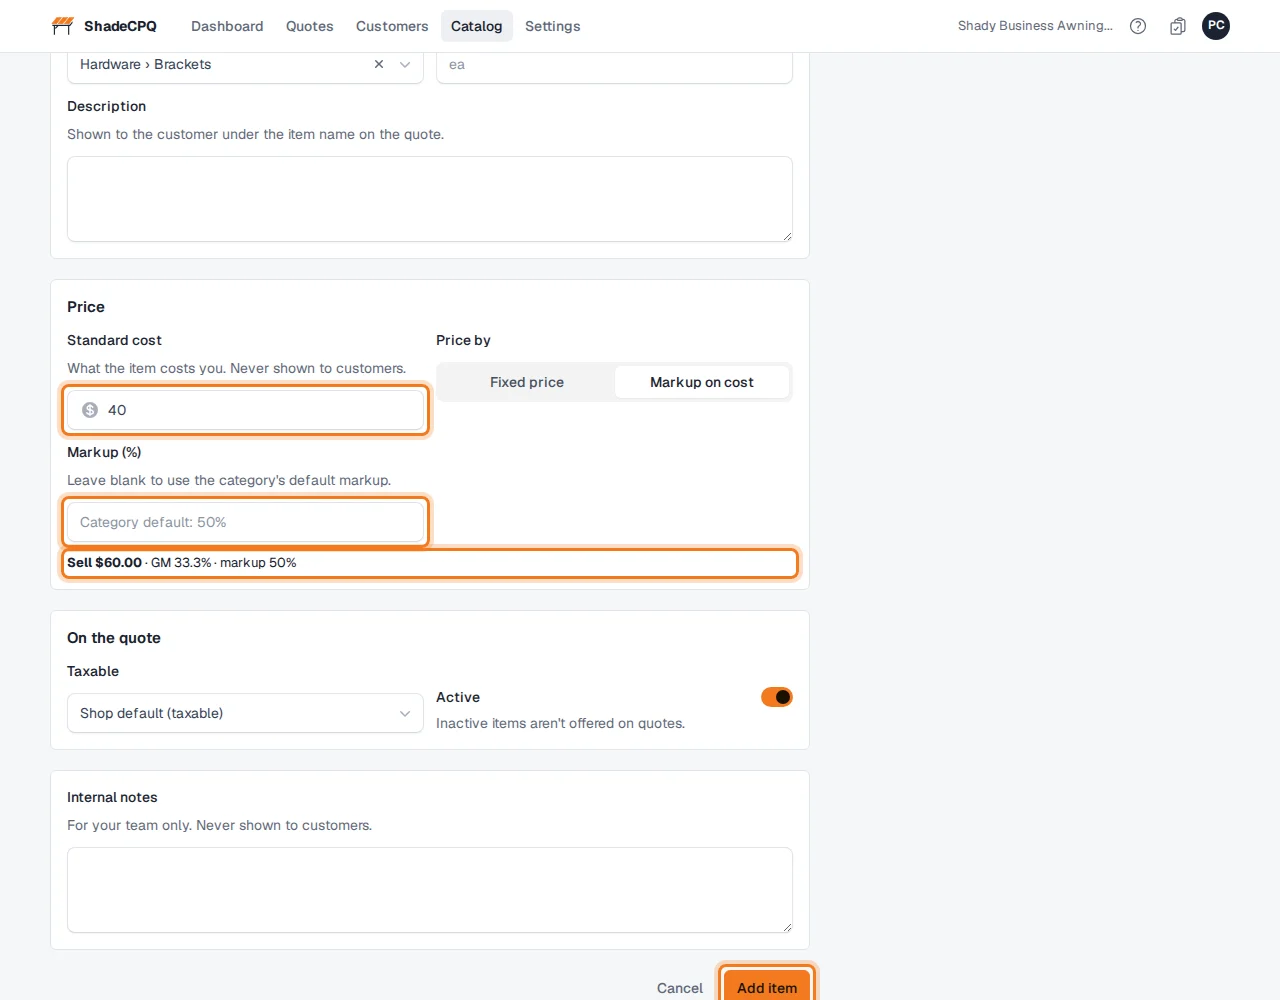
Under Price, type the Standard cost ($40), choose Markup on cost, and leave Markup empty. It shows the category default (50%) and Sell $60.00. Click Add item.
How fixed-frame awnings are priced
ShadeCPQ adds up what the awning costs you to make, then sets the price from your target margin.
- Materials.
- Tubing: each bar's length × that tube's price per foot.
- Mounting brackets: number of bracket sets × your bracket price.
- Fabric: the yards the layout needs, plus your fabric waste allowance, × the fabric's price per yard.
- ZipStrip (staple frames): a stocked color is charged by the foot used plus your ZipStrip waste; any other color is a special order, charged by the whole 150′ or 400′ roll.
- Labor: the time for each operation × the hourly rate for that kind of work.
- Frame: Per tube for each tube piece, plus Joint for each weld (and extra time for mitered corners).
- Fabric: time per panel, per inch of seam and per inch of stapling (and per grommet on a laced cover).
- Prep: sales, survey and design minutes.
- Cost = materials + labor.
- Price = cost ÷ (1 − target margin).
Example: a 10′ wide × 4′ projection awning, 30″ at the wall, 8″ truss, Sunbrella Forest Green, stapled with Dark Green ZipStrip (a special-order color), with the rates from Fabrics, tubing and labor rates.
| Materials |
|---|
| Tubing | 119.17 ft of tube, each length at its price per foot | $259.27 |
| Brackets | 4 sets × $8.00 | $32.00 |
| Fabric | 3.35 yd for the layout + 10% waste (0.34 yd) = 3.69 yd × $24.50 | $90.35 |
| ZipStrip | needs 37.5 ft; special order, so one 150′ roll × $0.70 | $105.00 |
| Materials | $486.63 |
| Labor |
|---|
| Frame | 29 tube pieces × 7 min + 50 welds × 7 min = 553 min at $65/hr | $599.08 |
| Fabric | 2 panels × 15 min + 300.3″ of seam × 18 sec + 570.1″ of stapling × 4 sec = 158.1 min at $55/hr | $144.93 |
| Prep | sales 30 min at $50 + survey 45 min at $50 + design 20 min at $60 | $82.50 |
| Labor | $826.52 |
| Cost | $1,313.15 |
| Price at a 50% target margin: $1,313.15 ÷ (1 − 0.50) | $2,626.29 |
Figures are rounded to the cent; ShadeCPQ adds up the exact amounts, so a total can differ by a cent from adding the rounded lines.
The price is twice the cost, so half of it ($1,313.15) is margin. A 50% margin is the same as a 100% markup.
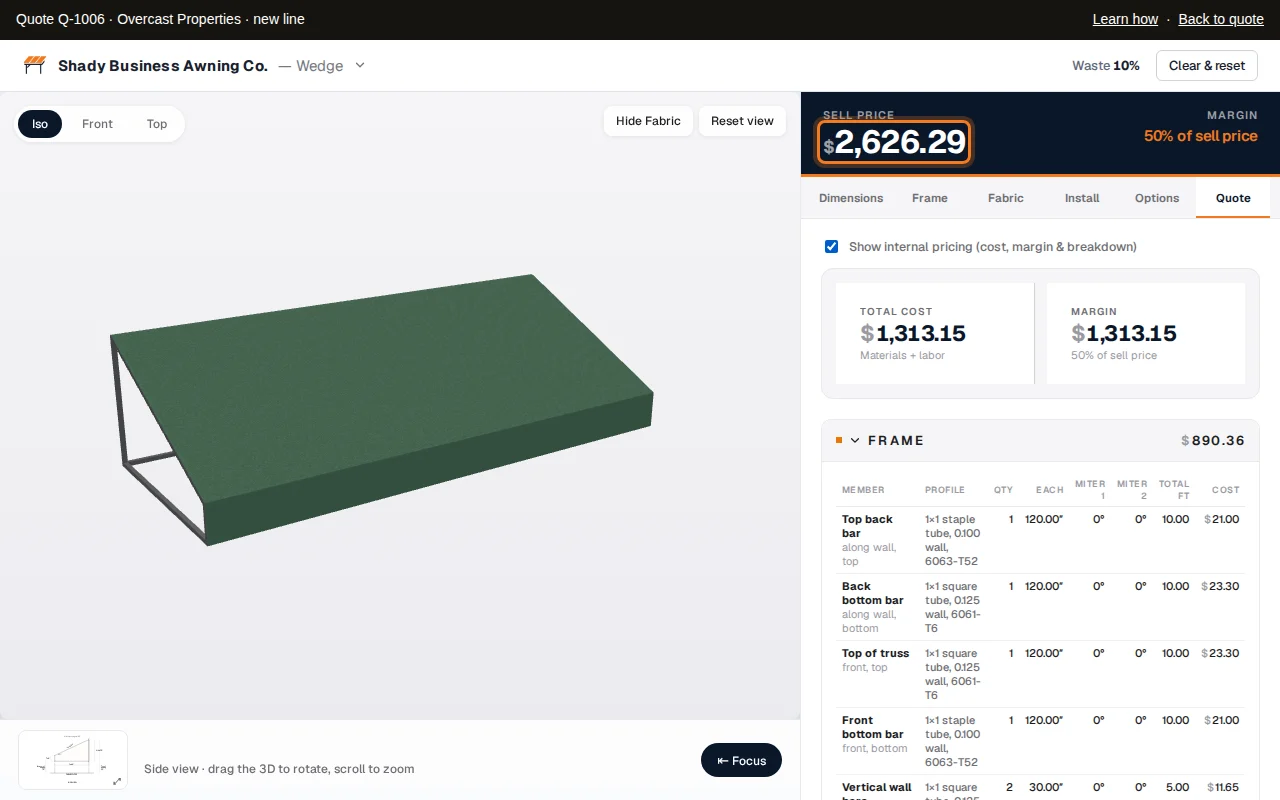
The configurator shows this breakdown when you tick Show internal pricing on its Quote tab.
- A recover (new cover on an existing frame) leaves out the tubing, brackets and frame labor, and uses your recover target margin if you've set one.
- Sales tax and discounts are added on the quote, not in the configurator.
- One roll per quote: when awnings on one quote use the same special-order ZipStrip color, the quote is charged the fewest whole rolls that cover all of them, and the cost is shared between those awnings by the footage each uses. A line with a quantity of 2 or more shares its roll the same way. In the configurator on its own, each awning is still charged its own roll.
Good to know
- Quotes you've already made don't change when you change a catalog price or a rate. A quote keeps the price an item had when it was added. On a draft, Check prices shows whether its awnings would price differently today.
- Raise many catalog prices at once: in Catalog, tick the items, then use Adjust prices by %. Fixed items get a new sell price; markup items get a new cost, and their sell price follows.
- Cost is never shown to customers.
Next: Creating a customer
Creating a customer
Add a customer with their contact, billing address and job site.
Who can do this: Admins and Sales reps. View-only users can look up customers but can't add them.
In this example a property manager, Overcast Properties, wants awnings at one of their buildings.
Their office (where bills go) is in Seattle; the building we'll work on, Cloudview Apartments, is in Tukwila.
- The billing address is where invoices go.
- The job site is where the work happens. New quotes use it, and sales tax is worked out for it.
Add the customer
Click Customers at the top of the page, then New customer.
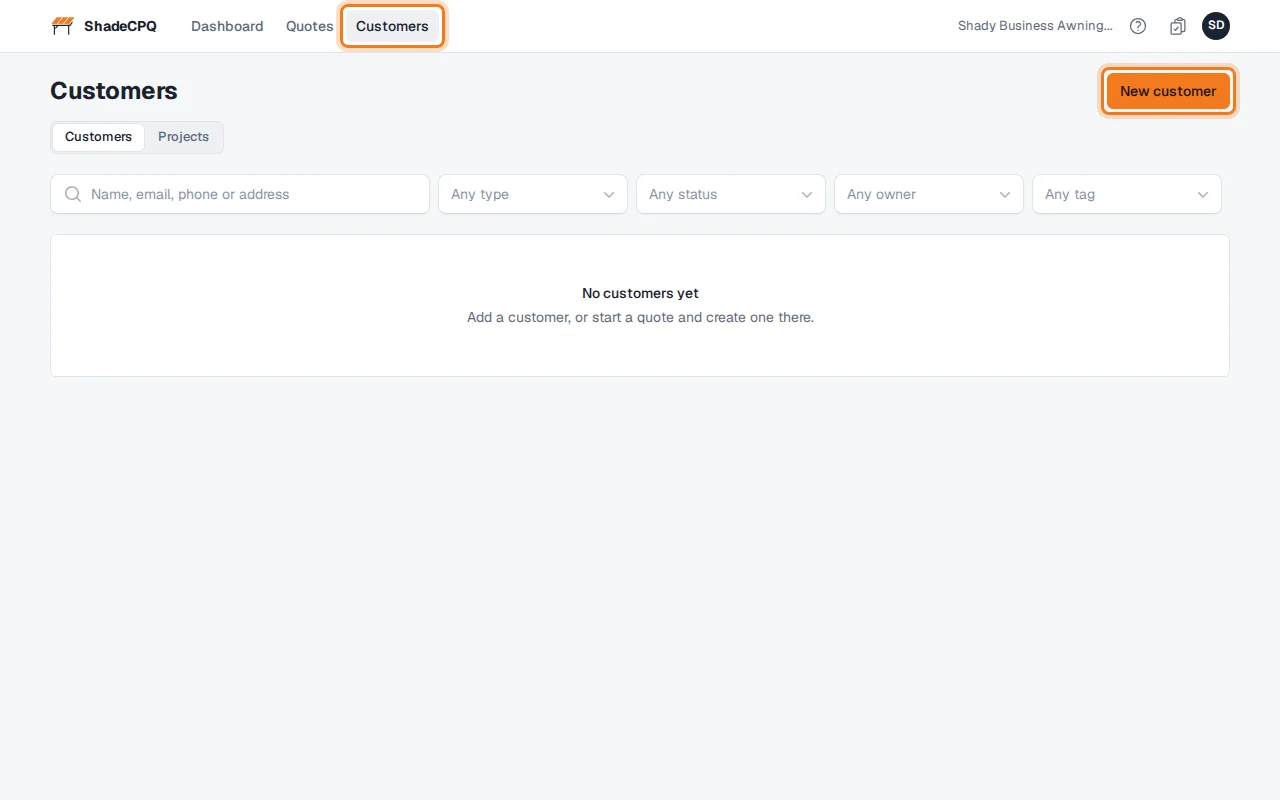
For a business, click Commercial: the form asks for a Company name, and the customer is listed under it. For a homeowner, leave Residential: there's no company name, and the customer is listed under the person's name.
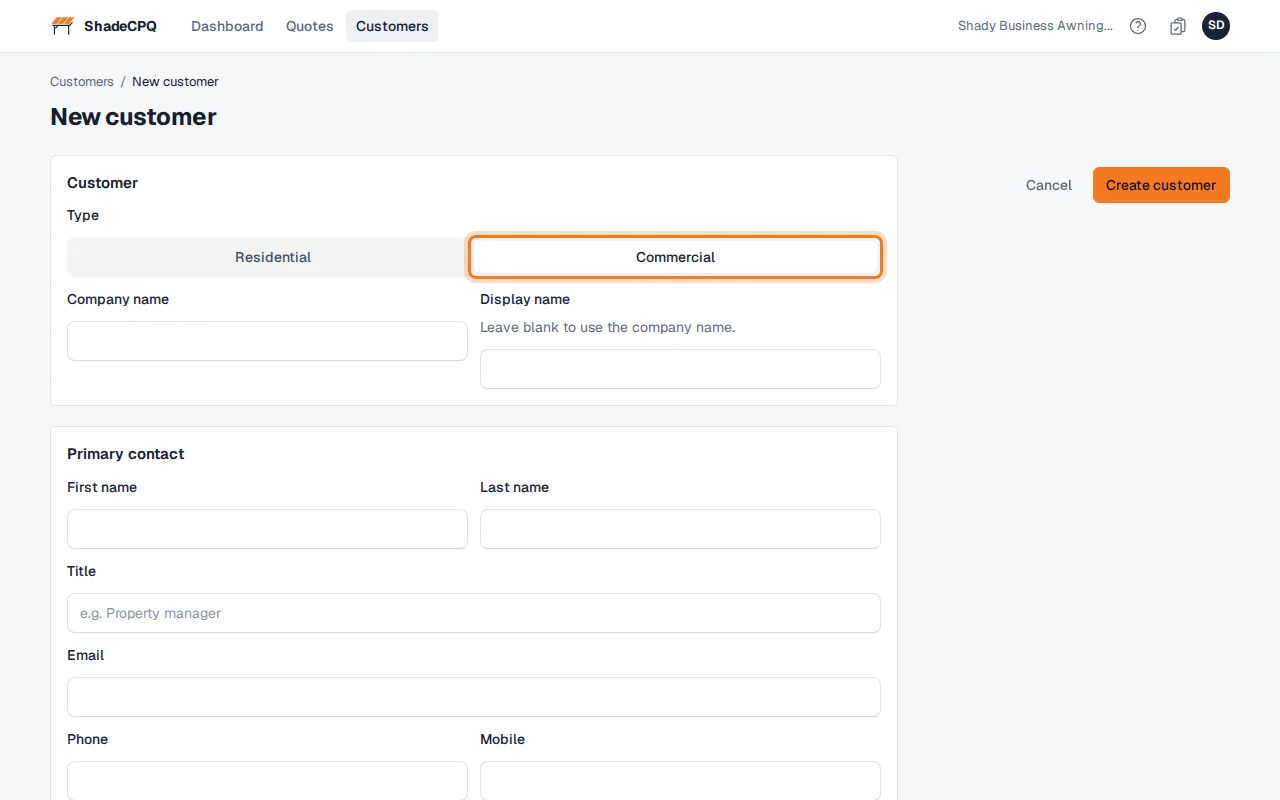
Type the Company name: Overcast Properties.
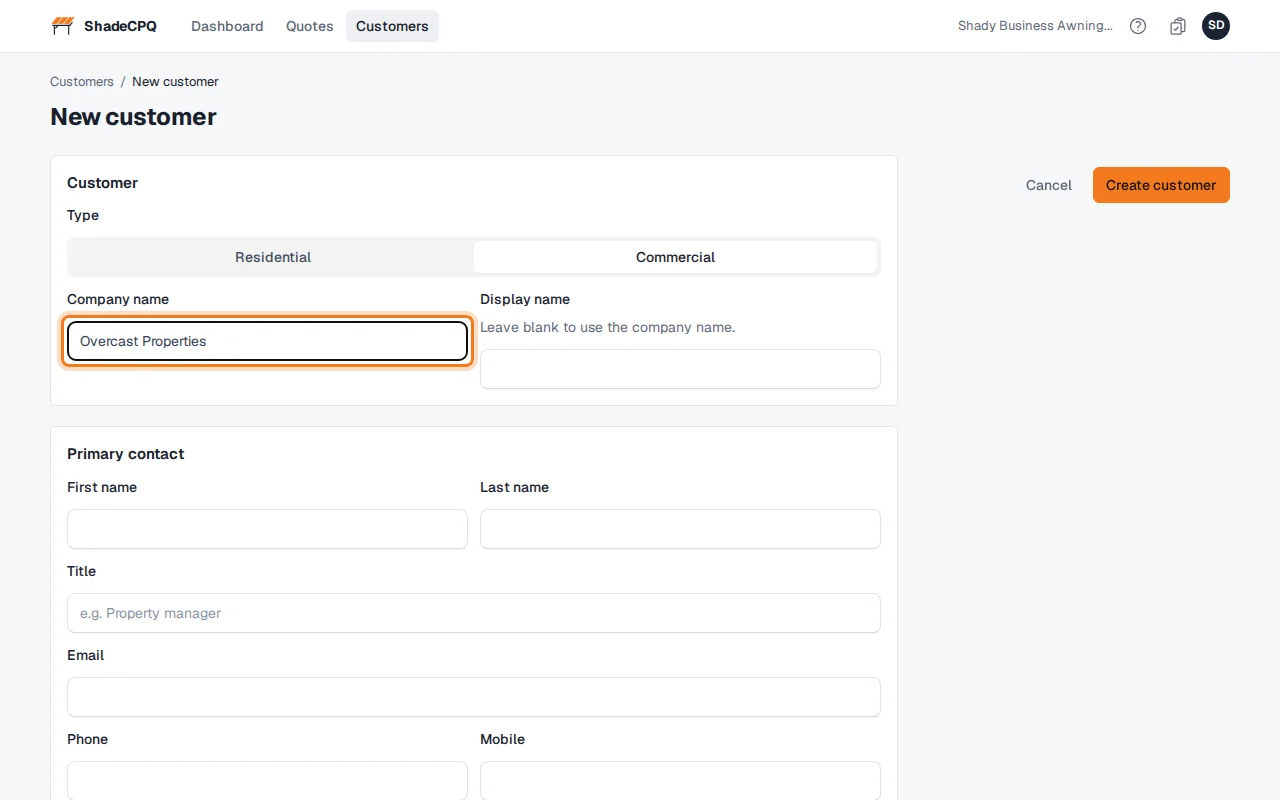
Under Primary contact, type the person you deal with: First name Gwen, Last name Tarp, their Title (Facilities Manager), Email and Phone. Quotes are emailed to this person.
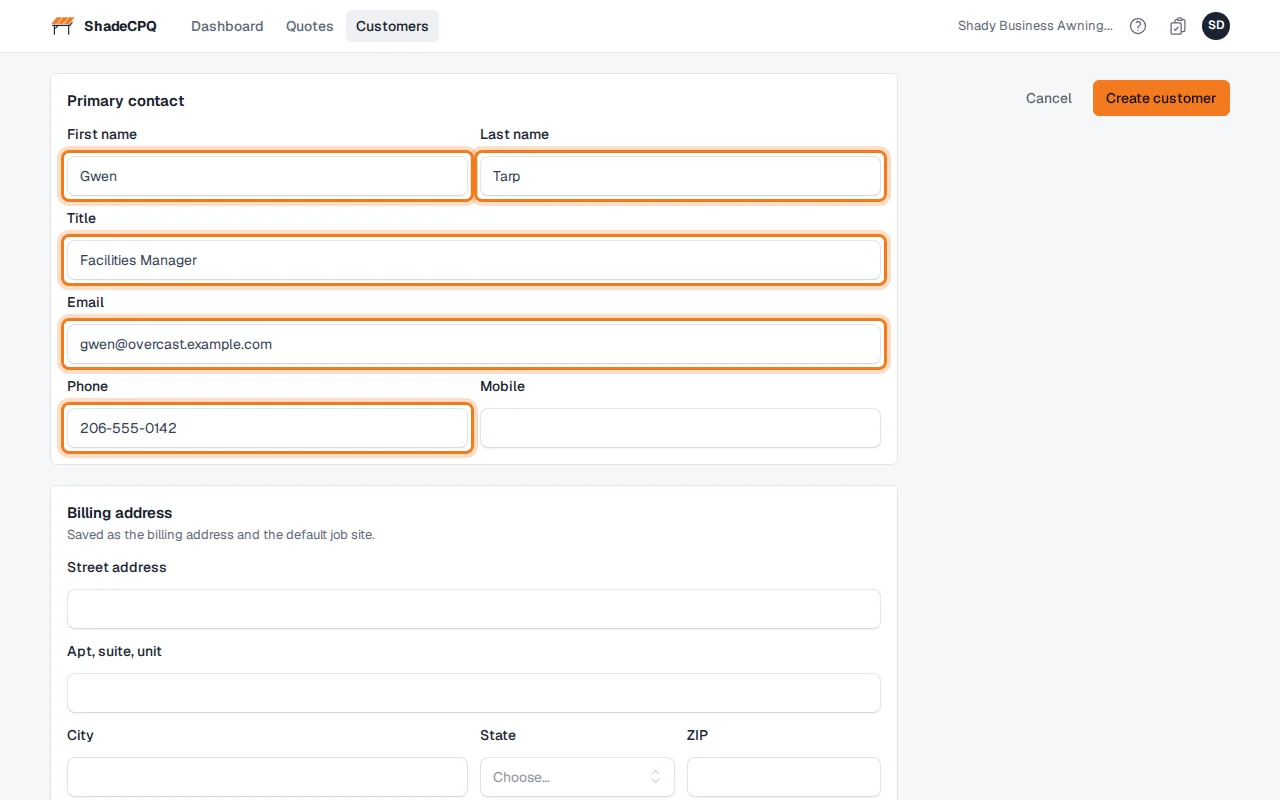
Under Billing address, type the street, city and ZIP, and choose the State from the list: 400 Drizzle Way, Seattle, WA 98101.
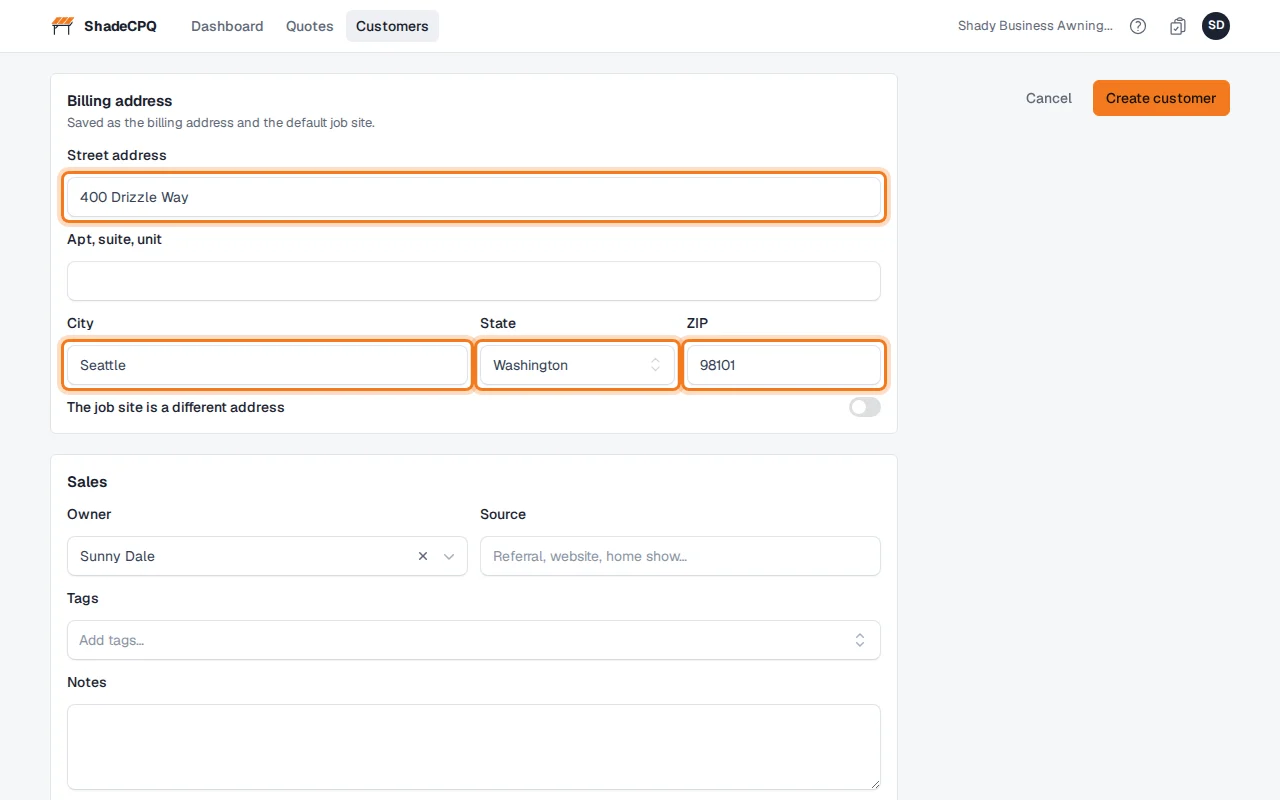
The work is at a different address, so switch on The job site is a different address, and type the Job site name (Cloudview Apartments) and its address: 1250 Nimbus Ave, Tukwila, WA 98188.
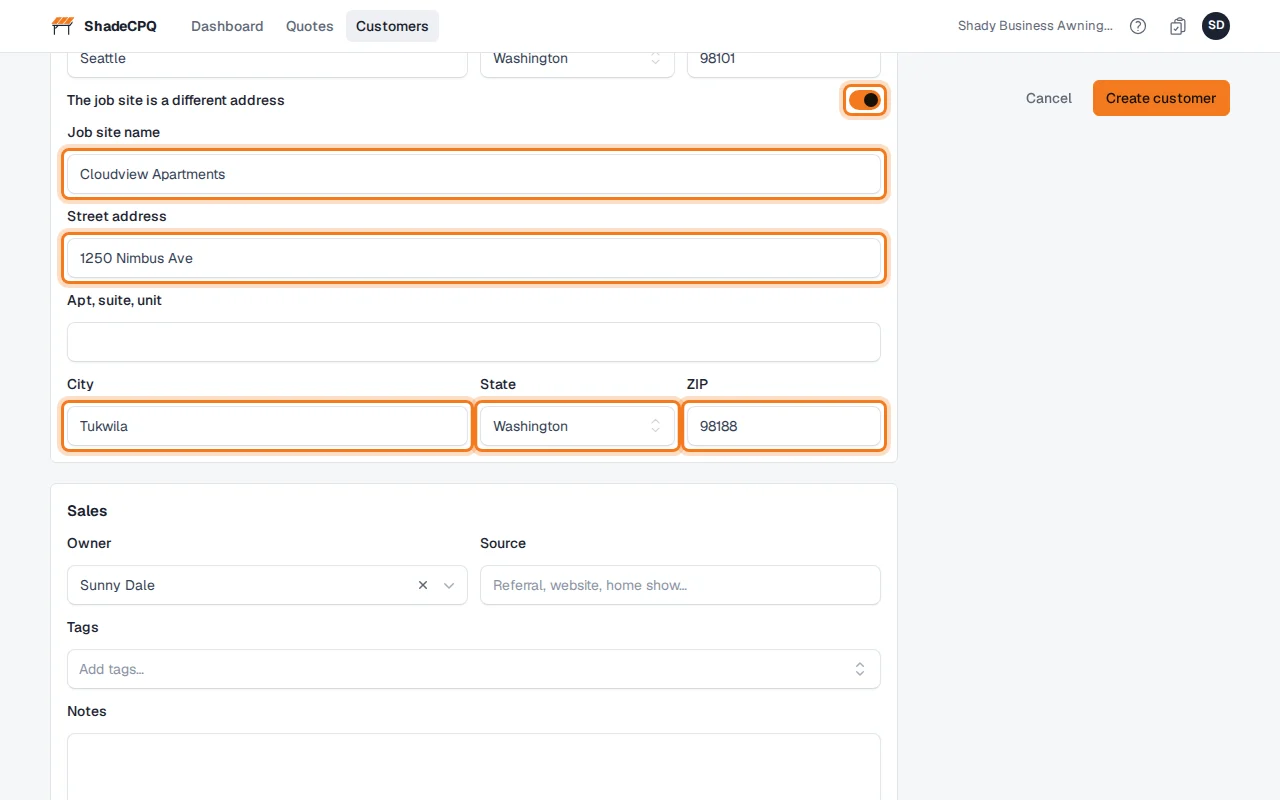
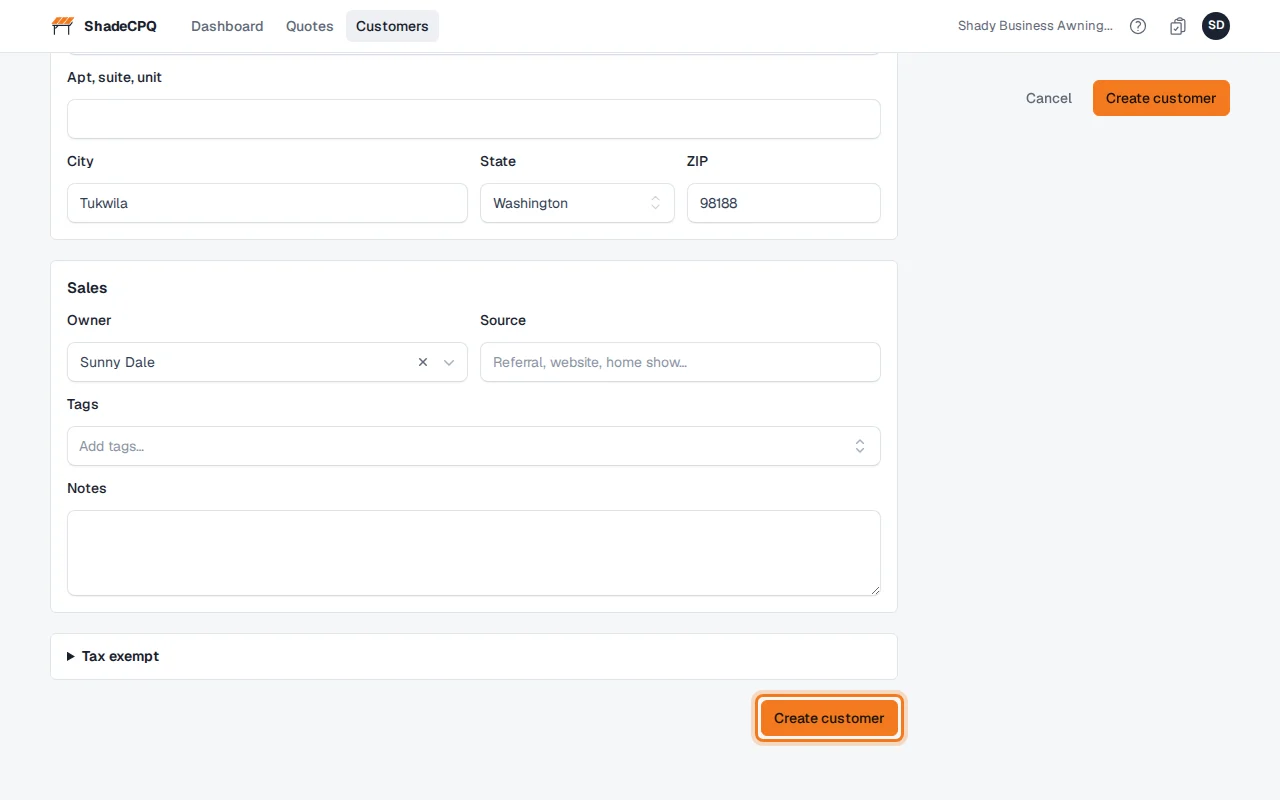
Click Create customer. If ShadeCPQ finds a customer with the same email, phone or address, it shows them first so you don't add someone twice.
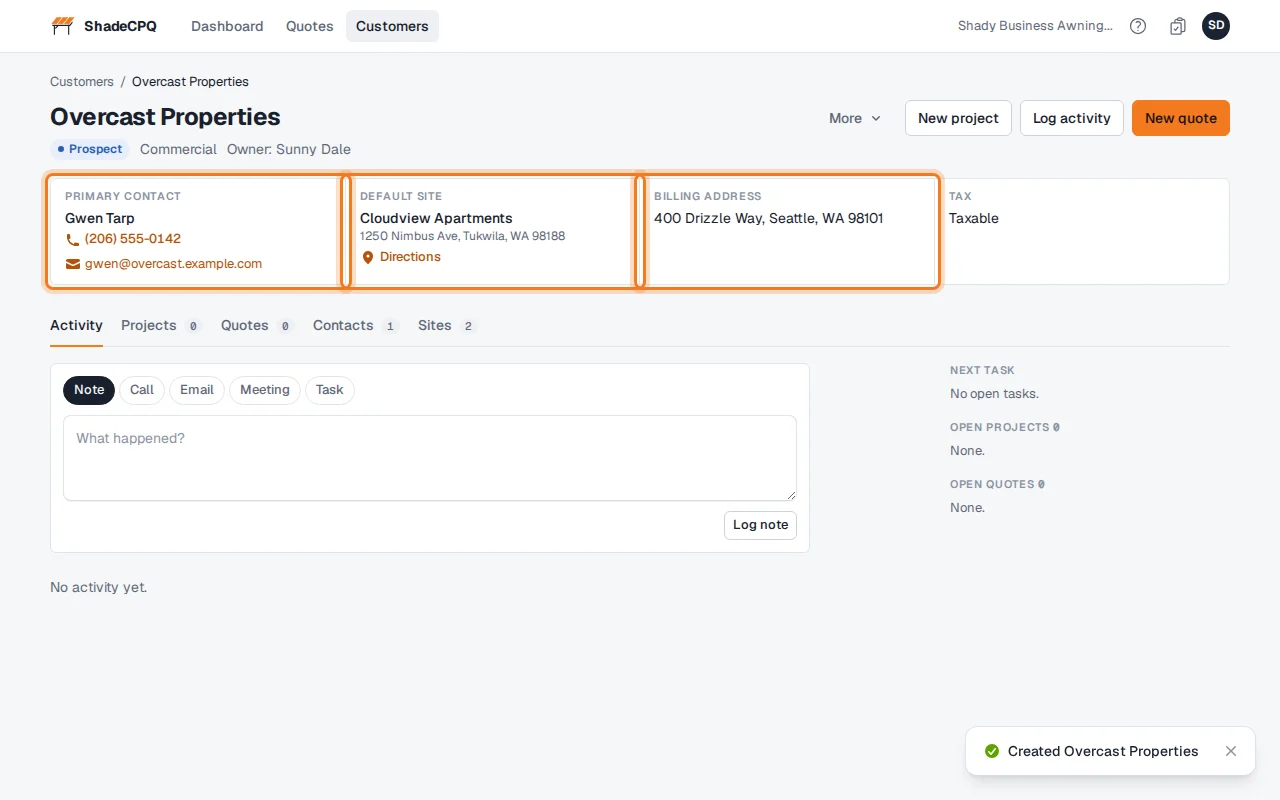
Check what was saved
The customer's page opens. Check the Primary contact, the Default site (Cloudview Apartments) and the Billing address.
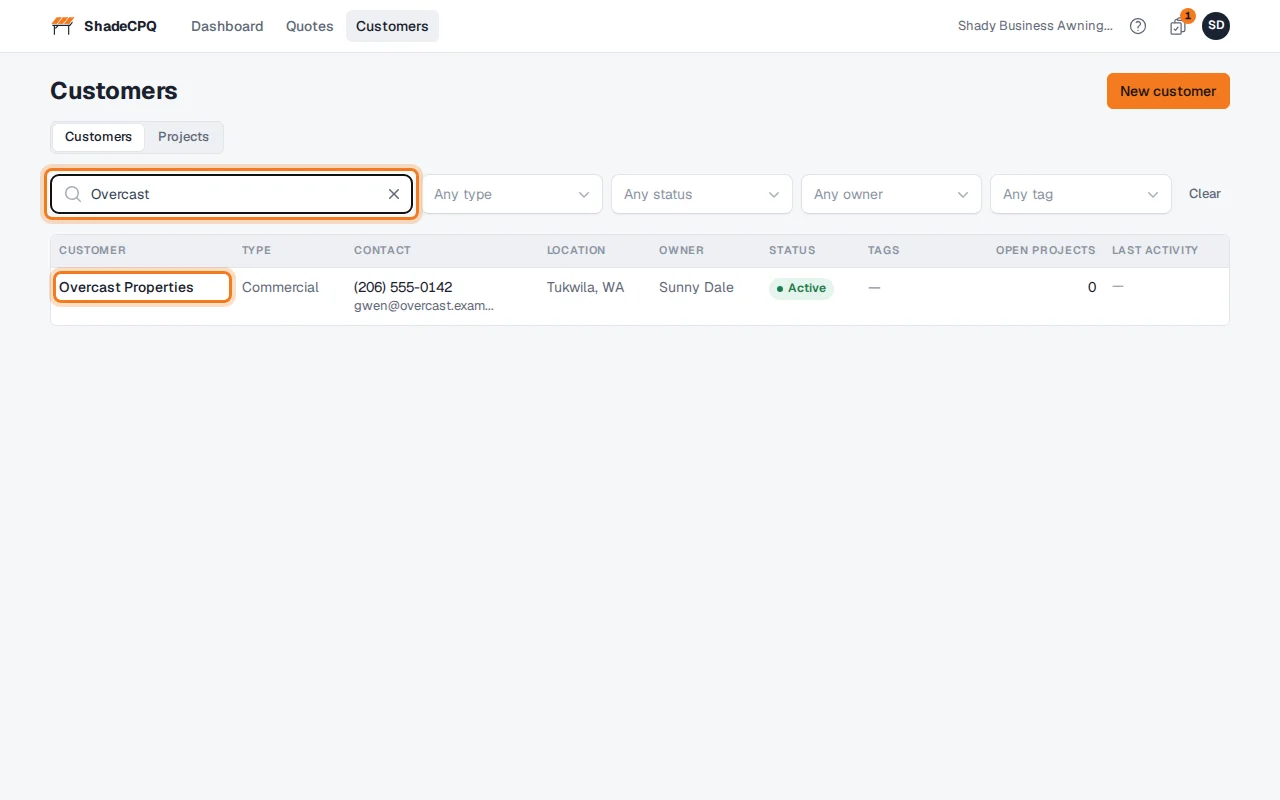
Find the customer again later
Click Customers and type part of their name, email, phone or address in the search box. Click the customer's name to open them.
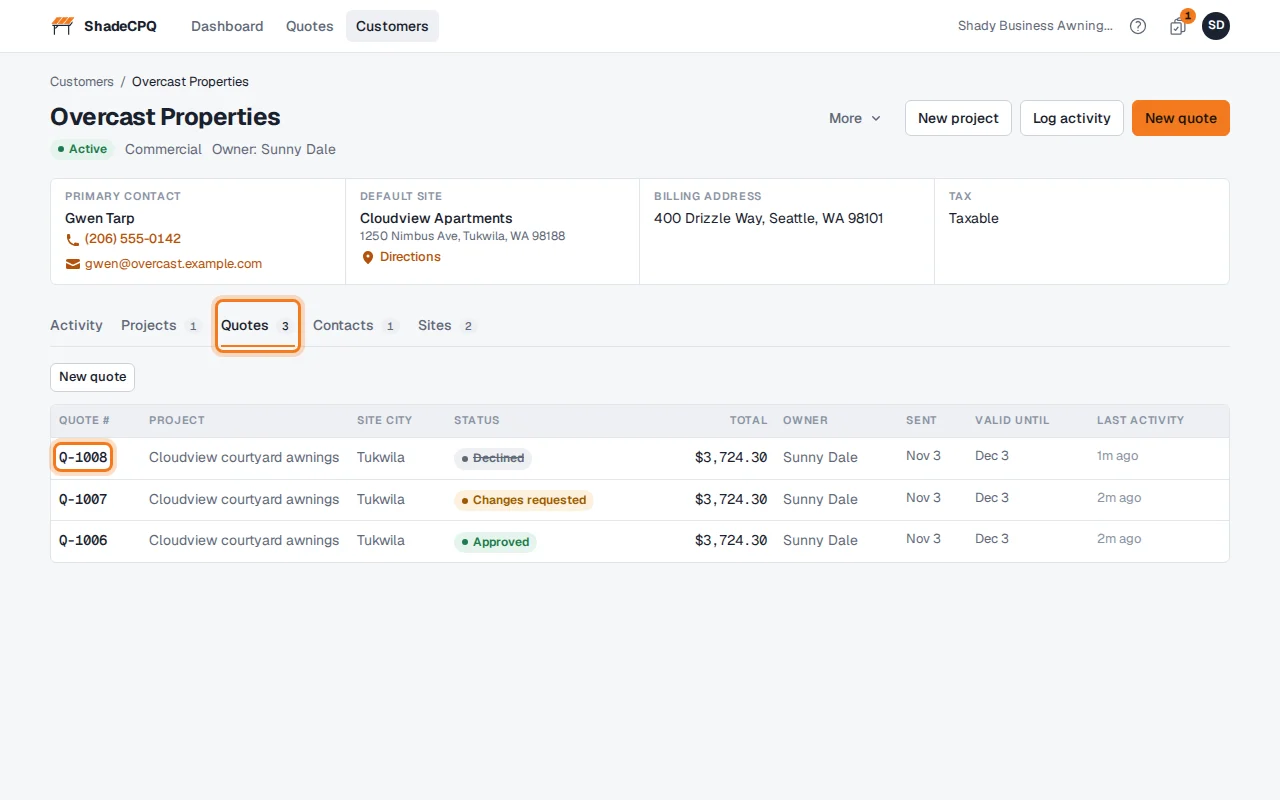
On the customer's page, the Quotes tab lists every quote for this customer. Click a quote to open it.
Good to know
- A customer can have more than one job site. Add more on the Sites tab.
- Under Sales, the Owner is the rep responsible for the customer. It starts as you.
Next: Creating a new quote
Creating a new quote
Start a quote for a customer, at their job site, and add products and services.
Who can do this: Admins and Sales reps. View-only users can open quotes but not create them.
Here Sunny, a sales rep, quotes Overcast Properties for awnings at Cloudview Apartments.
The quote goes to their contact, Gwen Tarp, and sales tax is worked out for the job site's address.
Start the quote
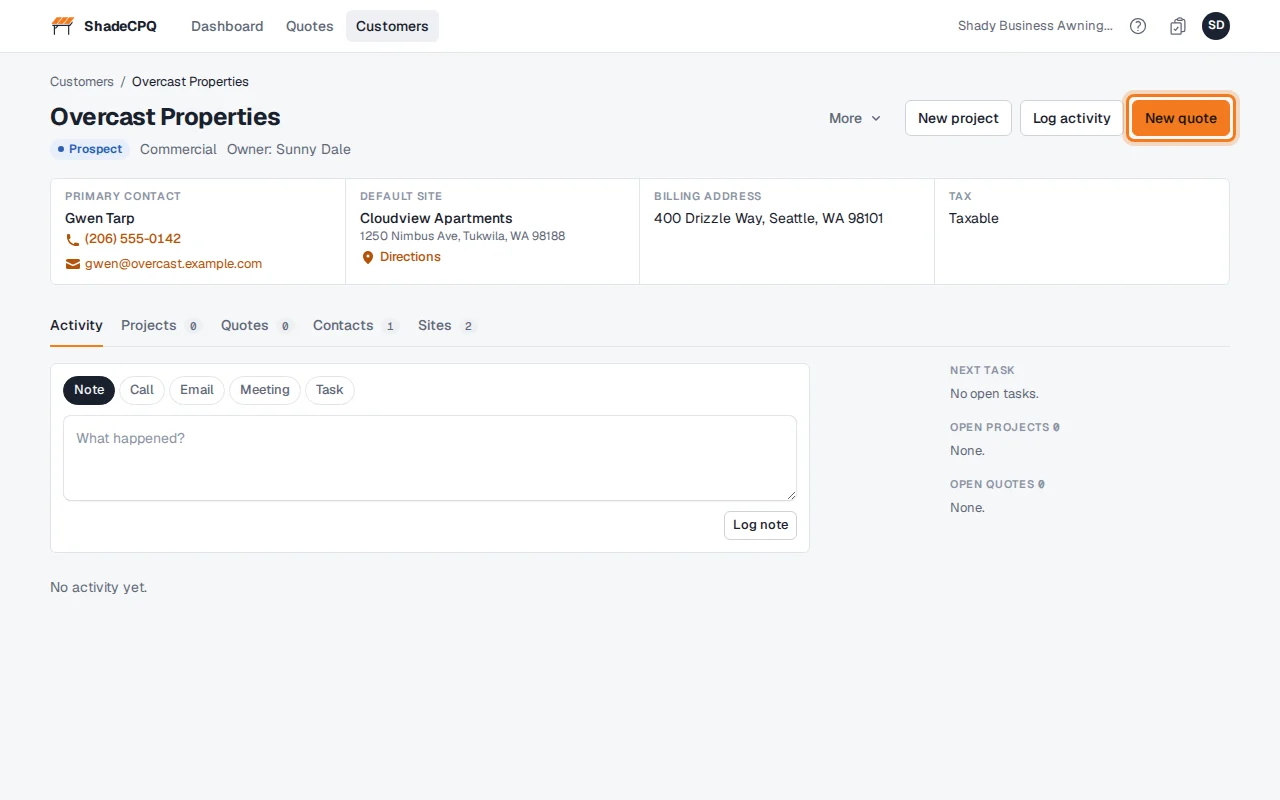
Open the customer (see Creating a customer) and click New quote.
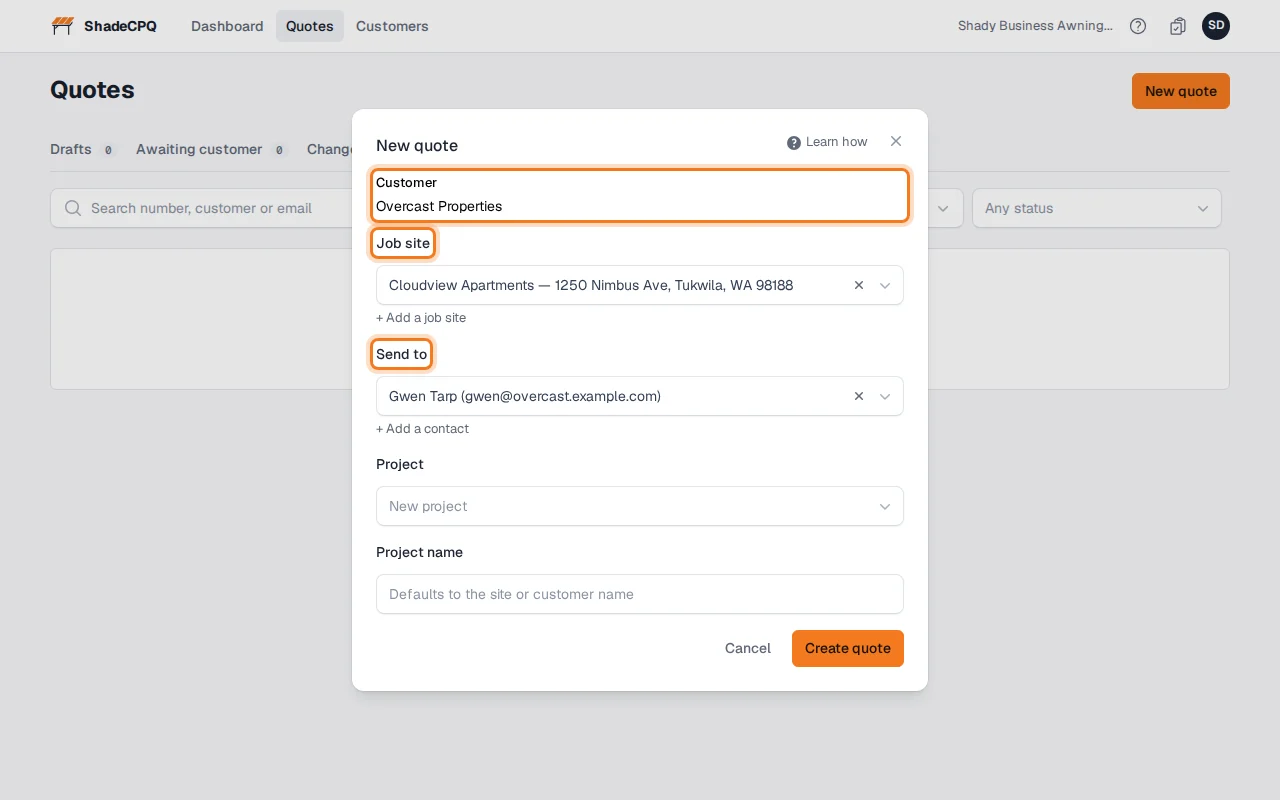
The Customer is filled in, and the Job site is their default site: Cloudview Apartments. Send to is the person who gets the quote: Gwen Tarp.
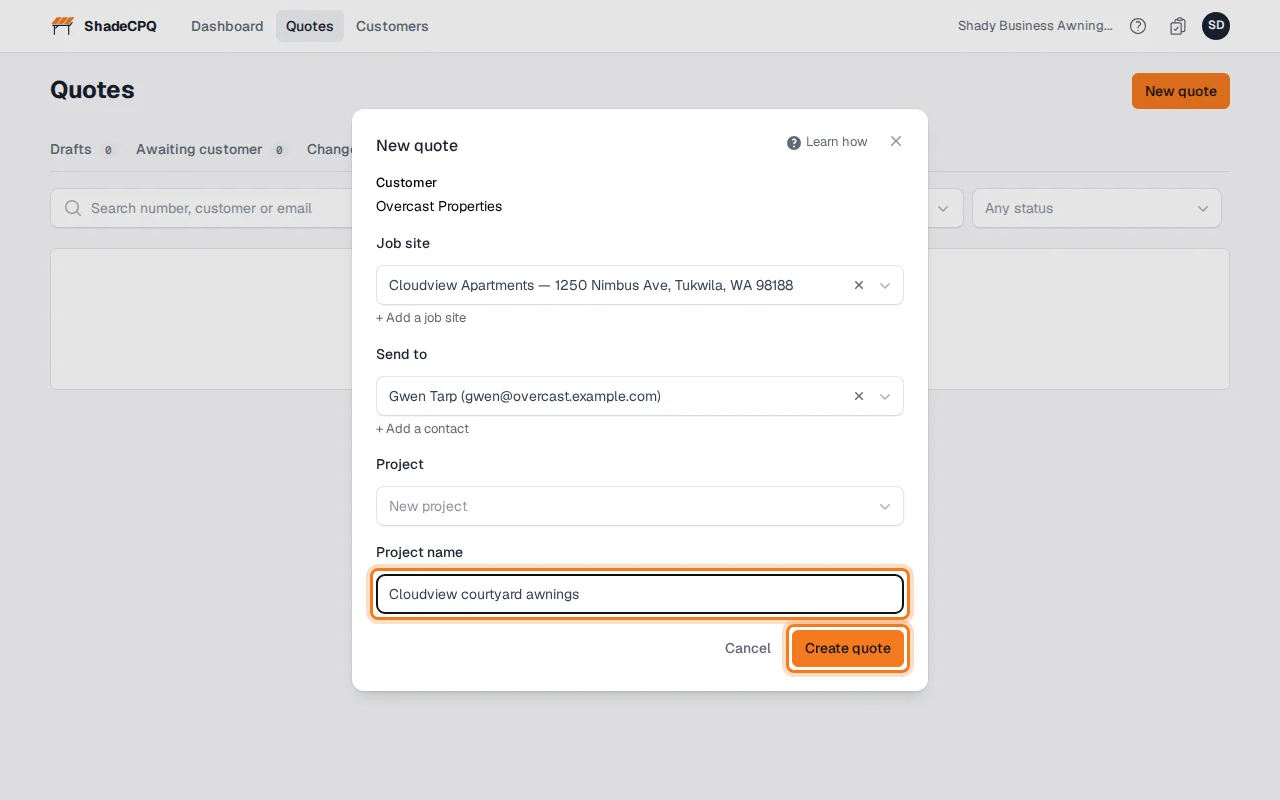
Under Project, leave New project and type a Project name you'll recognize (Cloudview courtyard awnings). Click Create quote.
Add products and services
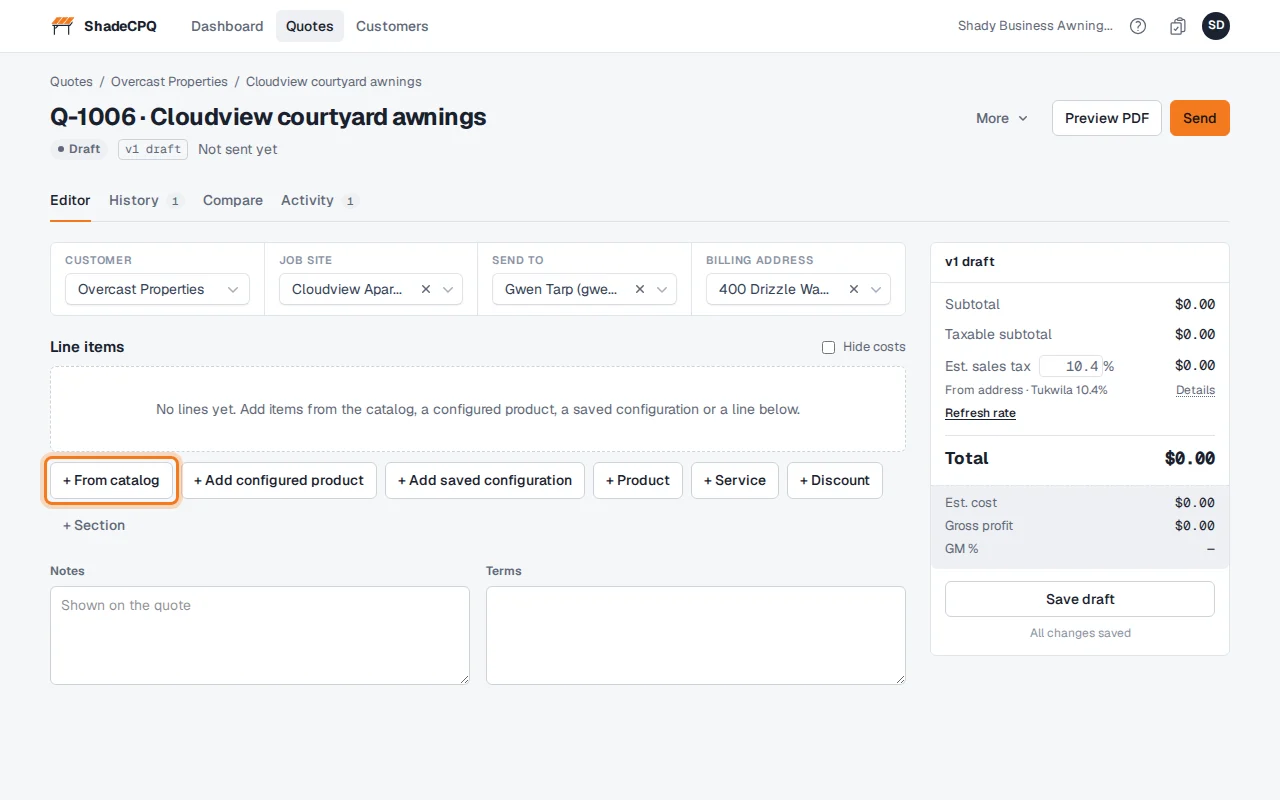
The quote opens as a draft. Click + From catalog.
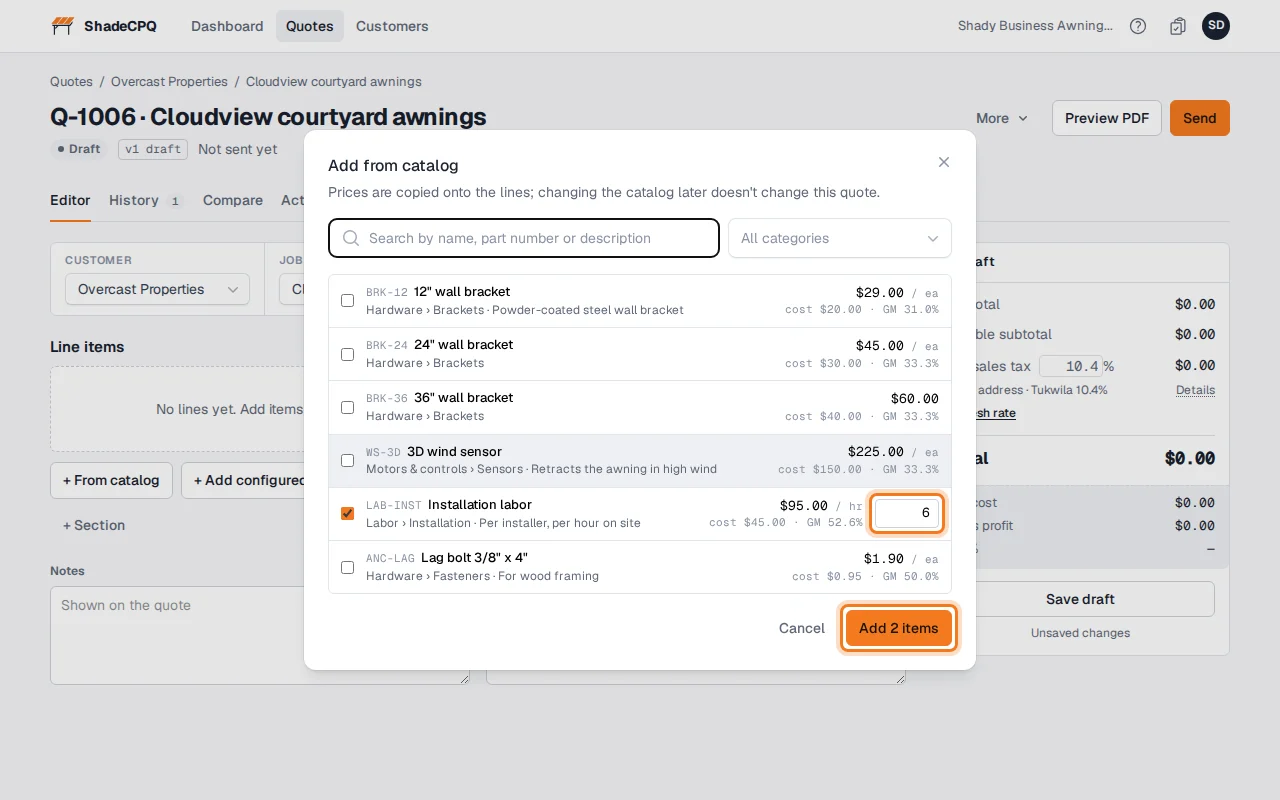
Search for an item, tick it, and type how many (6 hours of Installation labor). Tick any others (Remove old awning) and click Add.
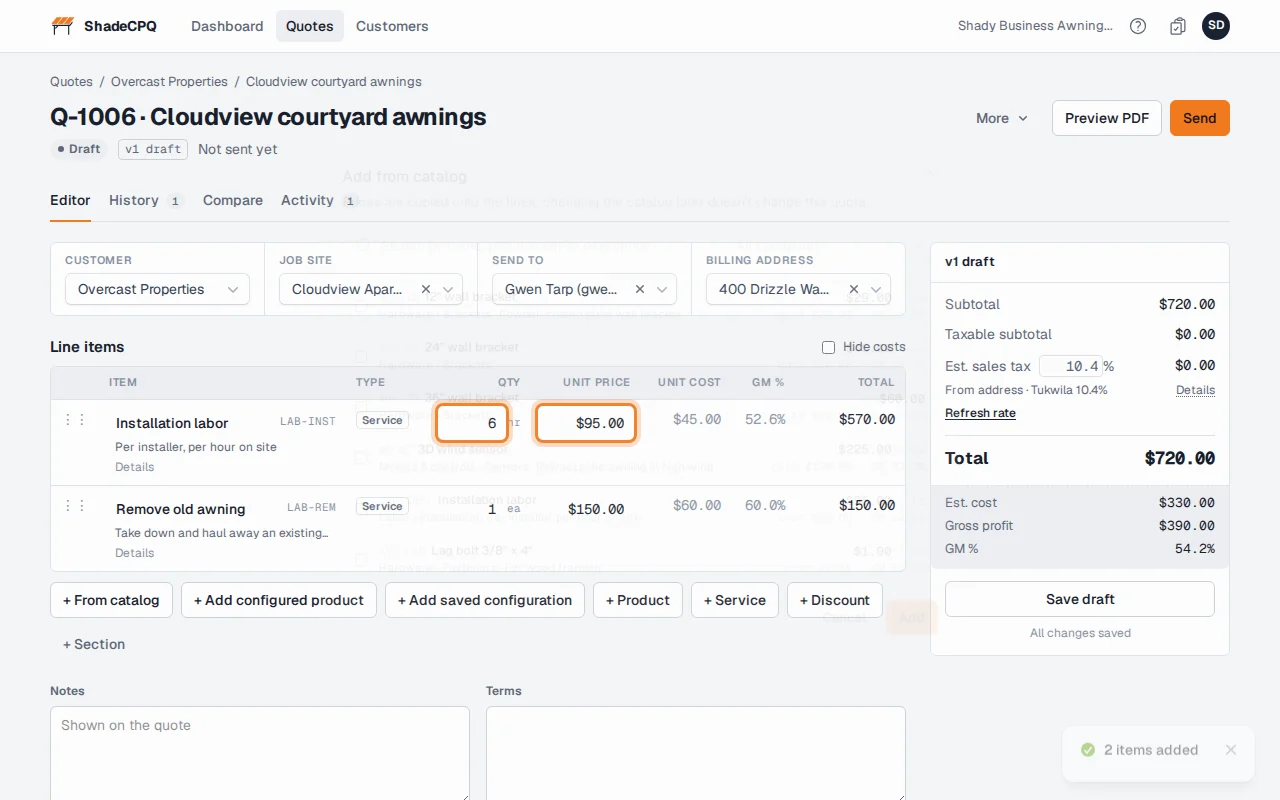
The items are on the quote, each tagged Product or Service. You can change the Quantity or Unit price on any line.
Need something that isn't in your catalog? Click + Product or + Service for a blank line and type it in. + Discount takes an amount off.
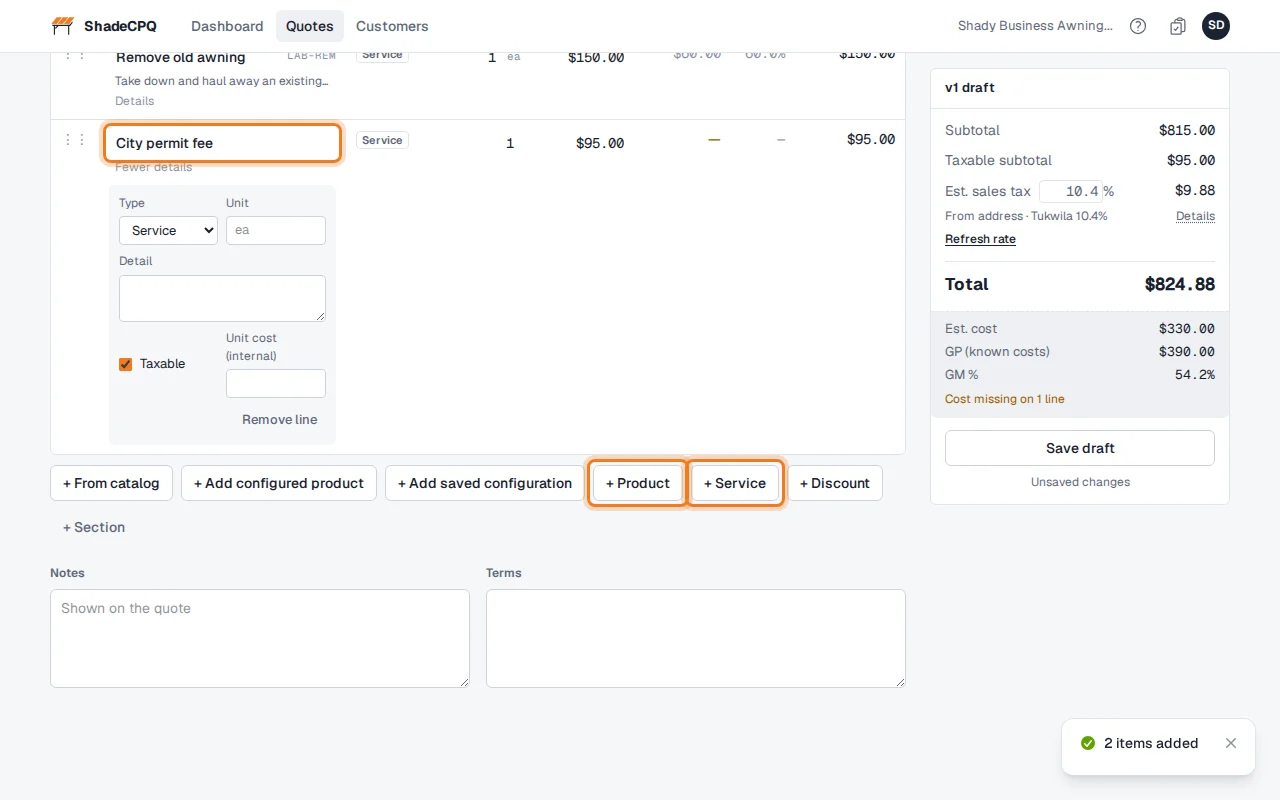
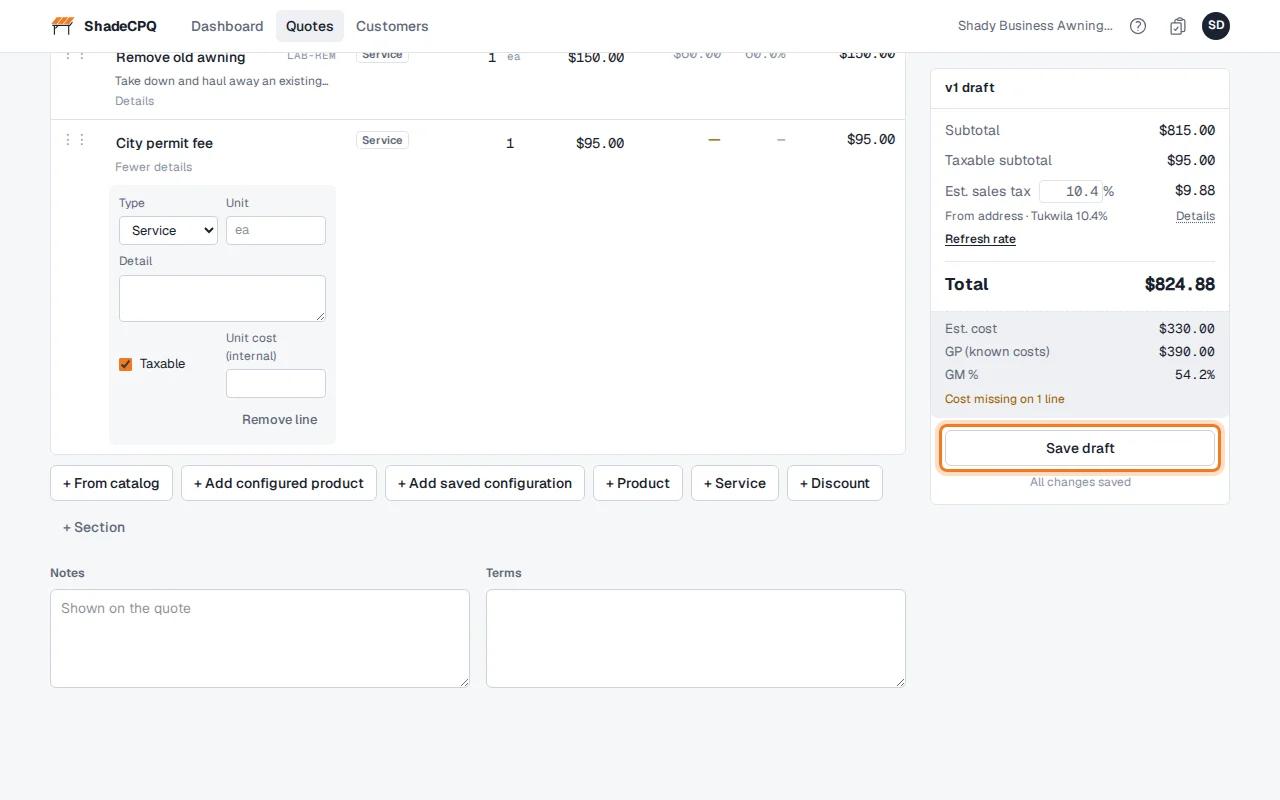
Your changes save themselves a few seconds after you finish typing. Save draft saves right away.
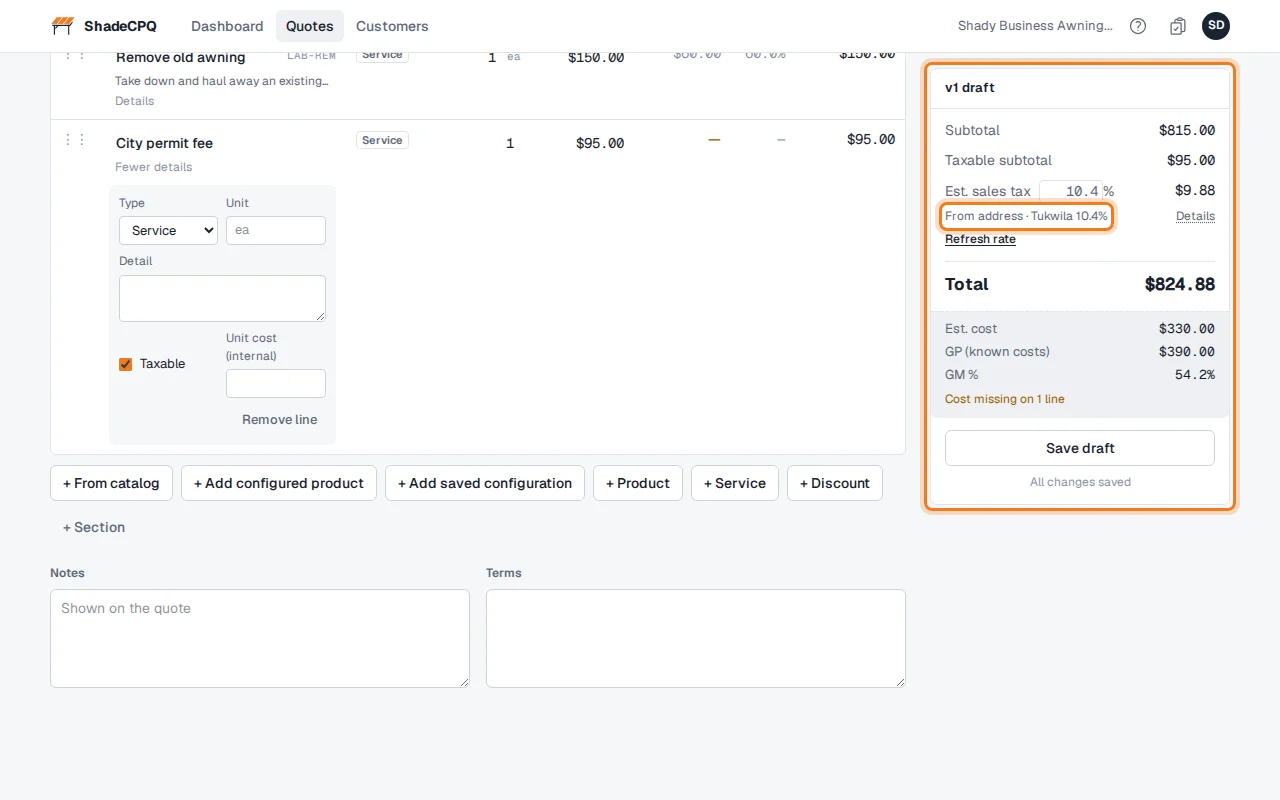
The totals show the subtotal, the estimated sales tax and the Total. The tax rate is looked up for the job site's address: here it says From address · Tukwila 10.4%, which is why it isn't your shop's default rate. If you can see costs, you also see your cost, gross profit and GM %.
Good to know
- You can also start from New quote on the Dashboard or the Quotes page and pick the customer there.
- + Section groups lines under a heading (Courtyard, Front entry) on the quote your customer sees.
- You can type a different tax rate on the quote; Refresh rate looks it up again for the job site.
- Costs and margin are never shown to customers. Click Hide costs before showing your screen to a customer.
Next: Measuring and entering a fixed-frame awning
Measuring and entering a fixed-frame awning
Open the configurator from a quote and enter the awning's size.
Who can do this: Admins and Sales reps.
A fixed-frame awning slopes down from the wall to a front face called the truss. You enter up to five
measurements, all in inches:
| Measurement | What it is |
|---|
| Width | Side to side, along the wall. |
| Projection | How far the awning sticks out from the wall. |
| Wall height | The height of the frame where it meets the wall, from its bottom bar to its top bar. |
| Truss | The height of the front face. The top of the awning slopes from the wall height down to the truss. |
| Mount height | Optional: how high the top of the awning sits on the wall, from the floor. It shows on the drawings and the quote. |
The side-view drawing under the 3D view labels each one, so you can check you have them the right way round.
Open the configurator from the quote
On the draft quote, click + Add configured product.
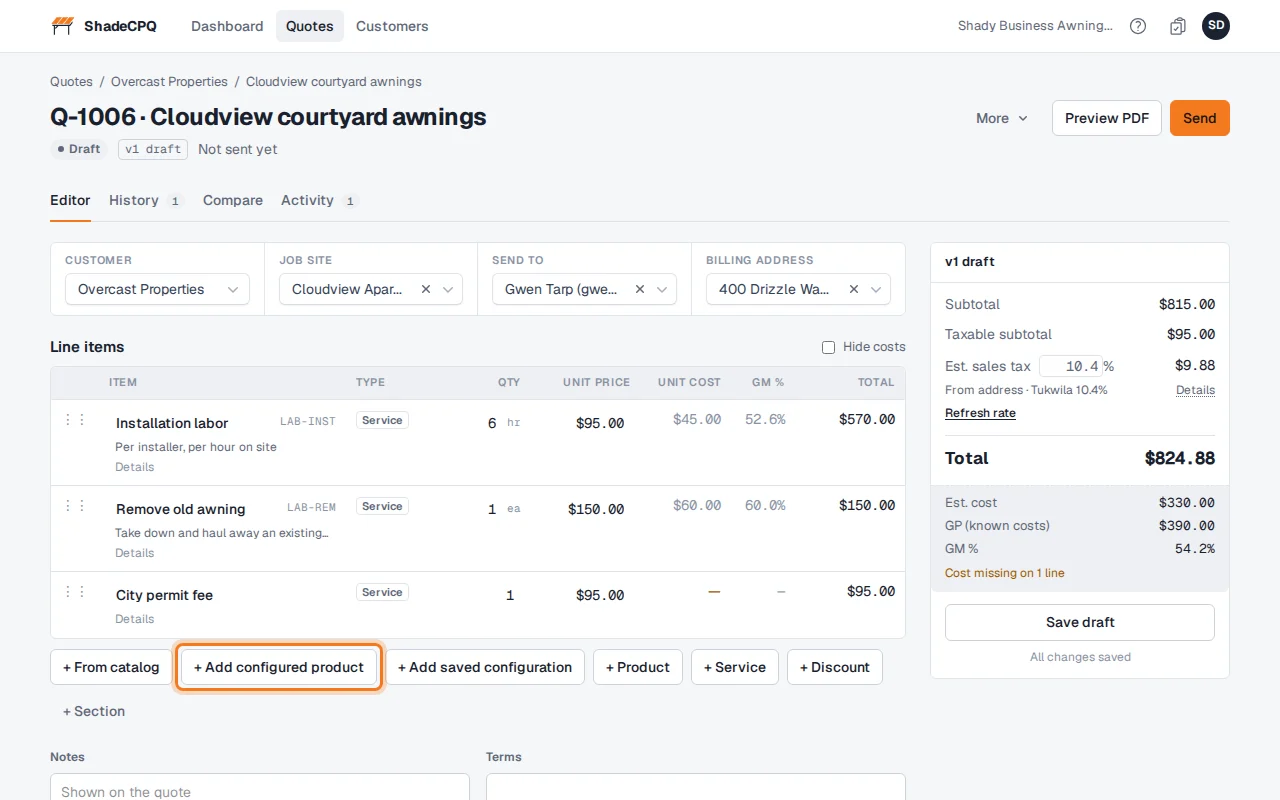
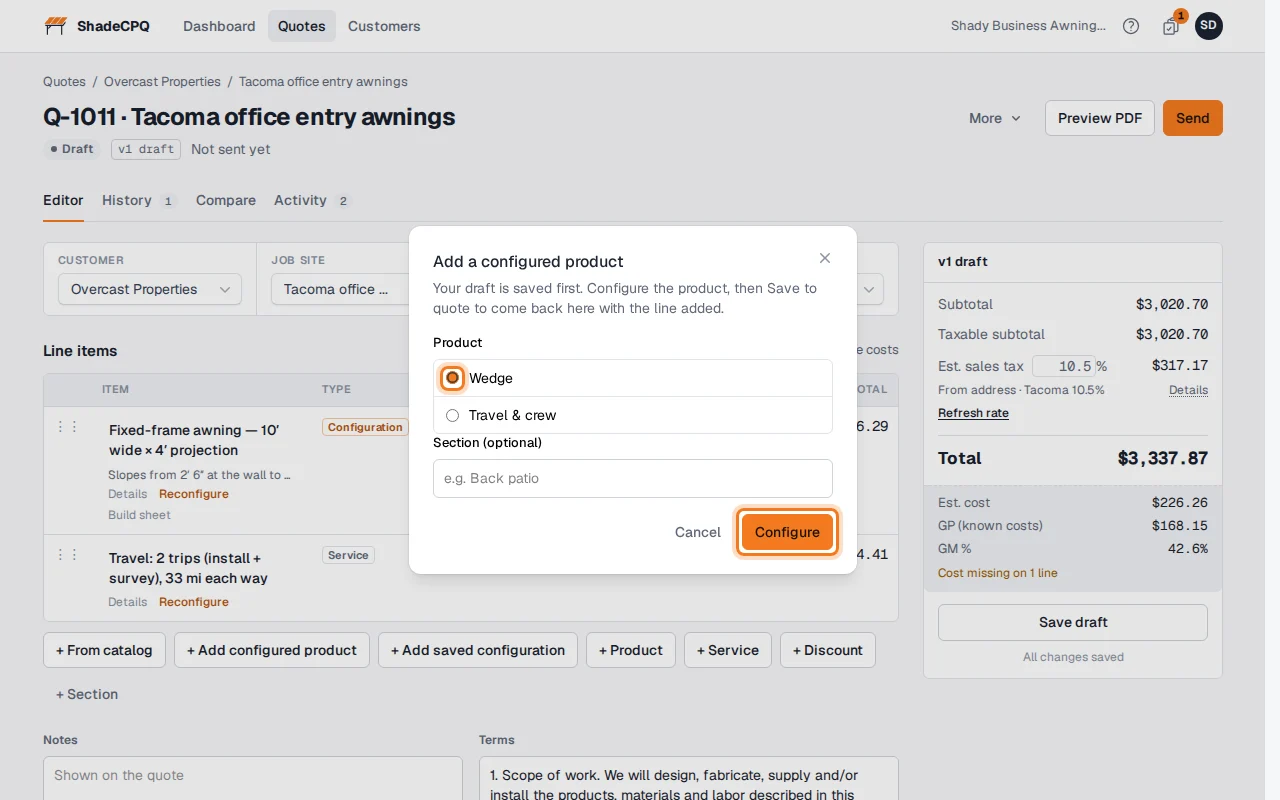
Pick Wedge, your fixed-frame awning (it's already picked if it's your only configurator), and click Configure.
The configurator opens. The bar at the top shows which quote you're adding to. Back to quote leaves without adding anything.
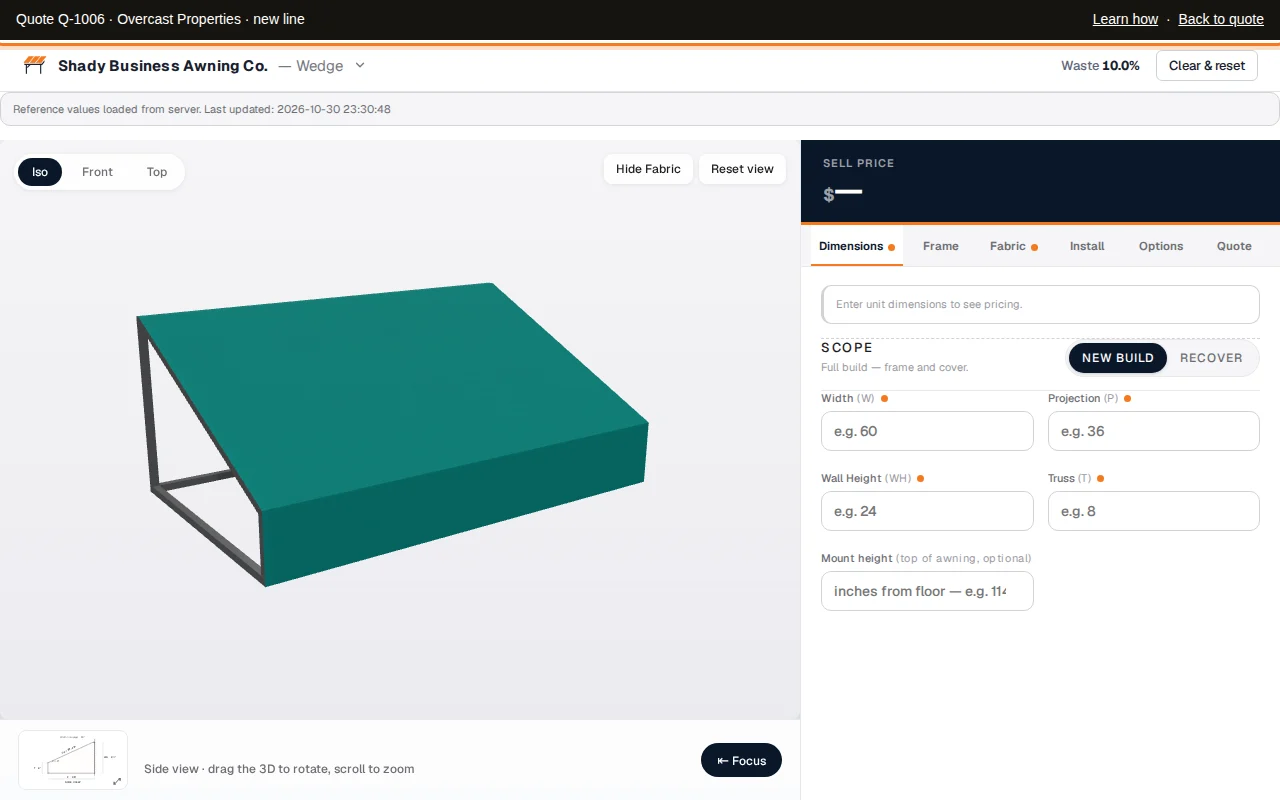
Enter the size
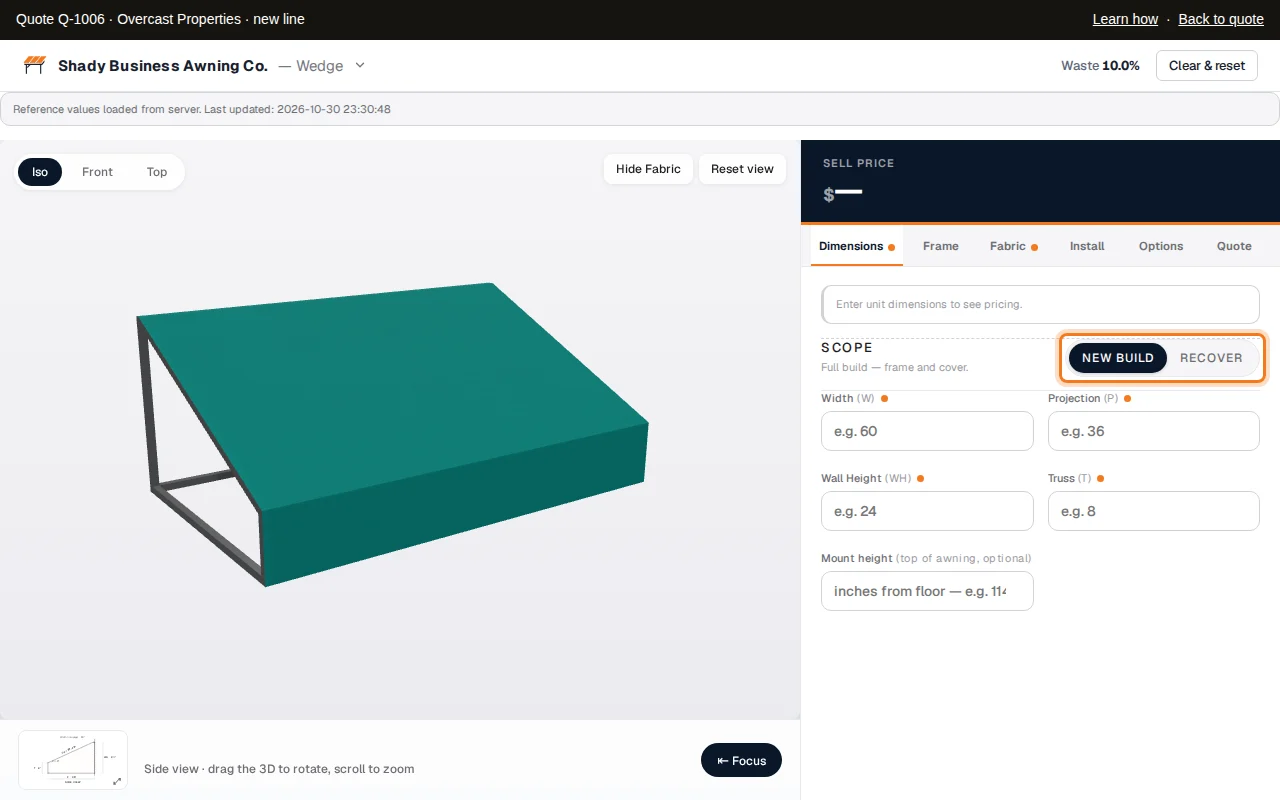
Under Scope, leave New build for a new awning. Choose Recover for a new cover on the customer's existing frame: the frame isn't charged, but you still enter its size so the cover fits.
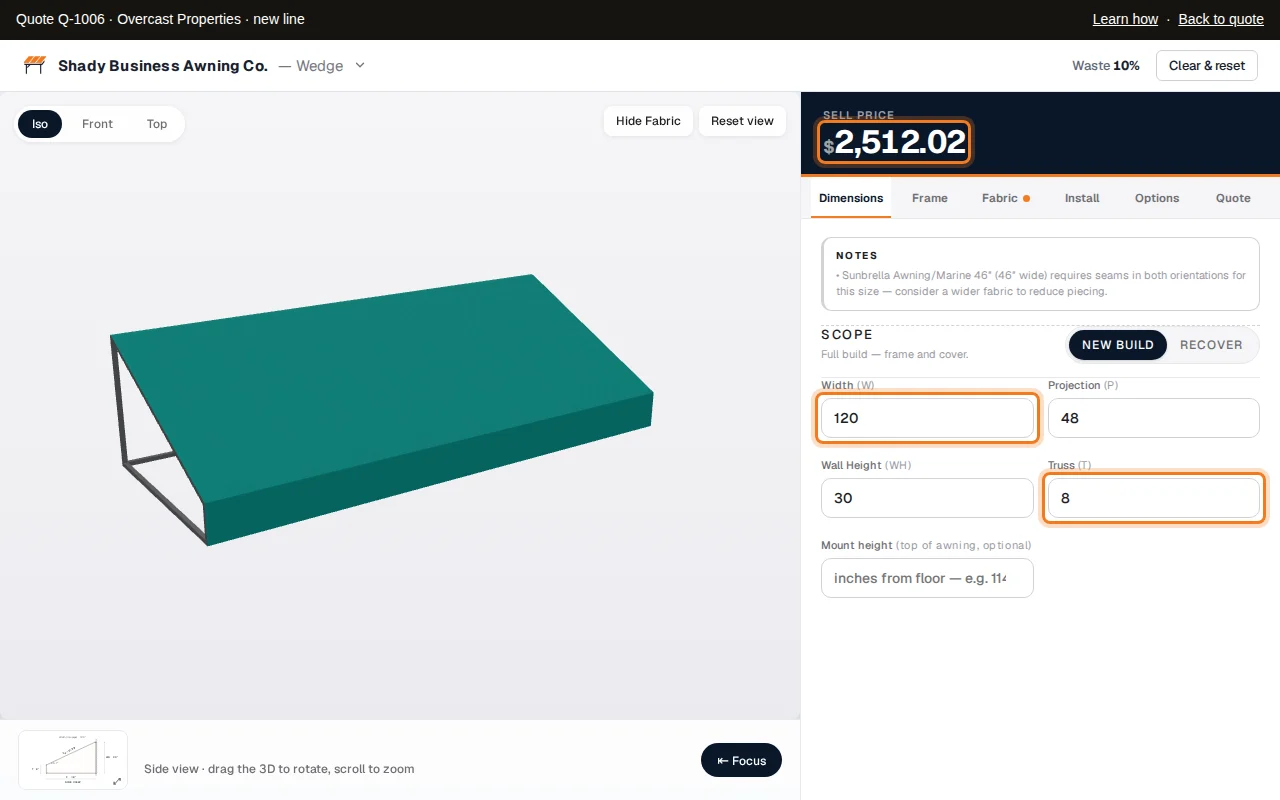
Type the Width (120), Projection (48), Wall Height (30) and Truss (8). The price appears at the top as soon as all four are filled.
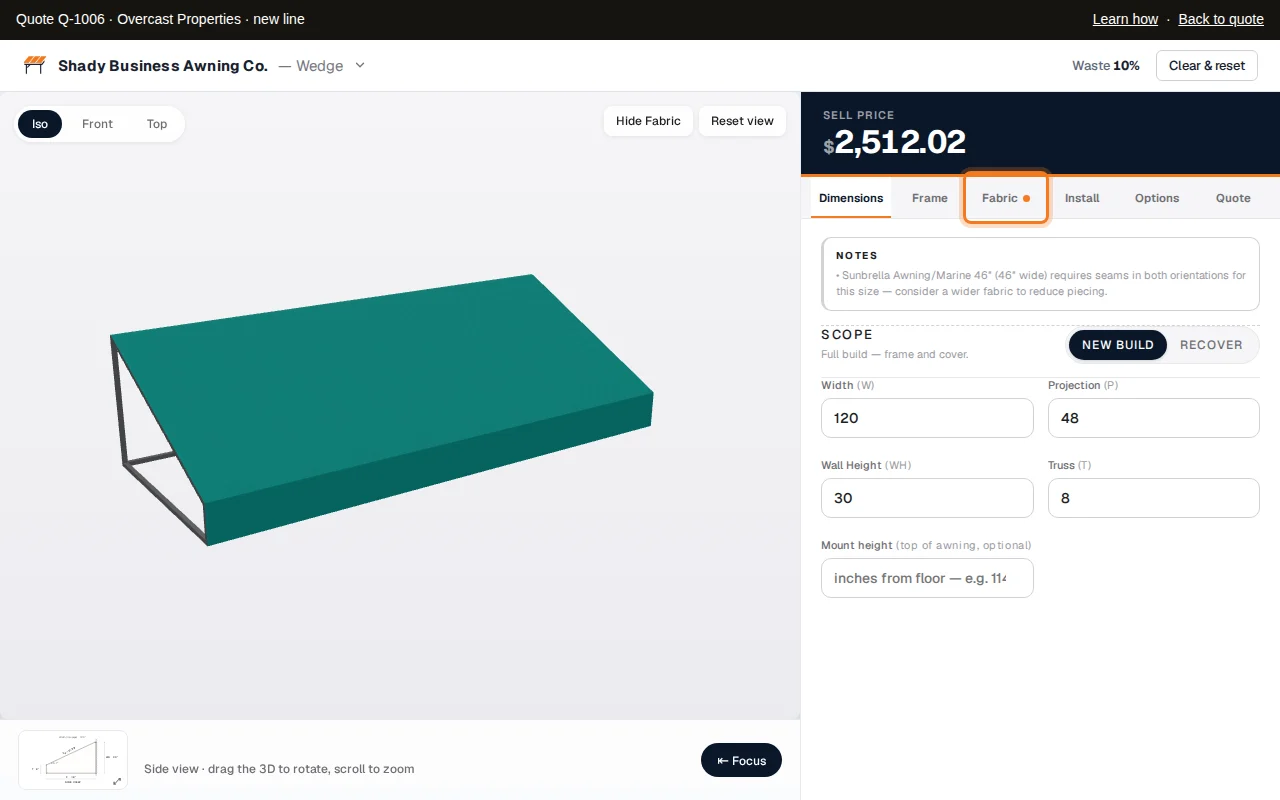
An orange dot marks anything still missing, on the field and on its tab. Finish them before you save.
Optional: type the Mount height, how high the top of the awning sits on the wall (114). The side view then shows it standing on the floor.
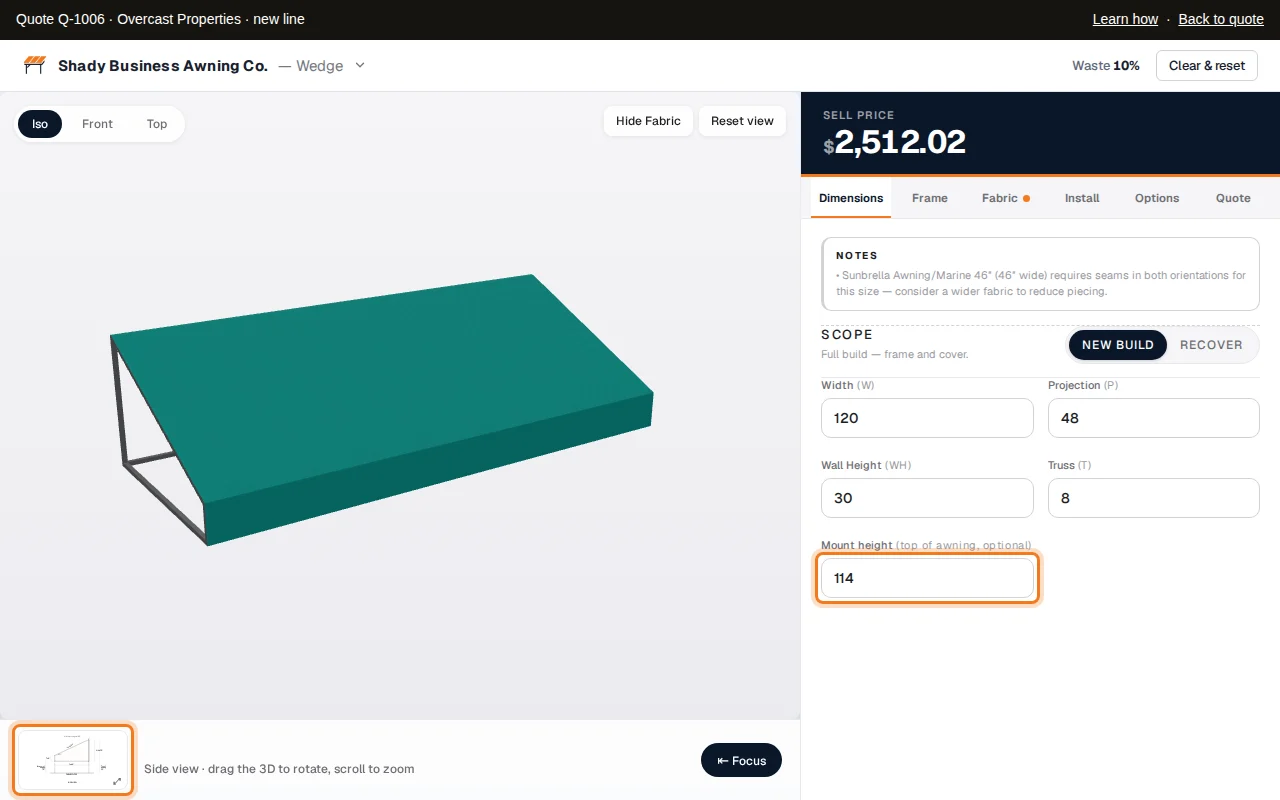
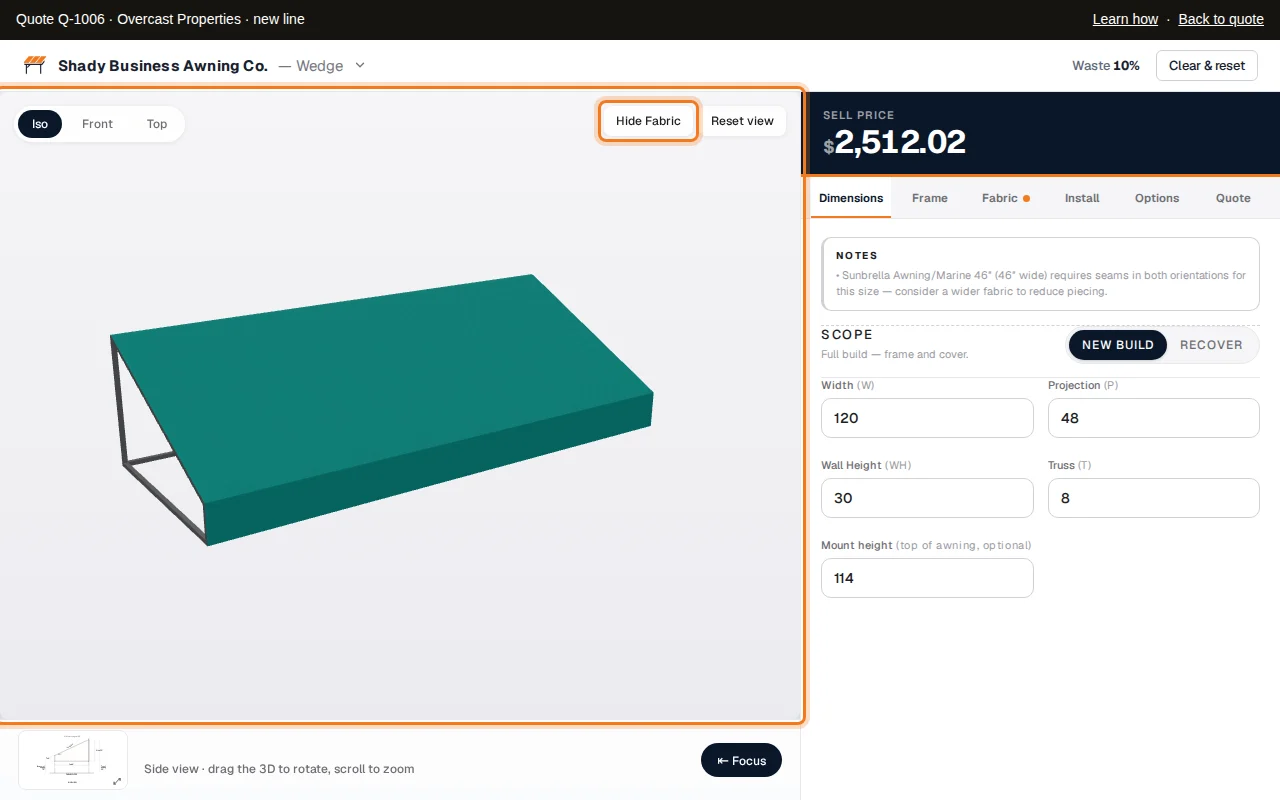
Check the drawing. Drag the 3D view to turn it, and use Iso, Front and Top for set views. Hide Fabric shows the bare frame; Reset view puts it back.
Good to know
- All sizes are in inches. 10 feet is 120.
- If the projection is more than twice the wall height, the configurator warns you: the slope is steeper than most shops build.
Next: Frame, fabric, install and options
Frame, fabric, install and options
Choose the frame, fabric and install details, check the price, and add the awning to the quote.
Who can do this: Admins and Sales reps.
After the size, the tabs along the top of the configurator set everything else. Most jobs only need the
Fabric tab; the Frame defaults suit most awnings.
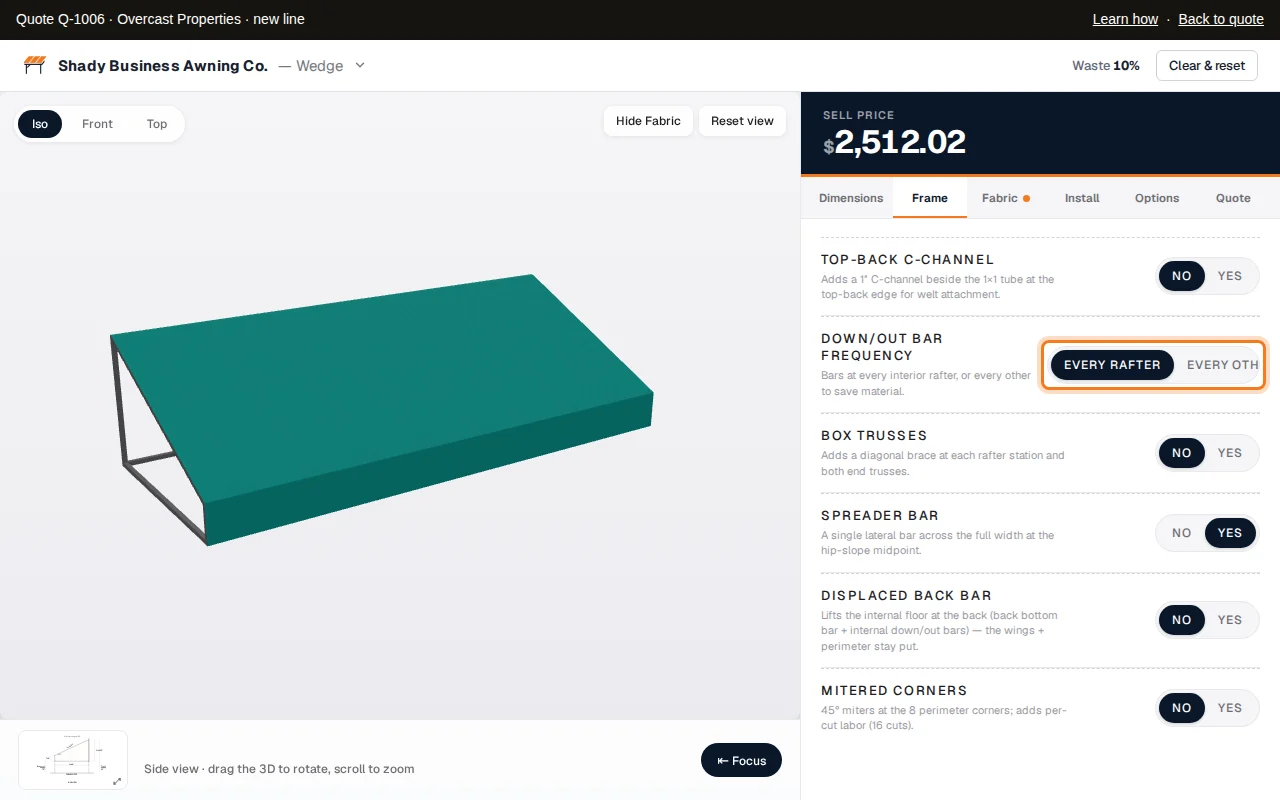
The Frame tab sets how the frame is built: Down/Out Bar Frequency (bars at every rafter, or every other one to save tube), Box Trusses, a Spreader Bar across the middle, Mitered Corners and a Top-Back C-Channel. Each choice says what it adds. The rafters are set for you from the width.
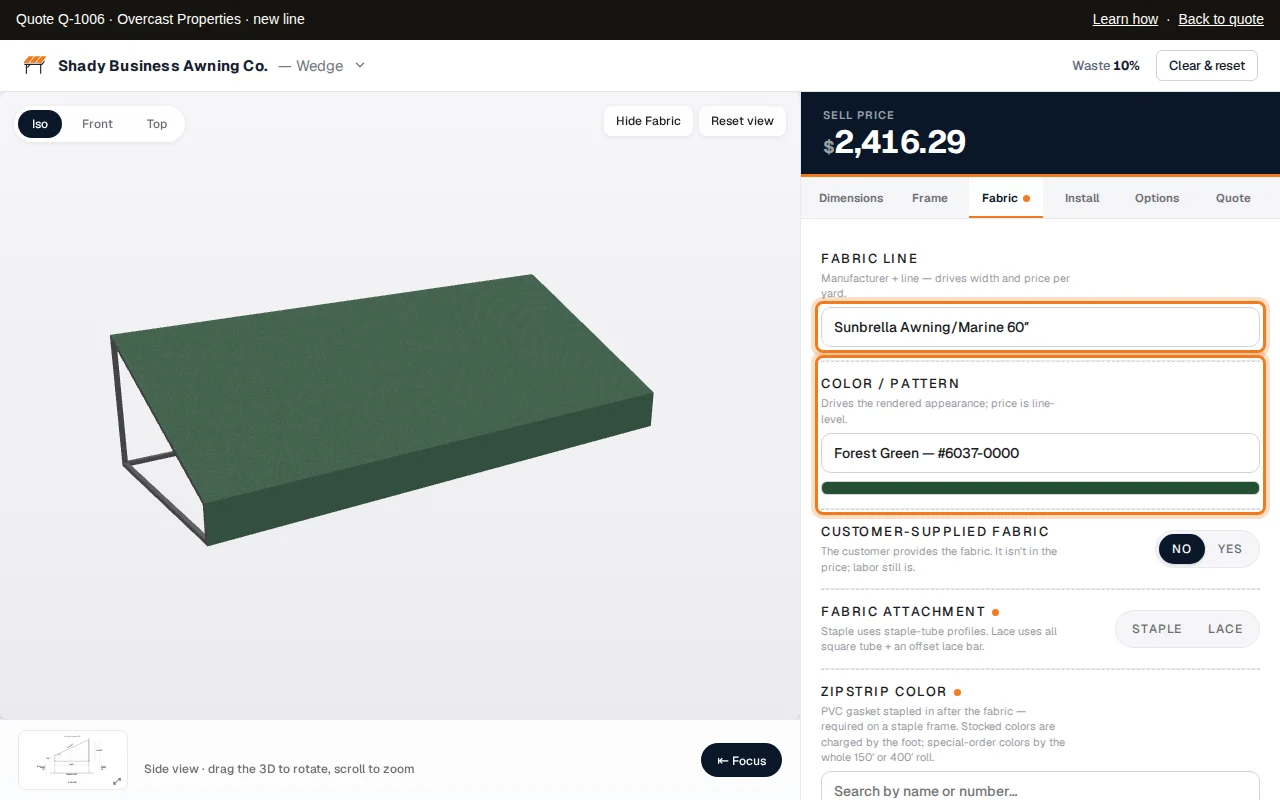
On the Fabric tab, choose the Fabric Line (Sunbrella Awning/Marine 60″) and the Color / Pattern. You can type a color name or number to find it. If the customer supplies their own fabric, switch on Customer-Supplied Fabric: the fabric isn't charged, but the sewing still is.
Under Fabric Attachment, choose Staple (stapled into the frame) or Lace (laced to a bar under the frame).
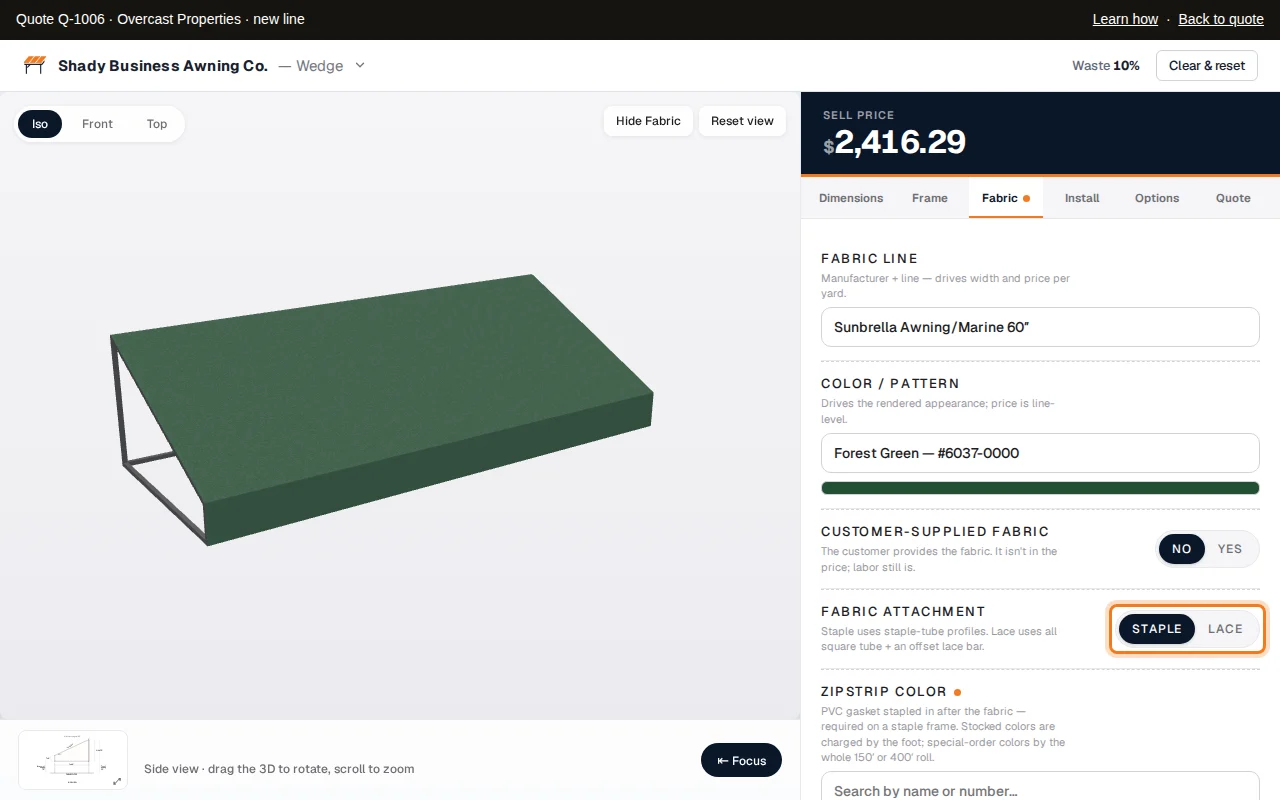
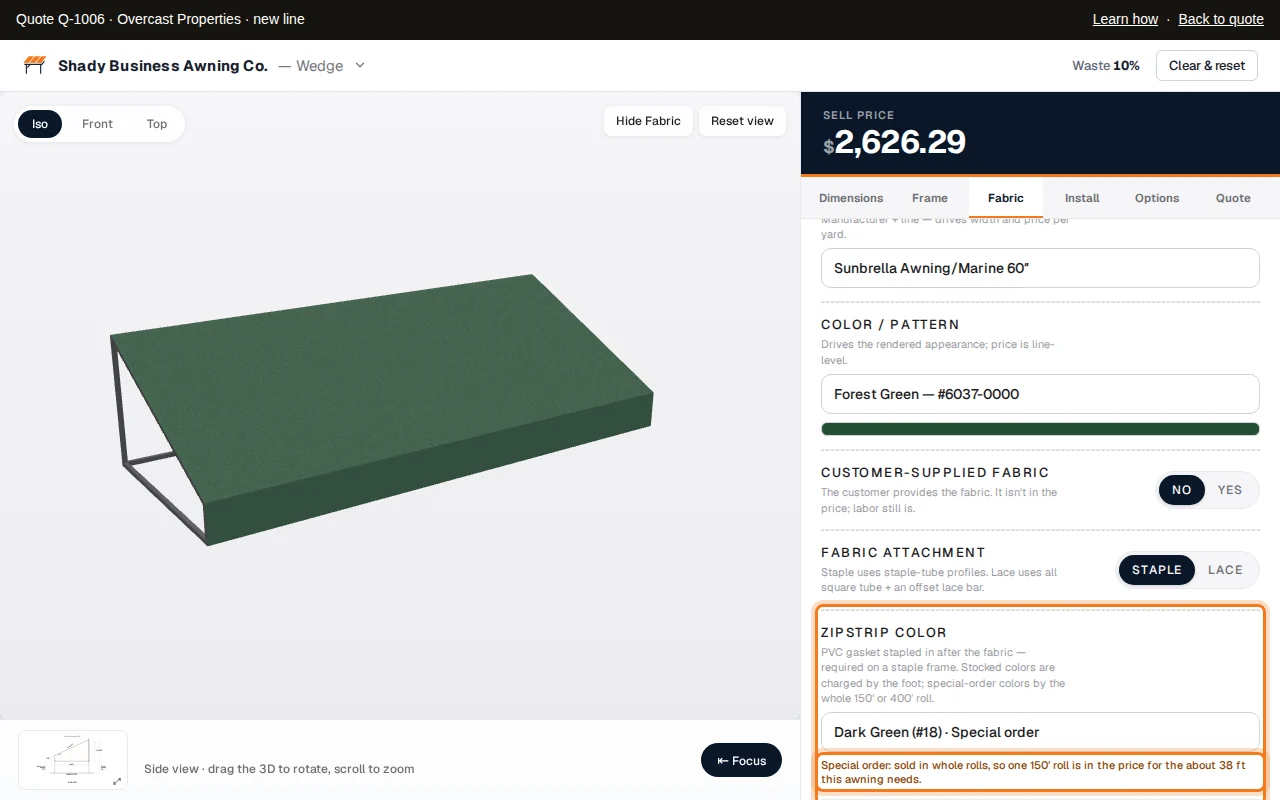
A stapled awning needs a ZipStrip Color. Each color says Stocked (charged by the foot) or Special order (charged by the whole roll), and the note under it says how this awning is charged. A special-order color that only comes in 400′ rolls puts a whole 400′ roll in the price, so check whether a 150′ color will do. On a quote, awnings in the same special-order color share their roll.
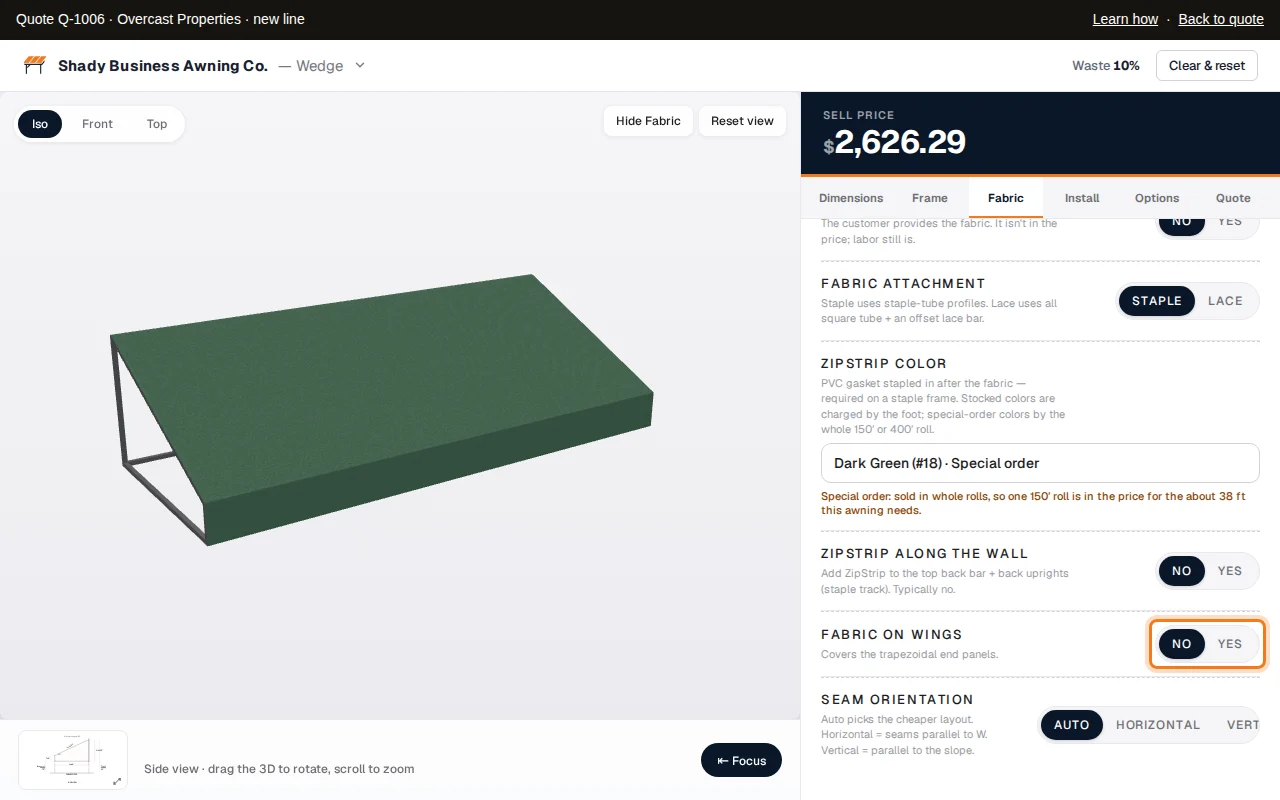
Fabric on Wings covers the triangular sides. Leave it off for open sides.
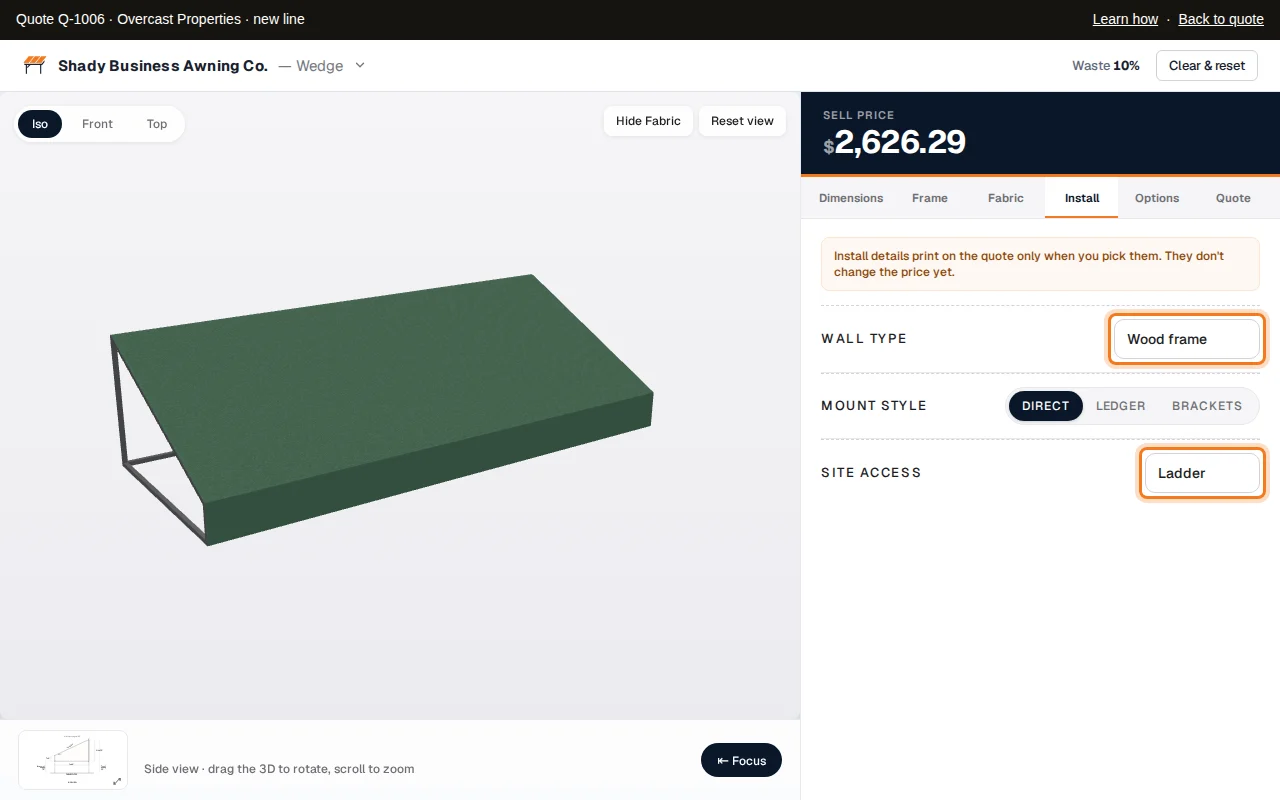
On the Install tab, set the Wall type, Mount style and Site access when you know them. They start as Not specified. Whatever you choose prints on your customer's quote ("Mounted on a brick wall with brackets"), so only pick what's right.
The Options tab is kept for add-ons your shop sets up; most shops leave it empty. On the Quote tab, tick Show internal pricing to see the cost breakdown: frame, cover (fabric, ZipStrip and sewing), prep and margin. Customers never see it.
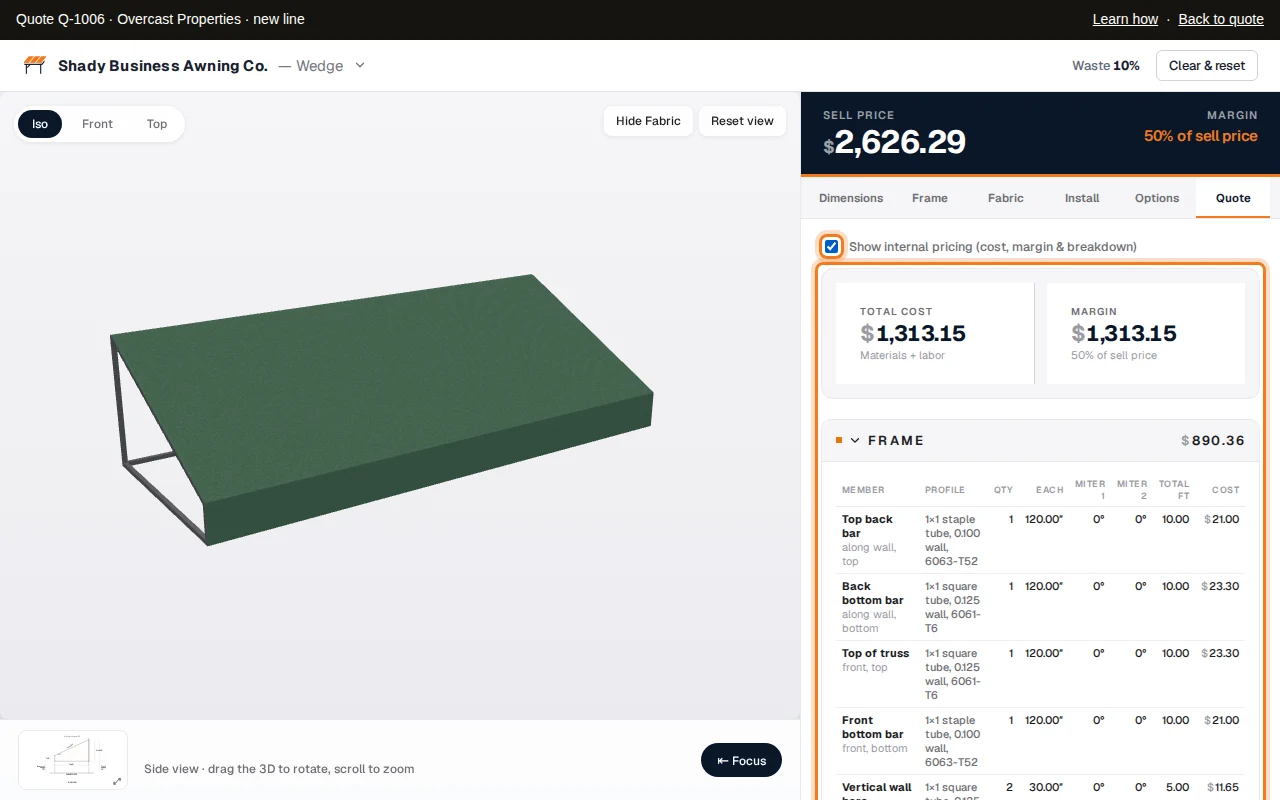
Check the price at the top and click Save to quote.
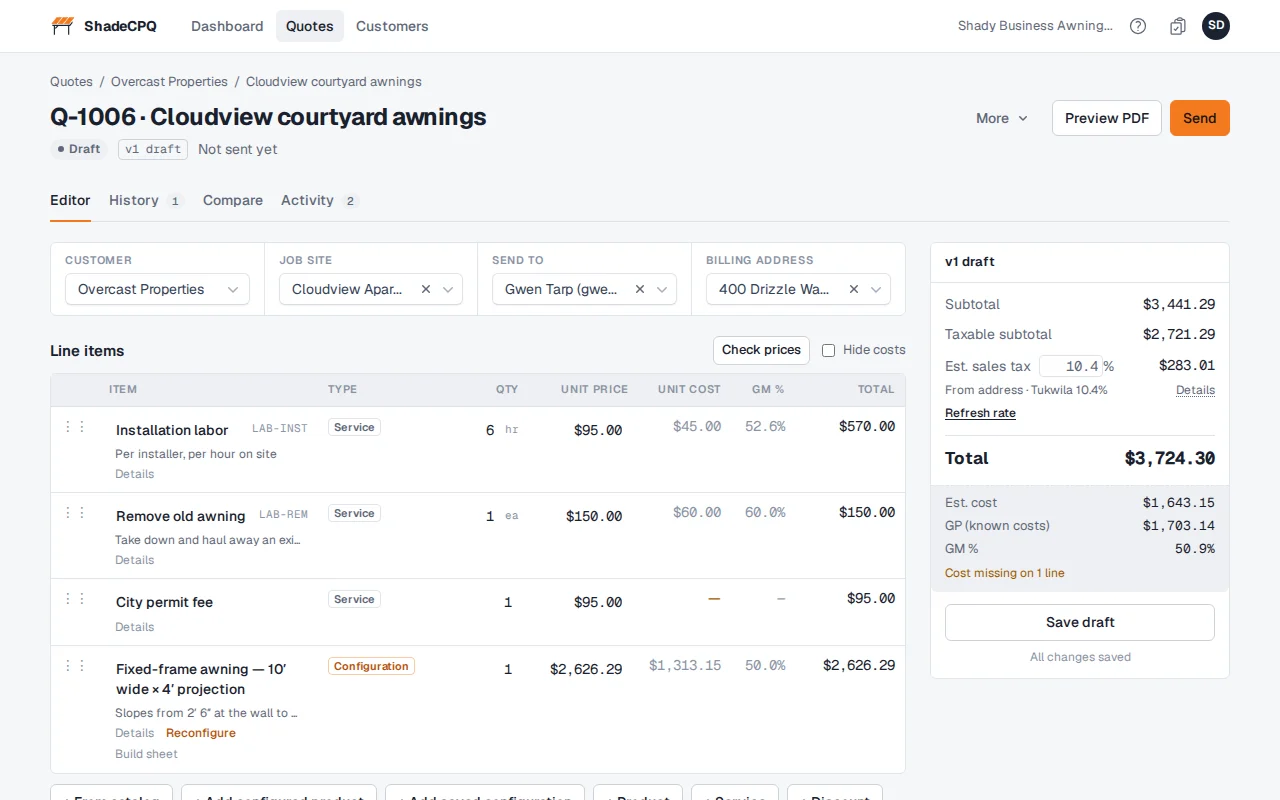
You're back on the quote. The awning is a new line tagged Configuration, described the way your customer will read it, with a drawing.
Good to know
- To change the awning later, click Reconfigure on its line. The line is updated in place.
- Prices on a quote don't move by themselves. On a draft, Check prices shows whether an awning would price differently with today's rates, and lets you update it.
- Awnings on the same quote in the same special-order ZipStrip color share one roll, so adding or removing one changes the others' prices. The line says so, for example "Special-order roll shared with line 3: this line carries 37.5 of 75 ft". A price you typed yourself is never changed; if the share changes its cost, the line says "Roll share changed: cost is now $X. Check your price." Customers only see the price.
- Build sheet on the line opens the shop's copy: see Build sheets.
Next: Travel and crew time
Travel and crew time
Add drive time and mileage to a quote as one line, priced from your shop's travel rates.
Who can do this: Admins set the rates. Admins and Sales reps add travel to quotes.
Travel is one line on the quote that covers getting your crew to the job and back: crew time for
everyone who goes and mileage for each vehicle. ShadeCPQ looks up the driving distance from your shop to
the job site and prices each trip from your rates.
Your customer sees only the trips and the miles, for example "Travel: 2 trips (install + removal/take-down),
35 mi each way", and the price. Crew size, vehicles and your rates are for your team only.
Set your travel rates
Click Settings, then Travel & crew.
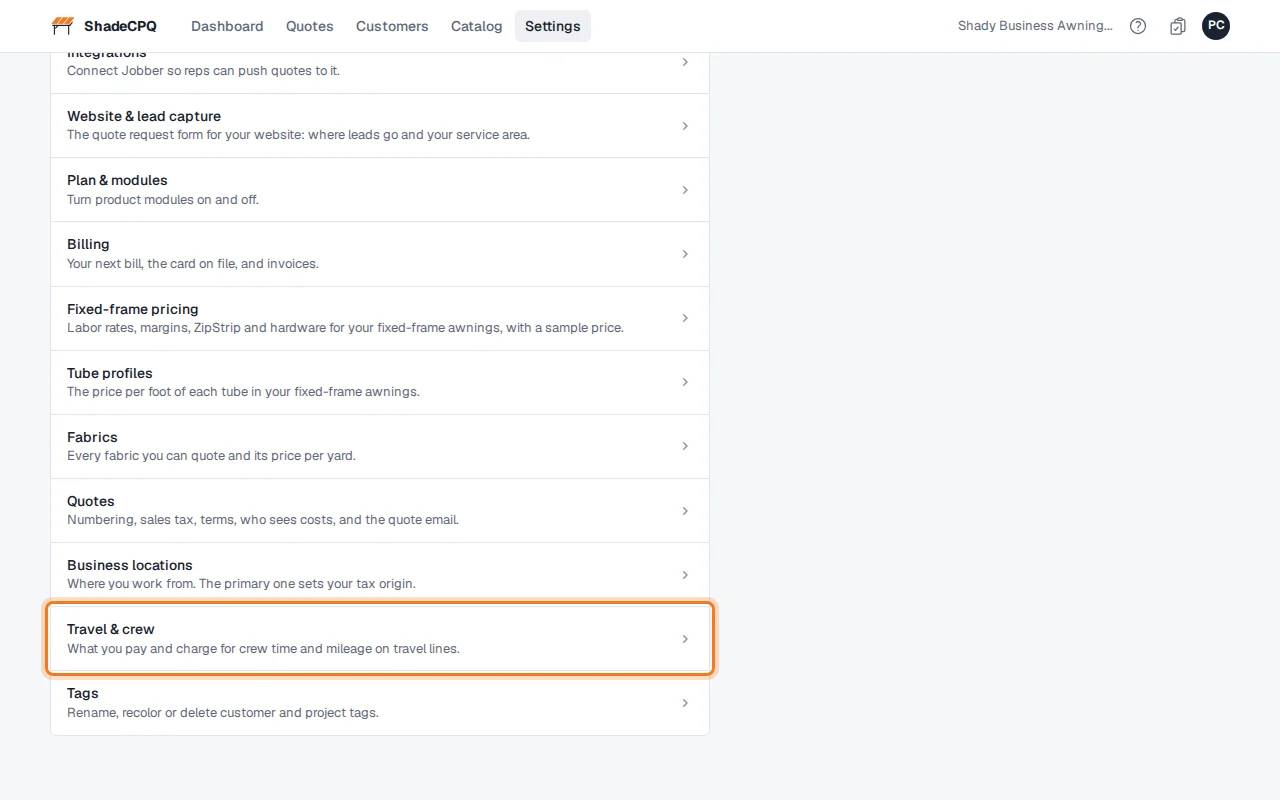
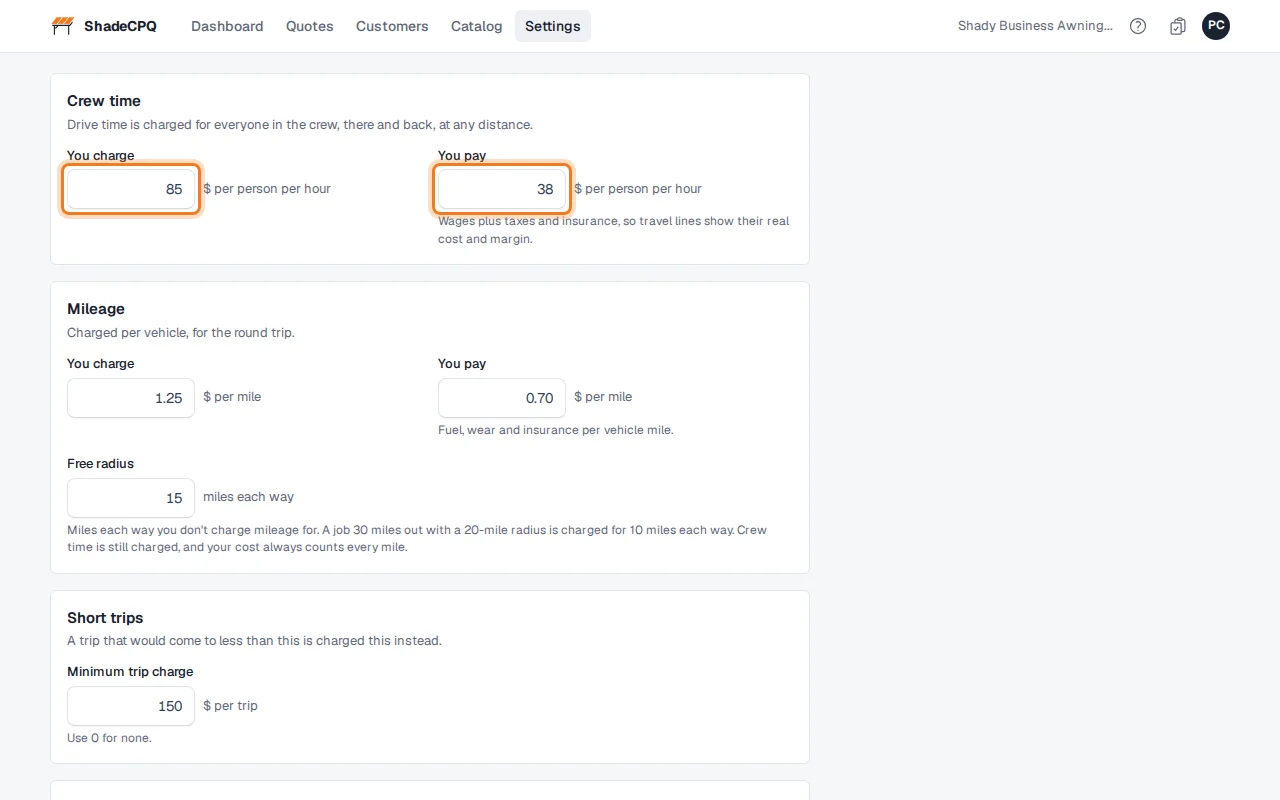
Under Crew time, type what you charge per person per hour ($85) and what each hour costs you with wages, taxes and insurance ($35). Crew time is charged for everyone, there and back, at any distance.
Under Mileage, type what you charge per mile ($1.25) and what a mile costs you ($0.70), per vehicle, for the round trip. Free radius is how many miles each way you don't charge mileage for: a job 30 miles out with a 20-mile radius is charged for 10 miles each way. Your cost always counts every mile.
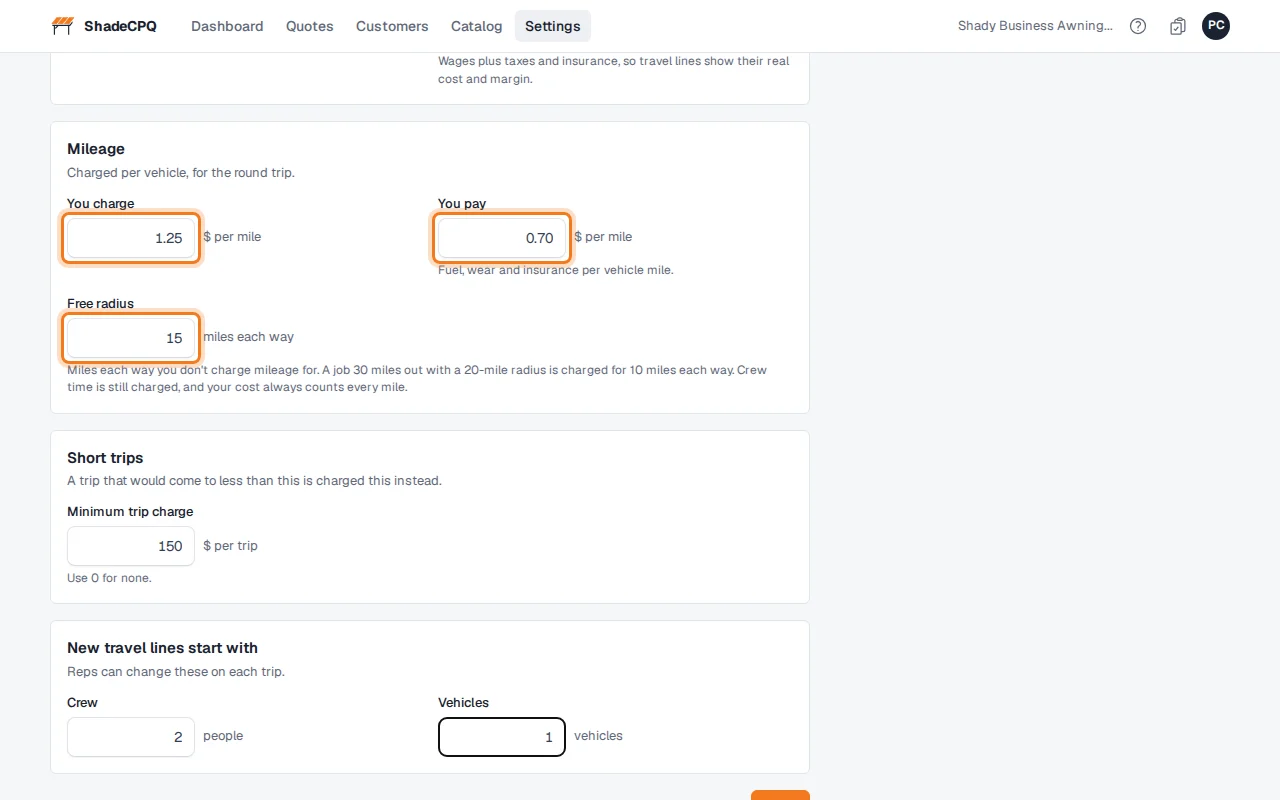
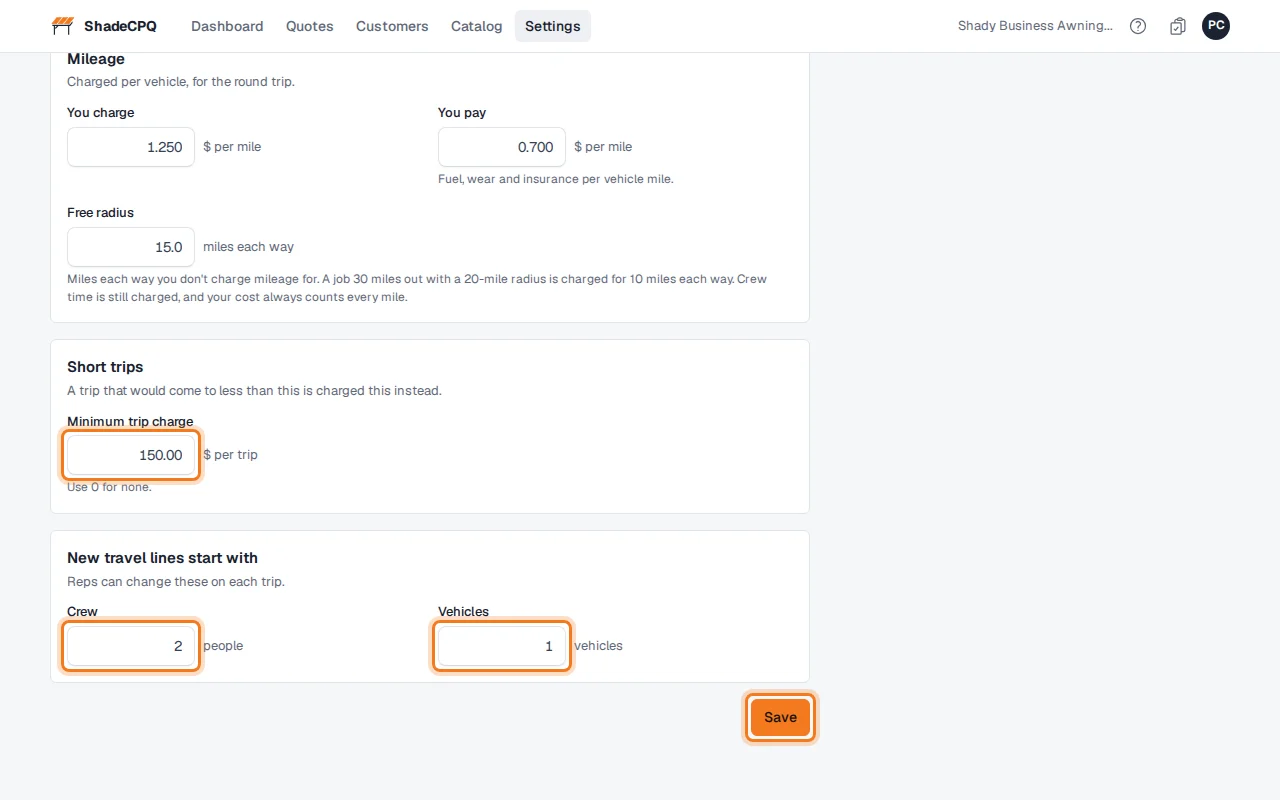
Minimum trip charge is the least a trip is charged ($150). Under New travel lines start with, set the usual crew and vehicles. Click Save. All four rates are needed before anyone can add travel to a quote.
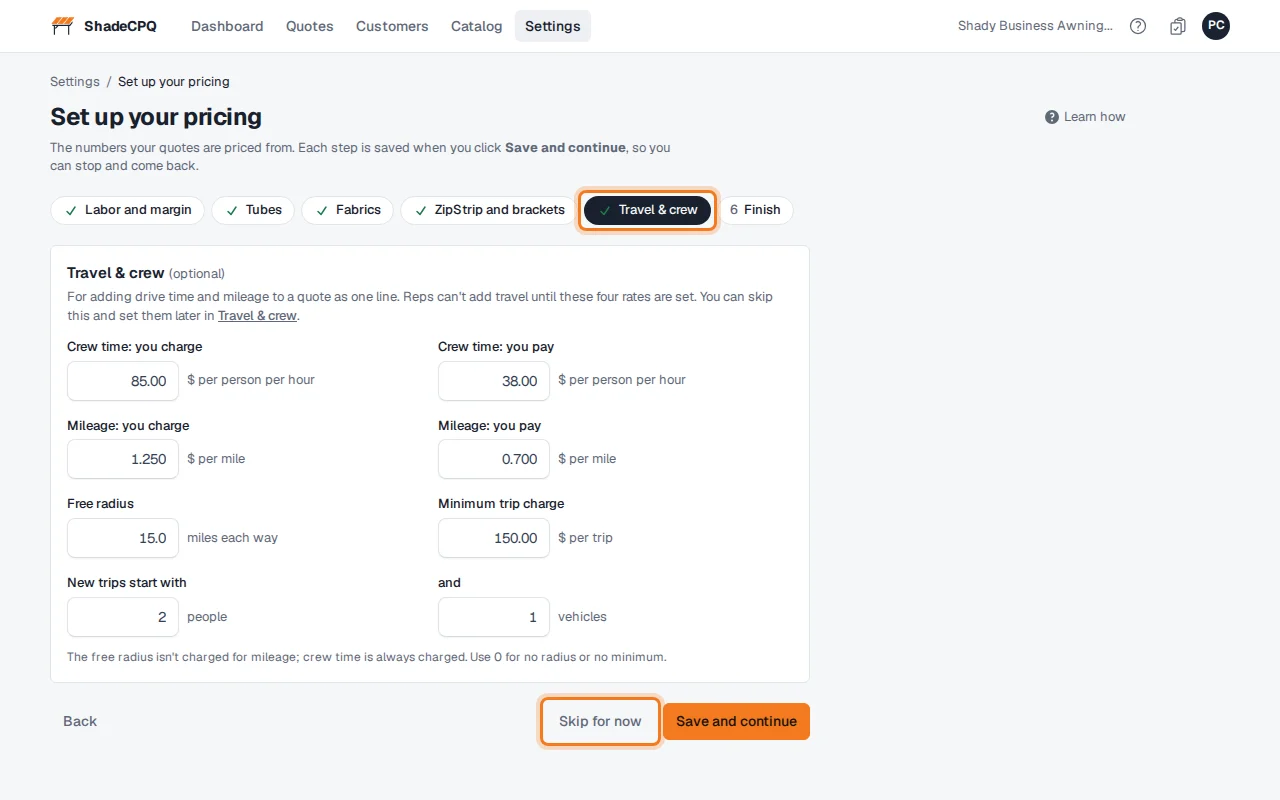
On a new shop, Set up your pricing has an optional Travel & crew step with the same fields. Click Skip for now to set them later.
Add travel to a quote
On a draft quote, click + Add configured product, pick Travel & crew and click Configure.
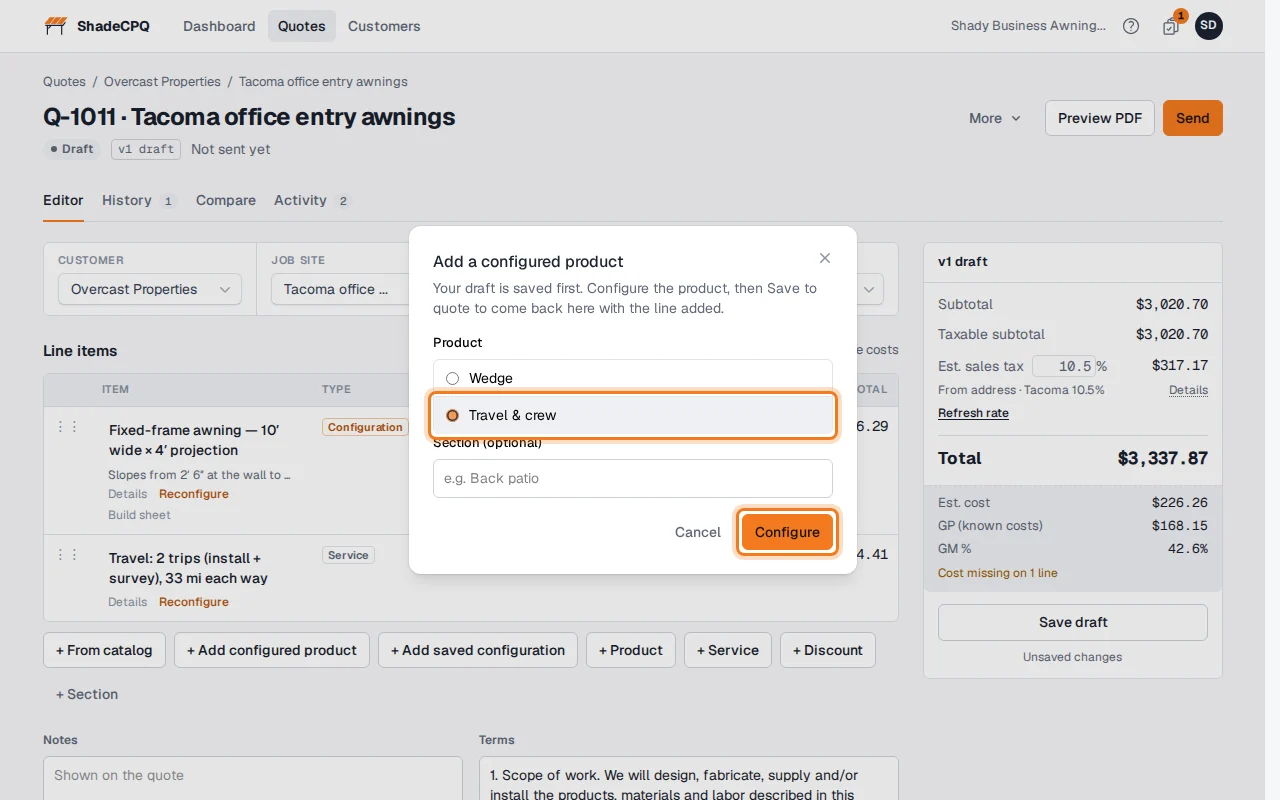
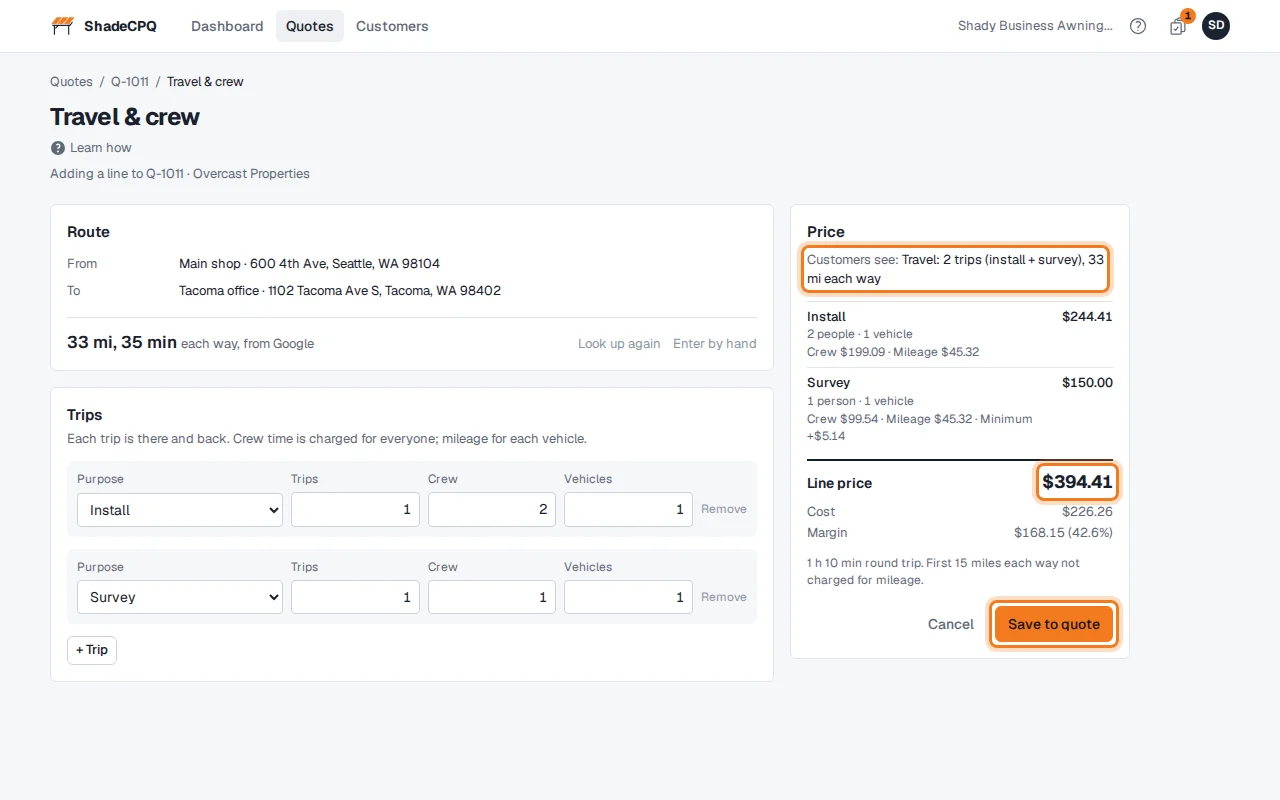
Under Route, check the shop address and the job site. The driving distance and time each way fill in from Google. If you have more than one shop location, pick the one the crew leaves from. If an address is missing a street or ZIP, the page says so and links to where to fix it.
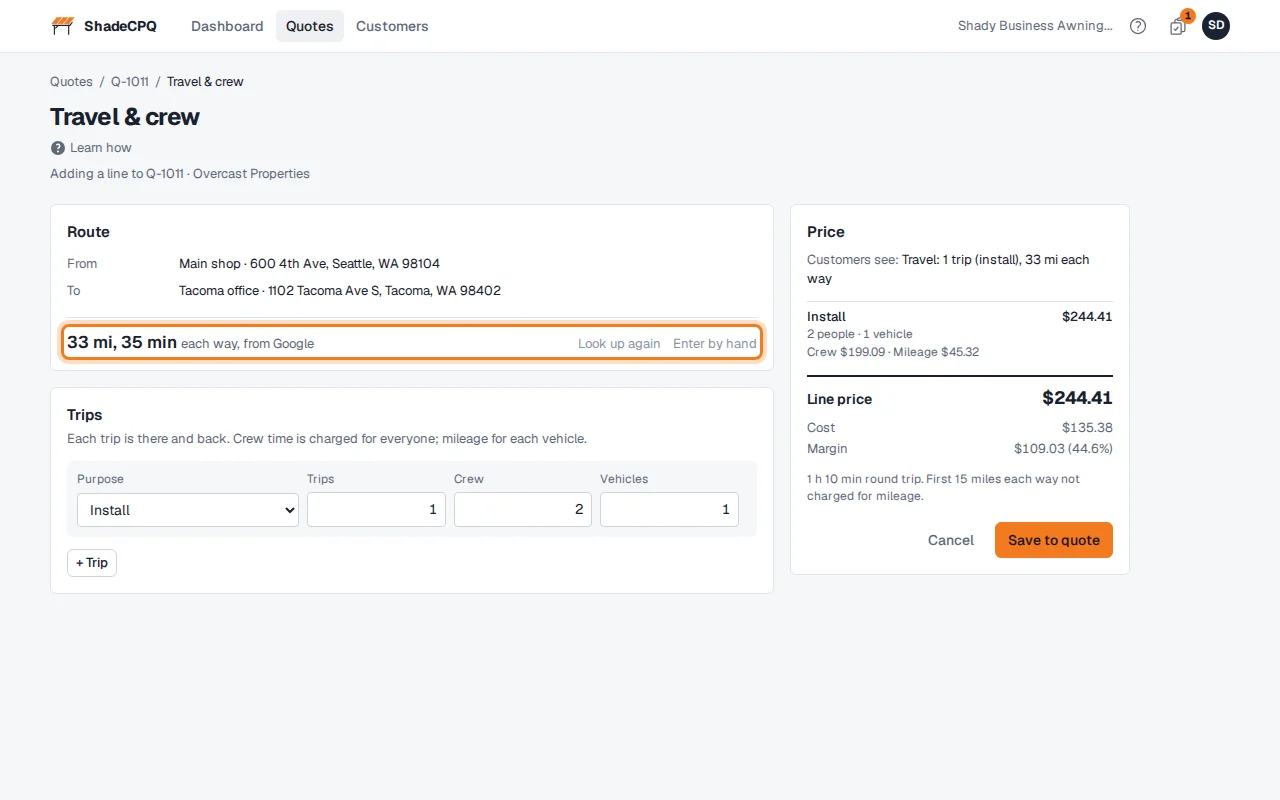
If the distance can't be looked up, or you know it better, click Enter by hand and type the miles and minutes each way. Use Google's distance instead switches back.
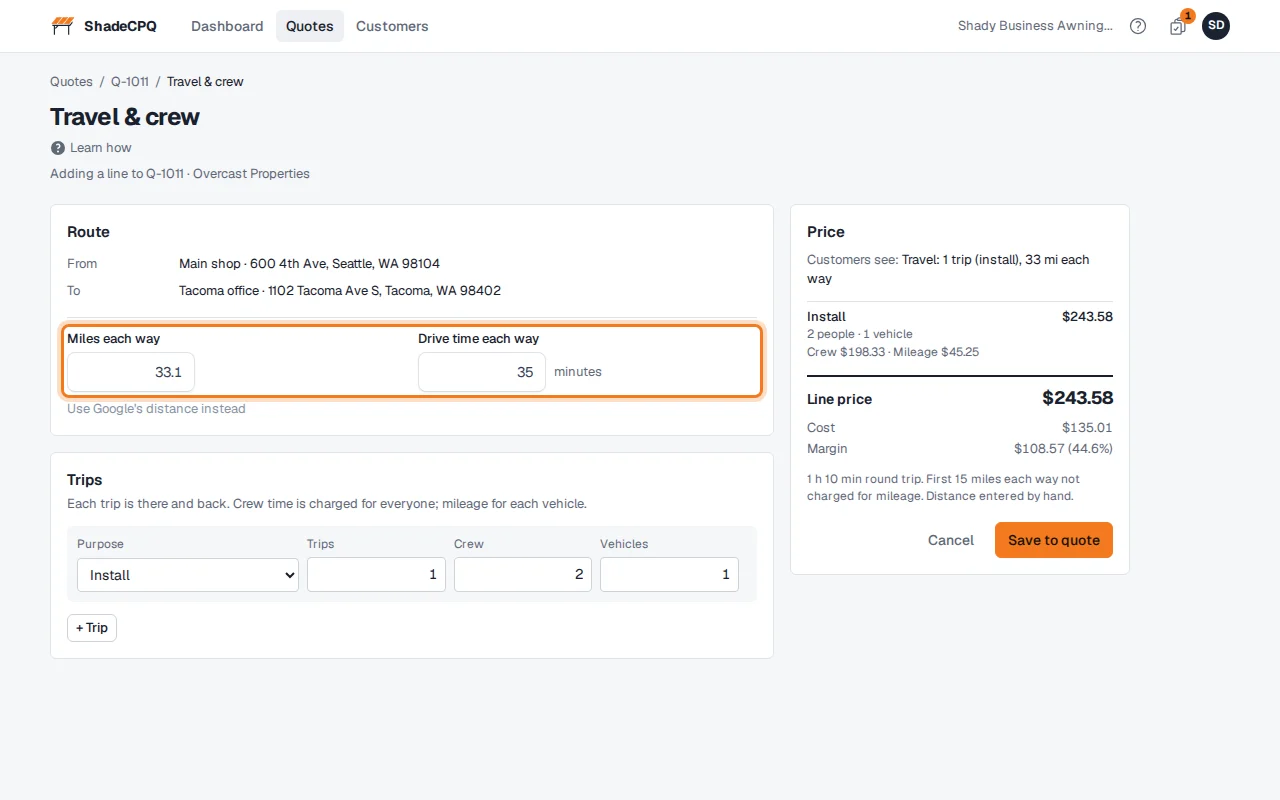
Under Trips, set each trip's purpose, how many times it's made, the crew and the vehicles. A new line starts with one install trip at your usual crew. Click + Trip to add a survey (1 person, 1 vehicle), a removal/take-down or a service visit.
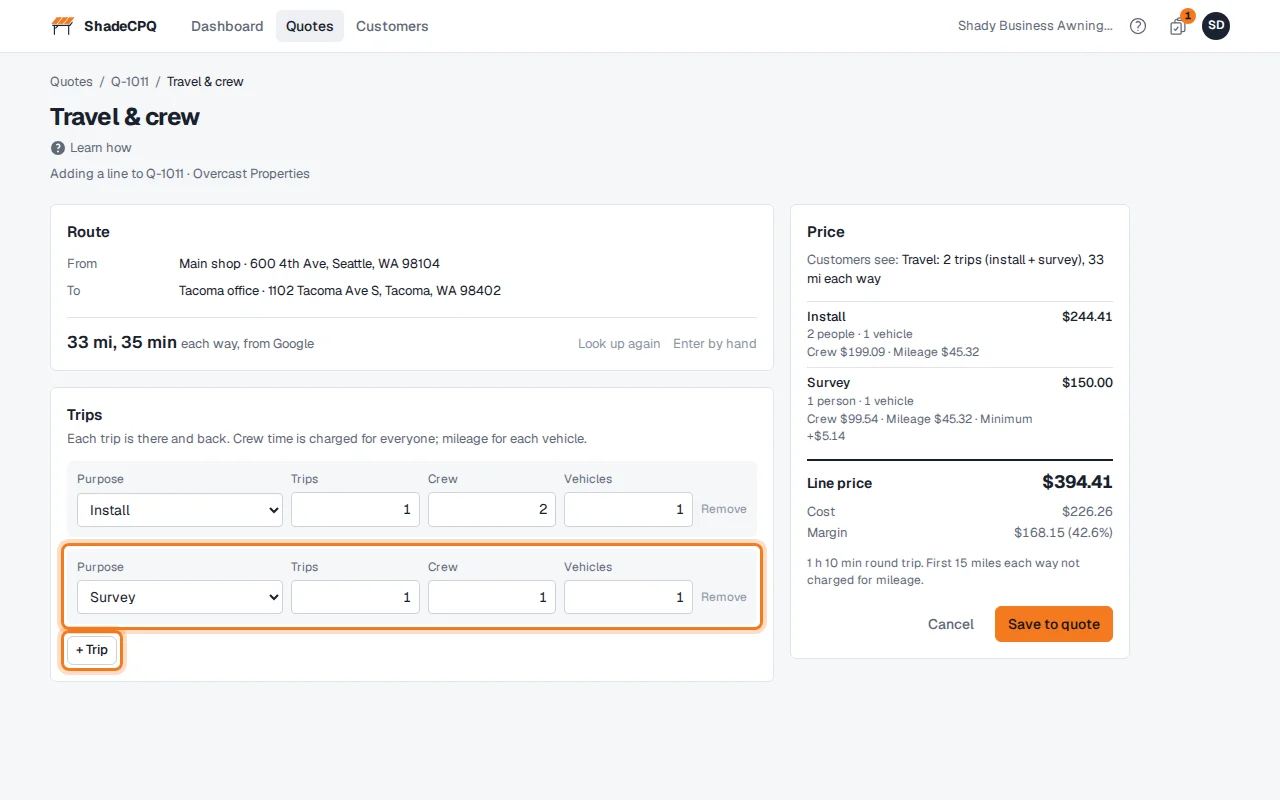
The Price panel shows what your customer will see, each trip's crew and mileage charge, and the line price. If you can see costs, it shows the cost and margin too. Click Save to quote.
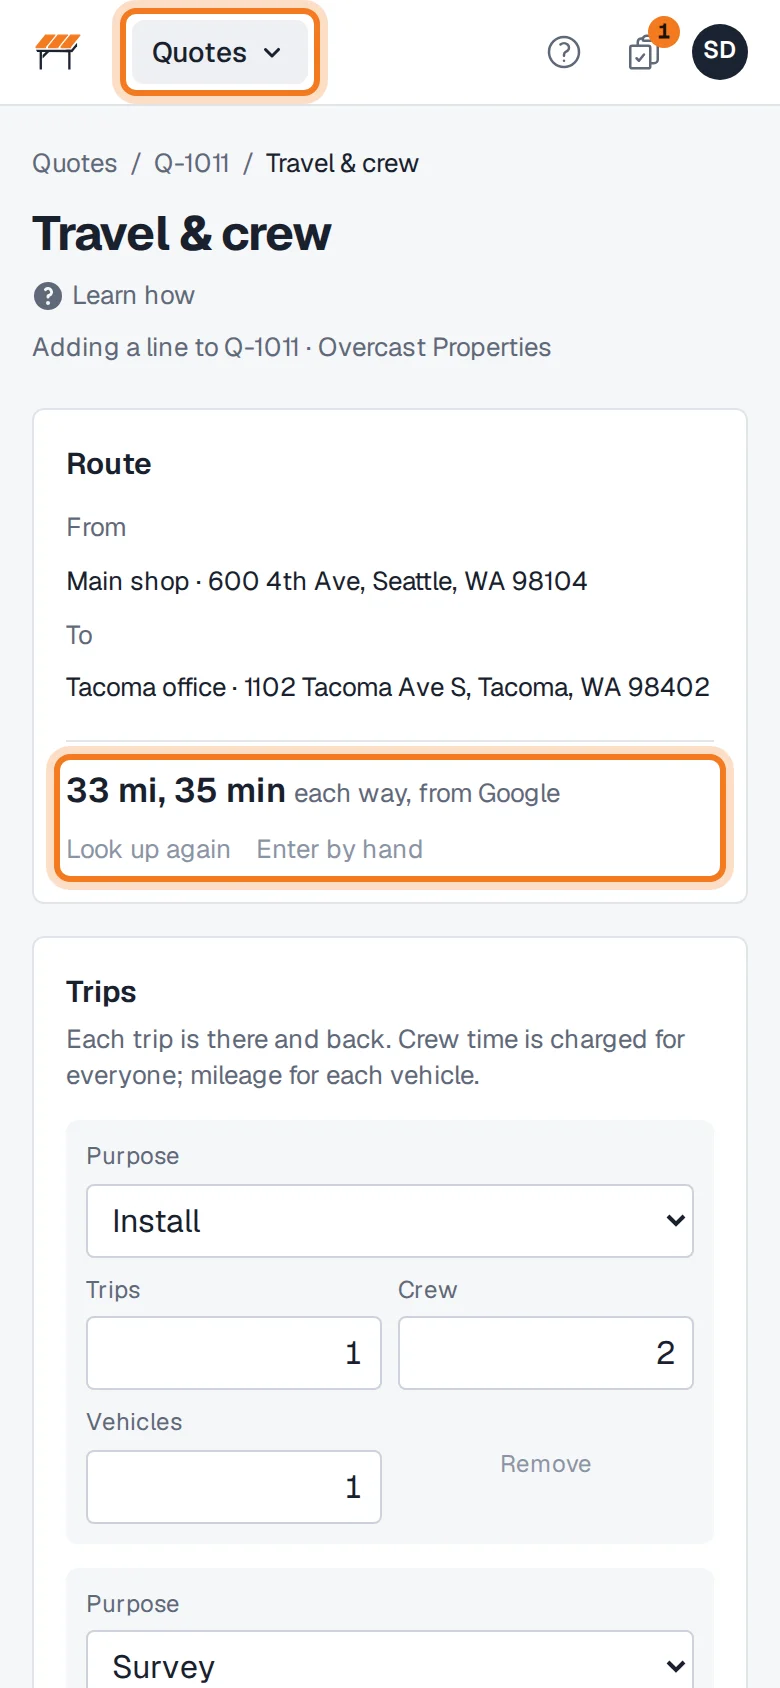
On a phone, the page stacks: route, trips, then the price. The menu at the top shows where you are.
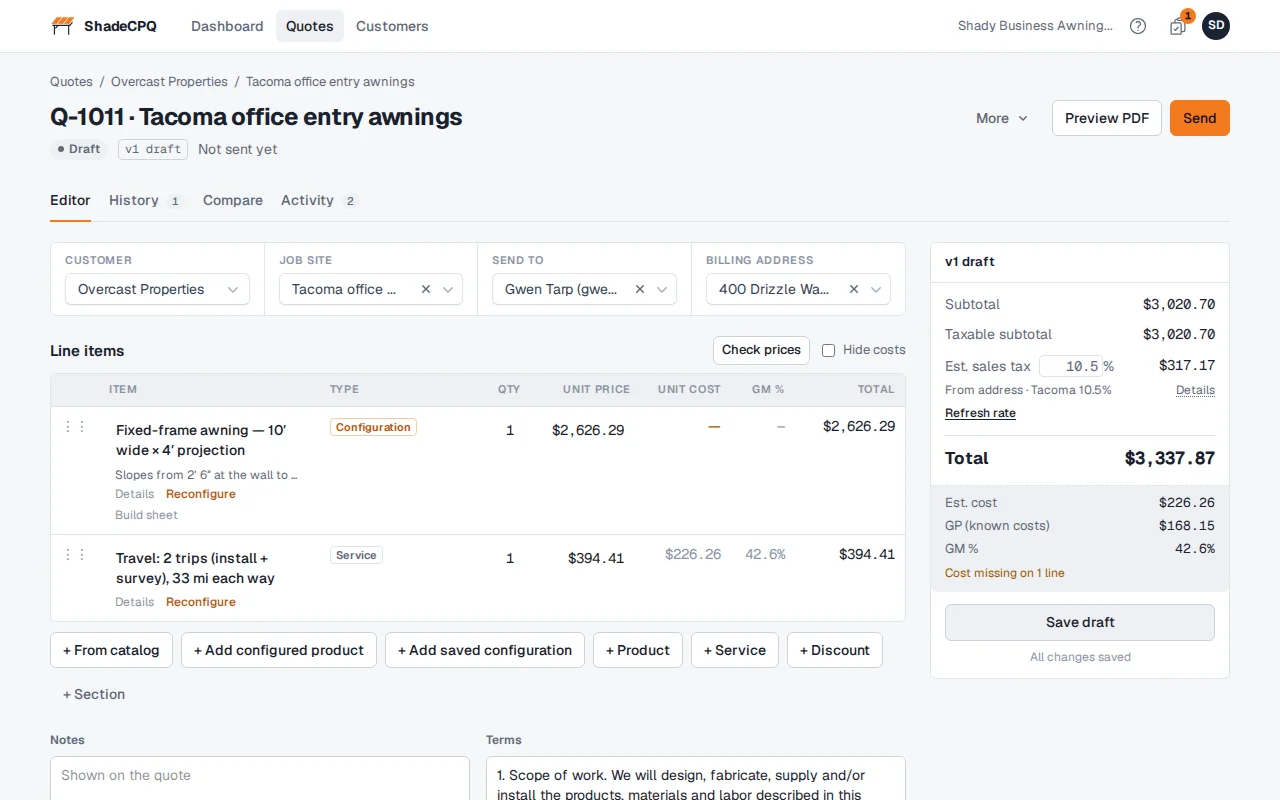
Back on the quote, travel is one line tagged Service. It's taxed like your other services unless you change it.
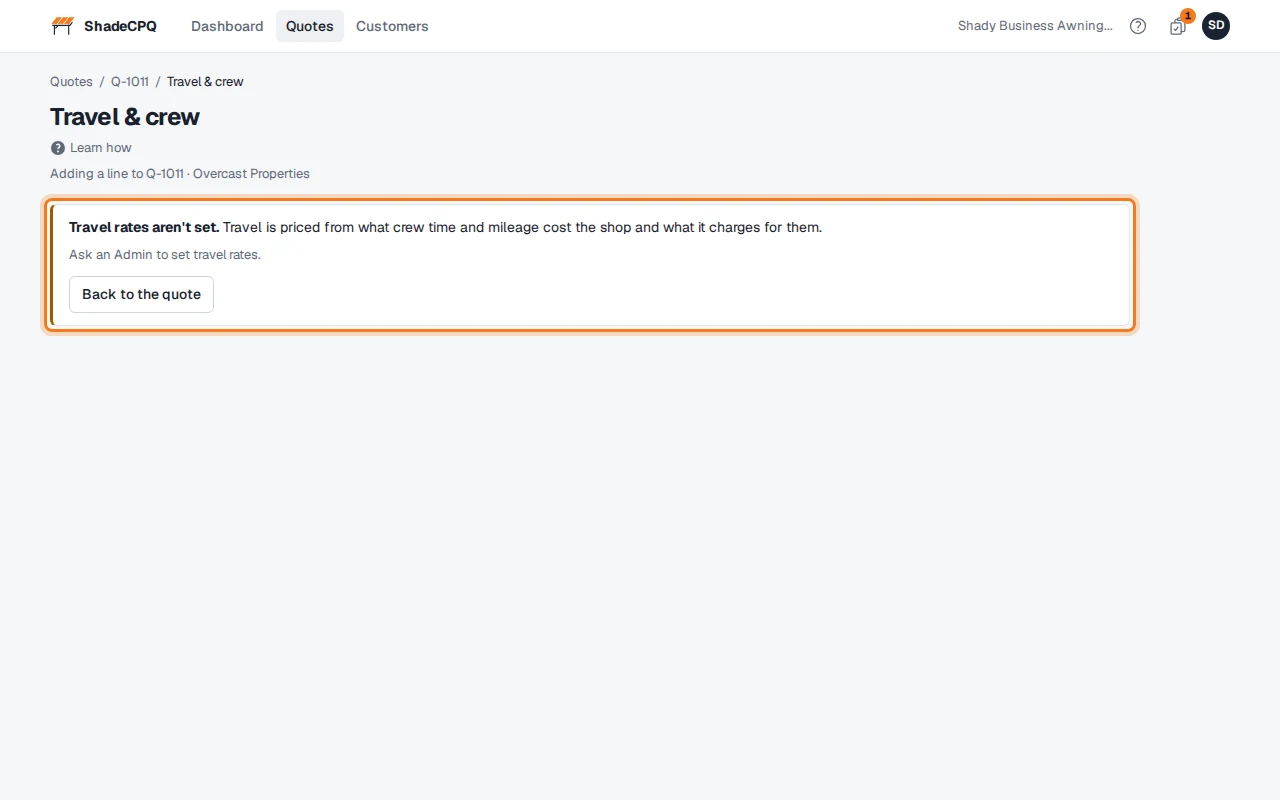
If your shop's travel rates aren't set yet, the page says so instead. Admins get a link to set them; reps are asked to ask an Admin.
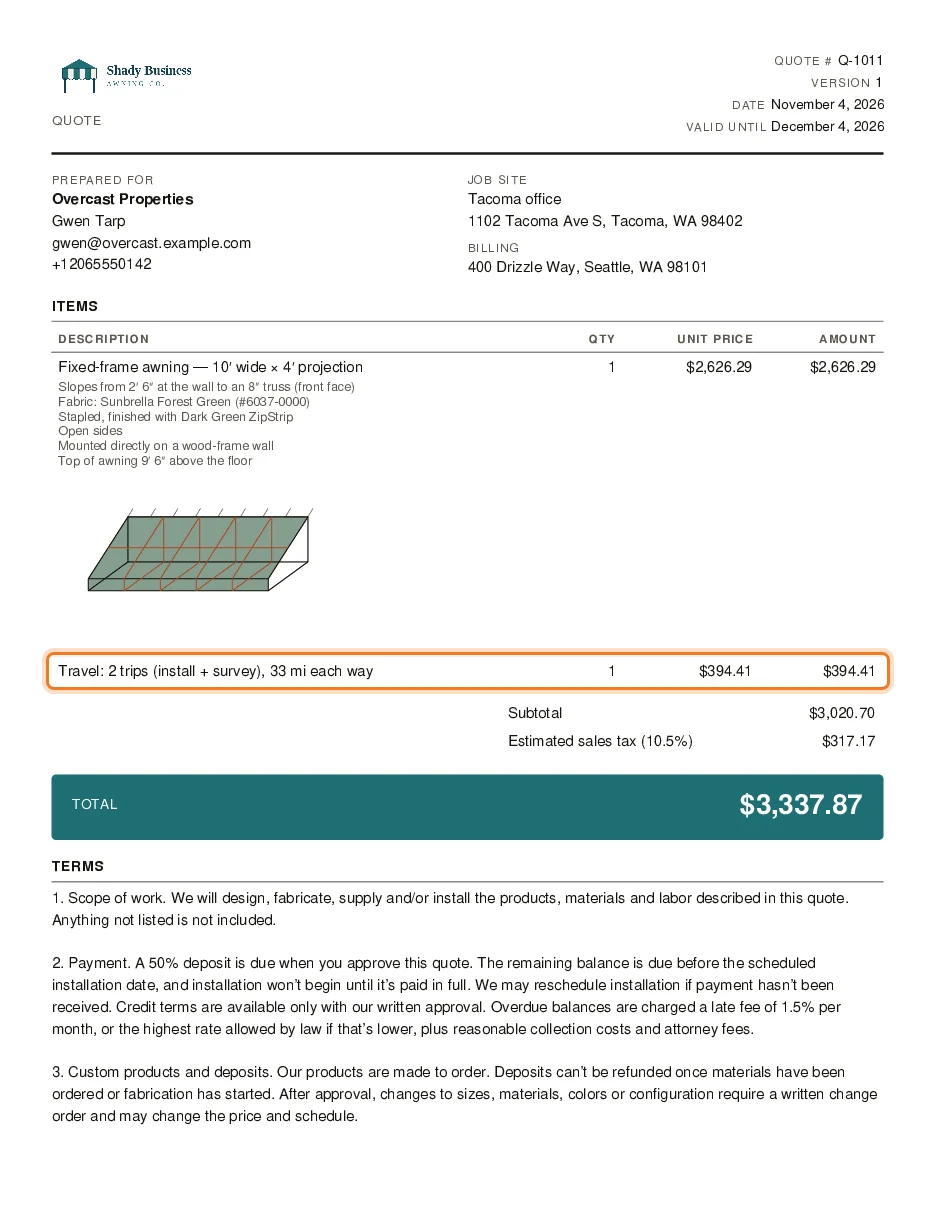
Your customer sees one line with the trips and miles, and its price. Crew, vehicles and your rates aren't shown.
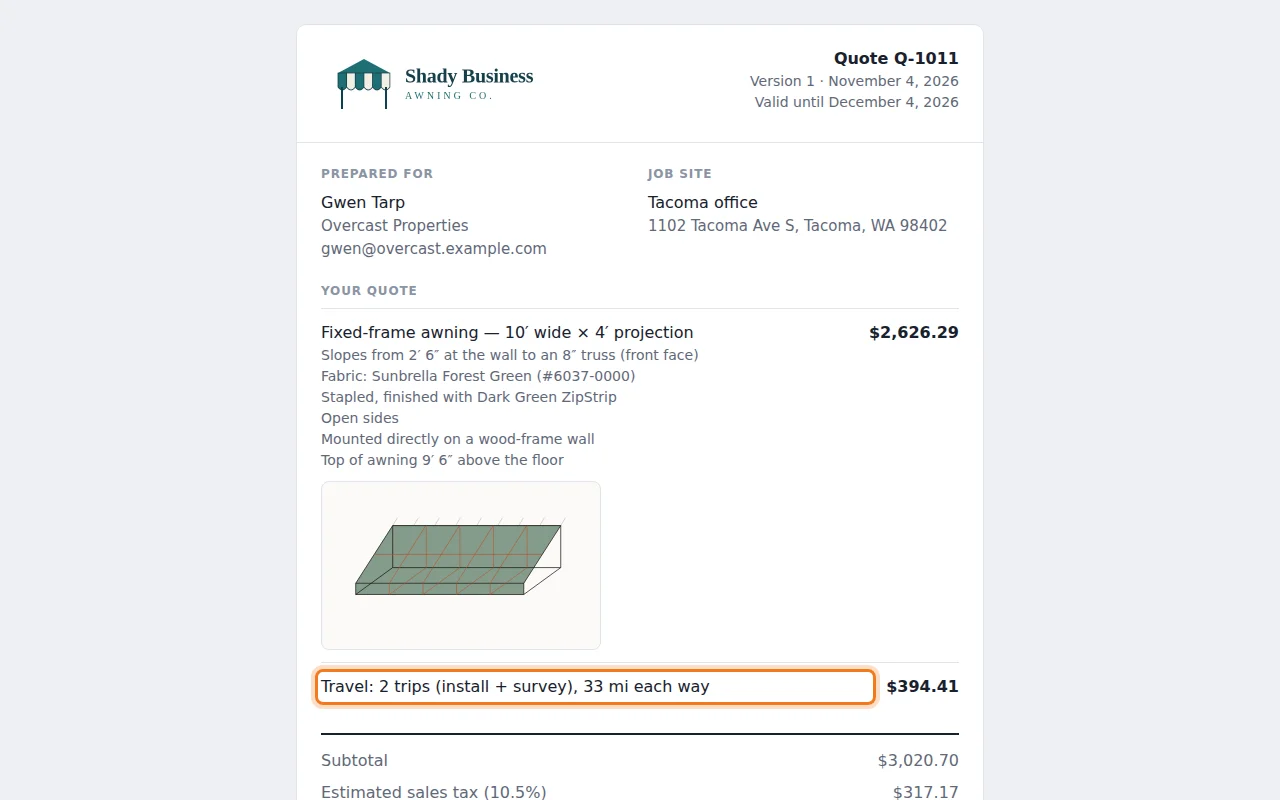
The PDF shows the same line.
Change it later
Click Reconfigure on the travel line to change the trips. The saved distance is kept; click Look up again to ask Google afresh.
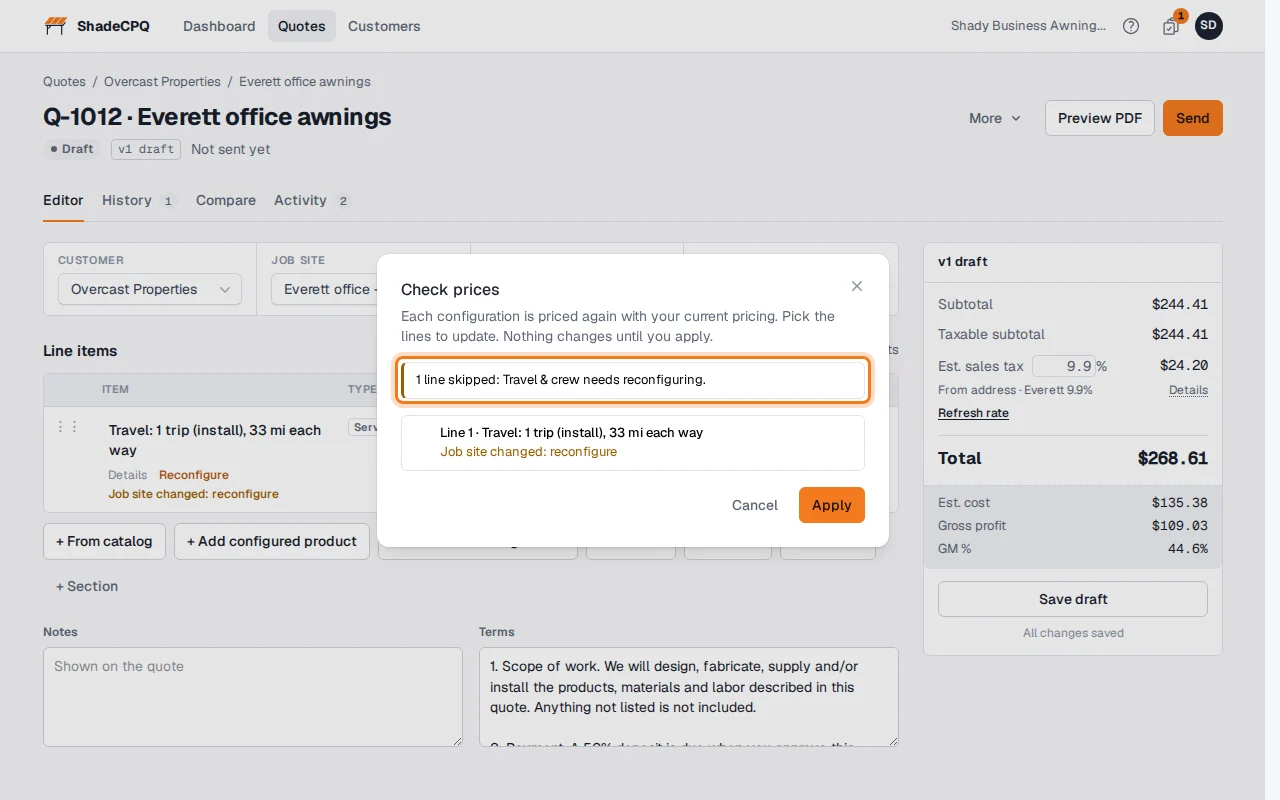
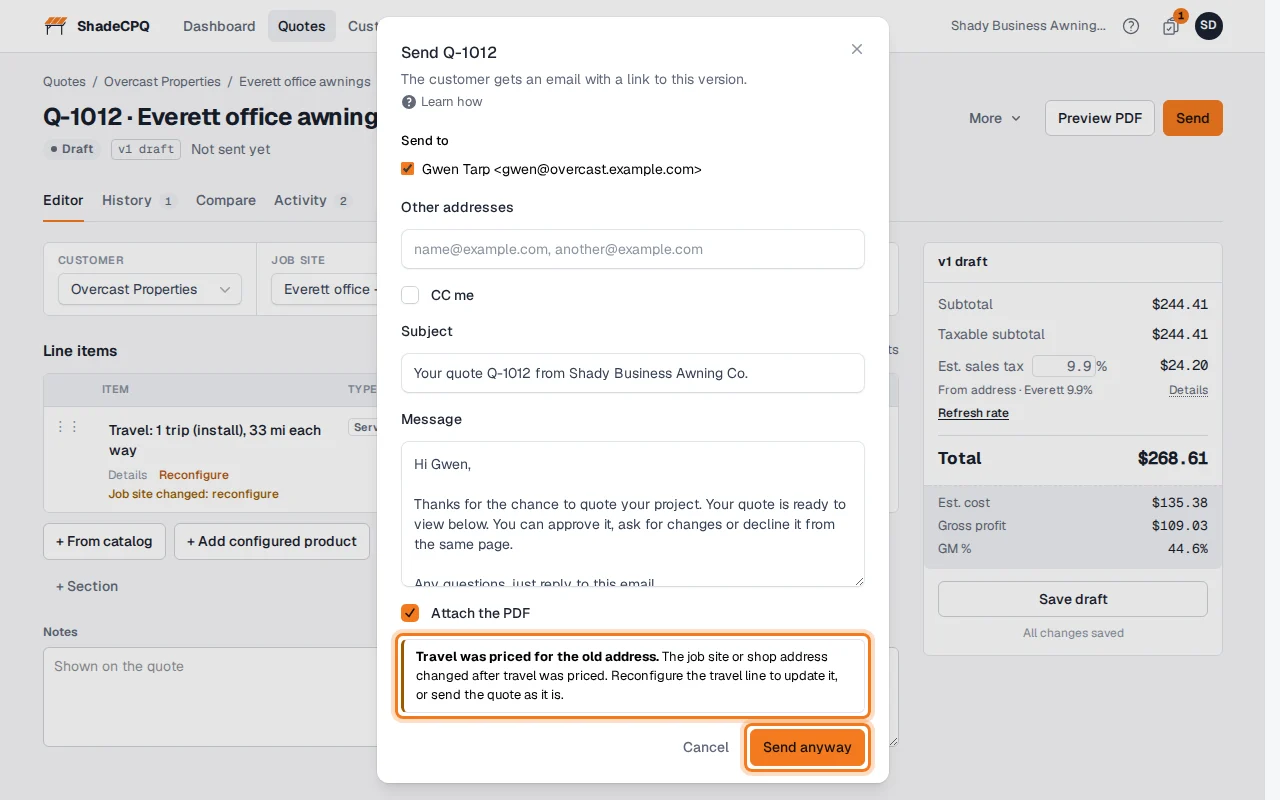
If the job site or your shop address changes after travel was priced, the line says Job site changed: reconfigure (or Shop address changed). Reconfigure it to price the new drive.
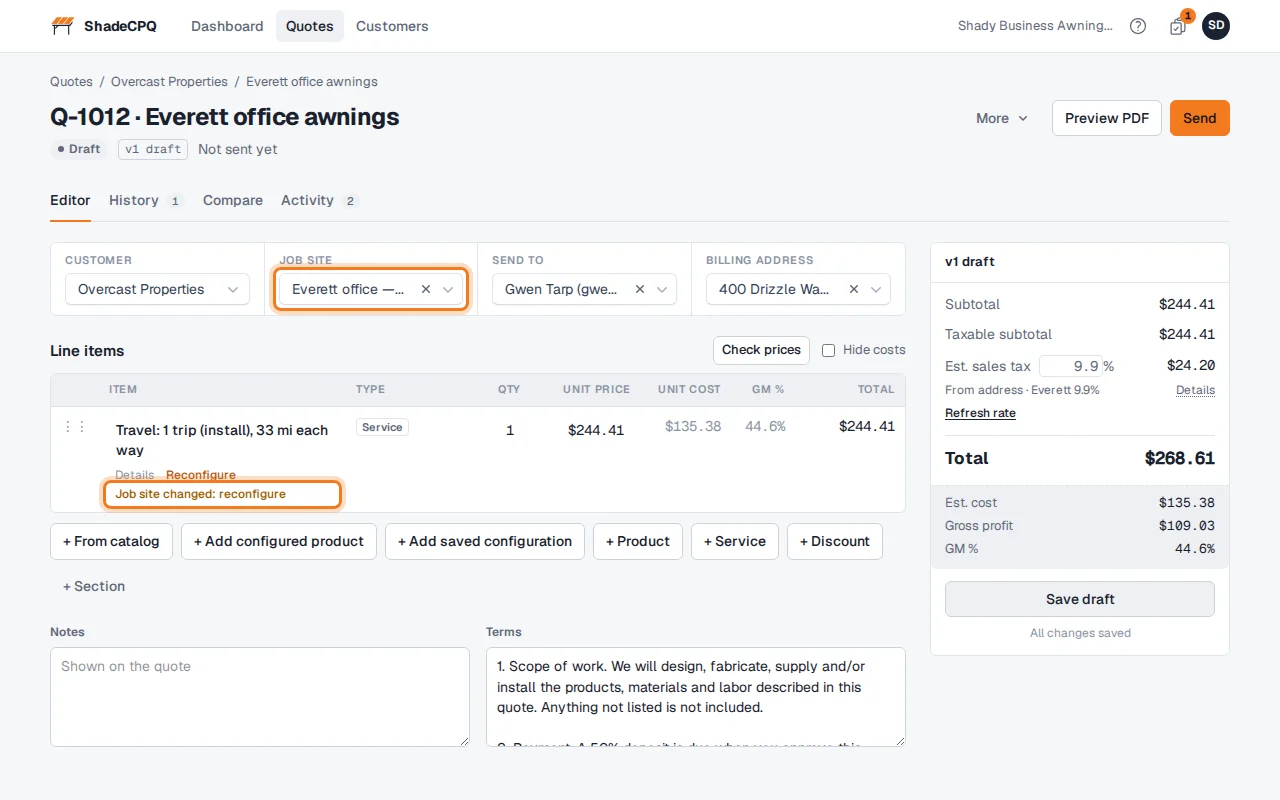
Until you do, Check prices skips that line and says so.
Sending the quote warns you first: Travel was priced for the old address. You can still click Send anyway.
Good to know
- Each trip's price is crew time (round-trip hours × people × your hourly charge) plus mileage (round-trip miles past your free radius × vehicles × your per-mile charge), or your minimum trip charge if that's more.
- New rates change new travel lines only. Travel already on a draft keeps its price until you use Check prices, which reprices it from the saved distance without looking it up again.
- Overnight stays and per-diem aren't part of travel yet. Add them as a + Service line.
Next: Sending the quote and getting it approved
Sending the quote and getting it approved
Email the quote, see what your customer sees, and know when they respond.
Who can do this: Sending: Admins and Sales reps. Approving: your customer, from the link in their email. They don't need an account.
When you send a quote, your customer gets an email with a link to their quote page, and a PDF if you attach one.
From that page they can approve it, request changes or decline. You're emailed when they respond.
Send the quote
Open the quote and click Send.
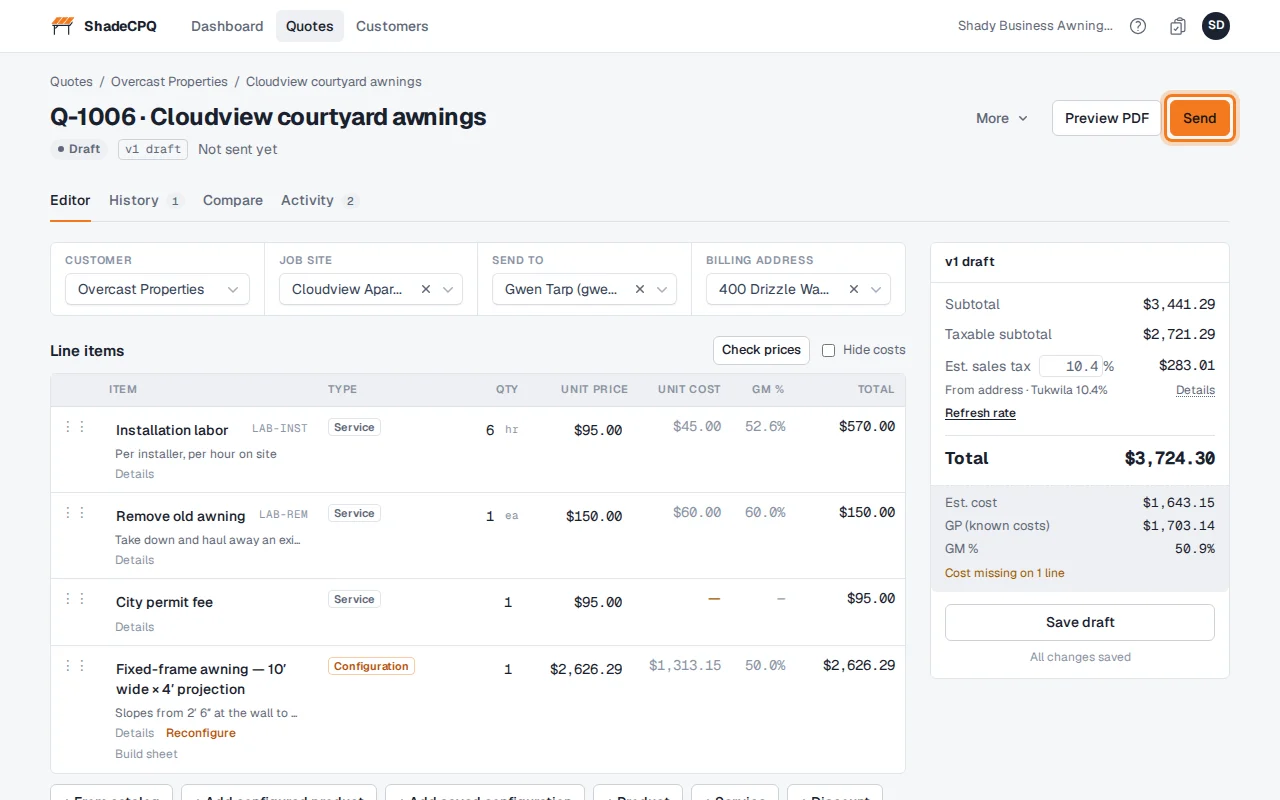
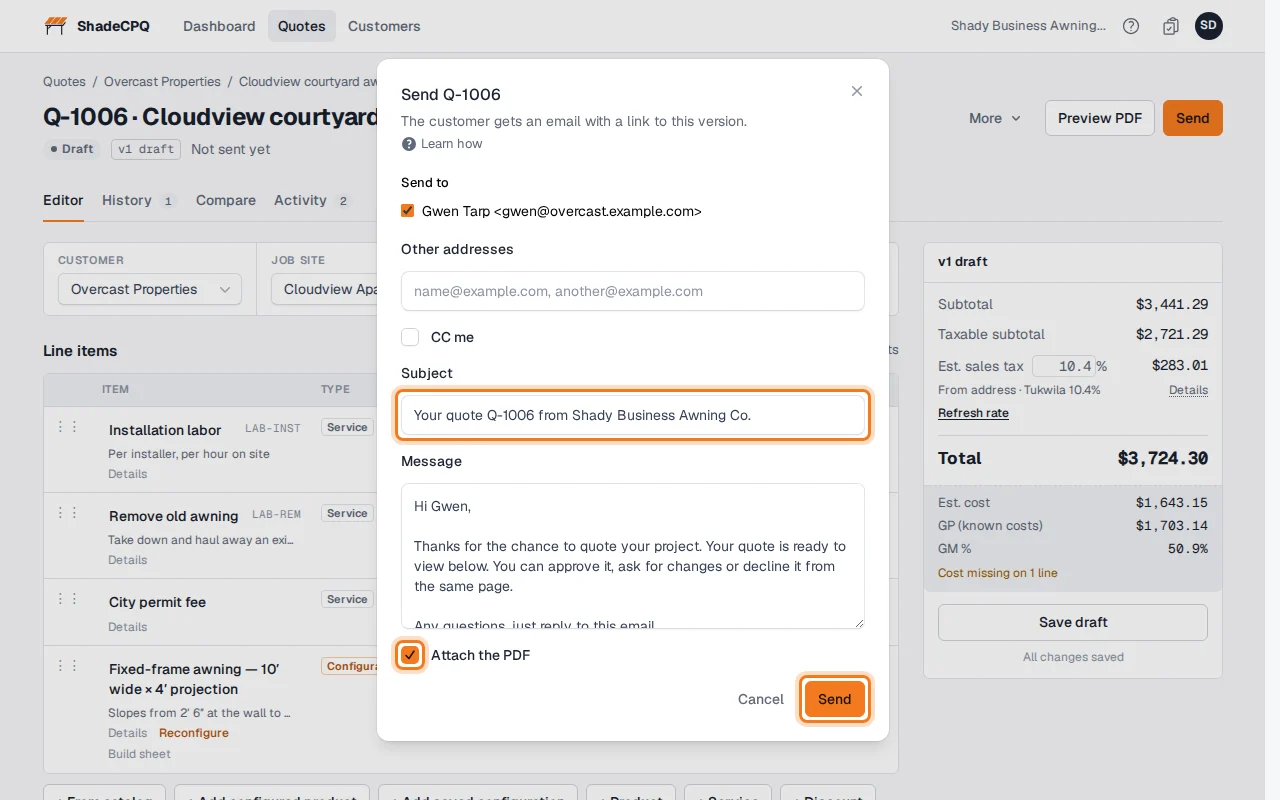
Check who it goes to under Send to, and the Subject and Message. Leave Attach the PDF ticked. Click Send.
The quote is now Sent, with the date and how long it's valid.
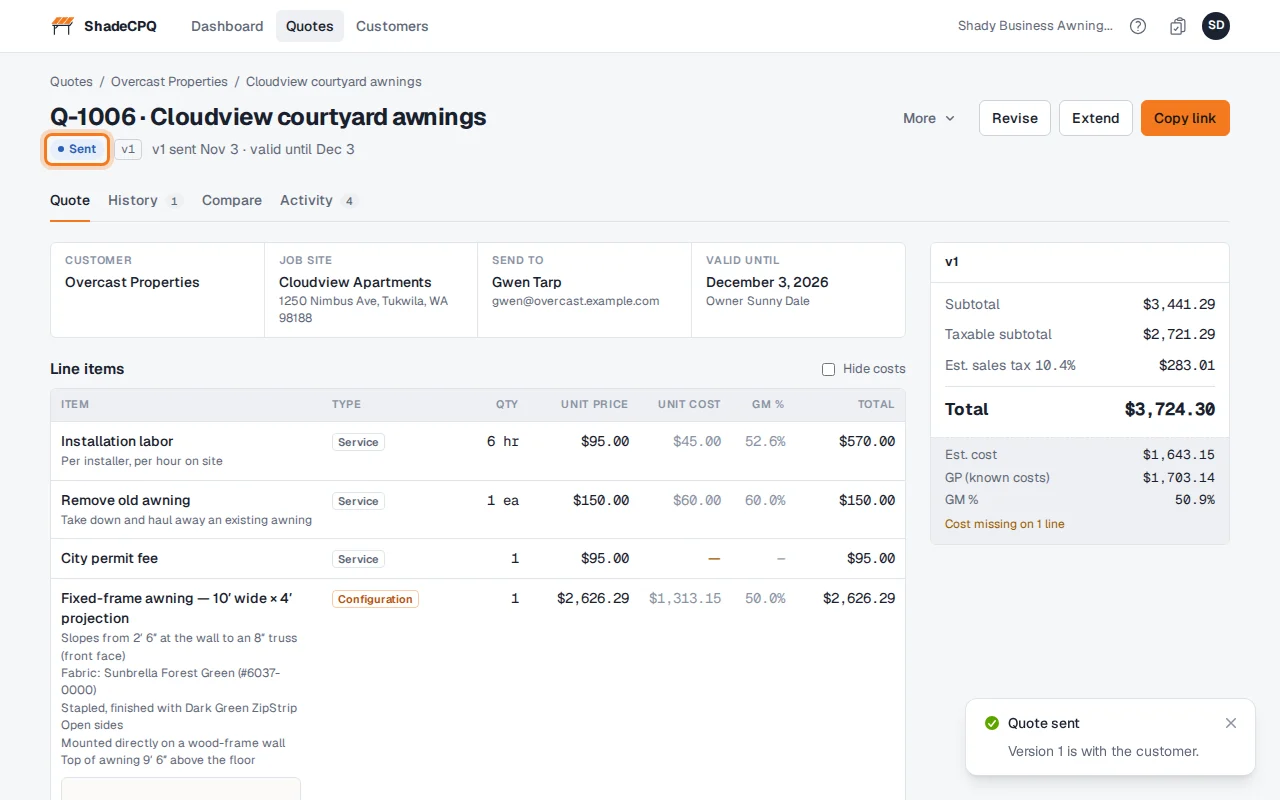
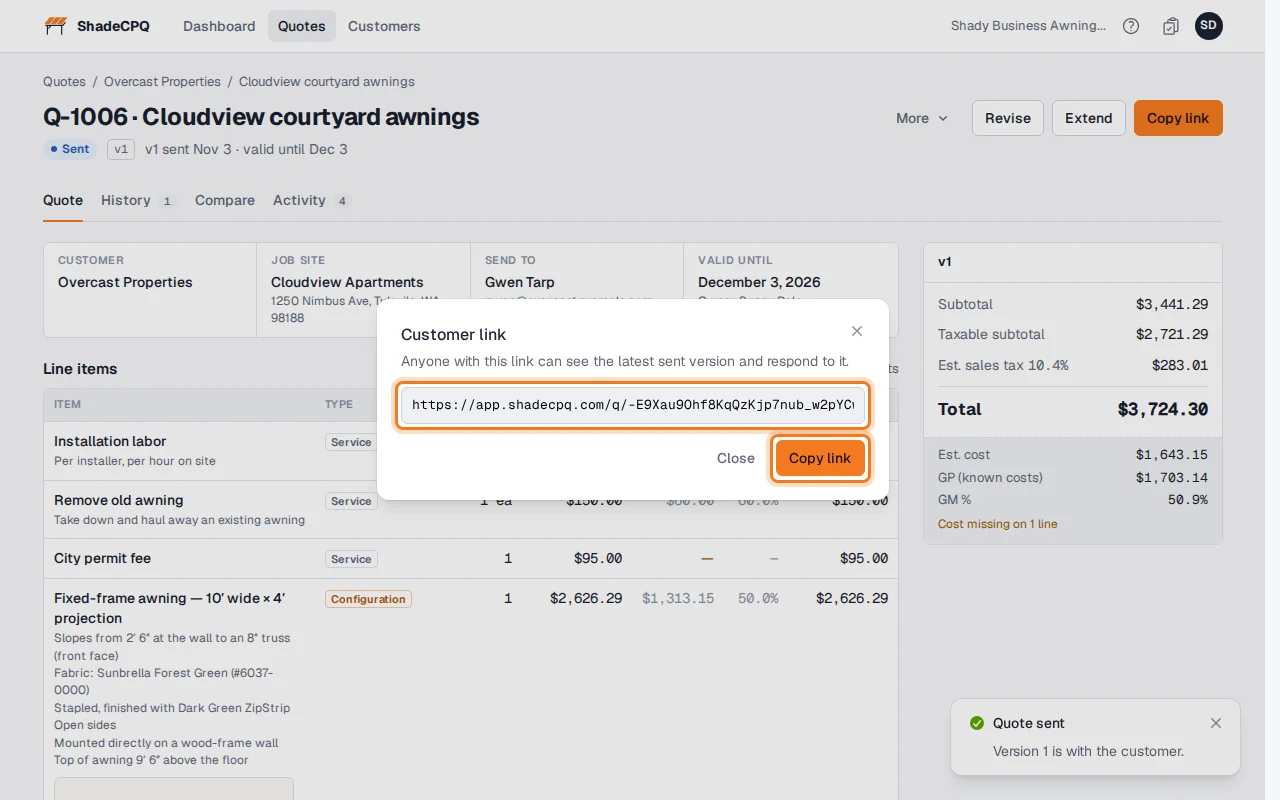
Need the link for a text message? Click Copy link, then Copy link in the box that opens. Anyone with the link can see the quote, so only send it to your customer.
What your customer sees
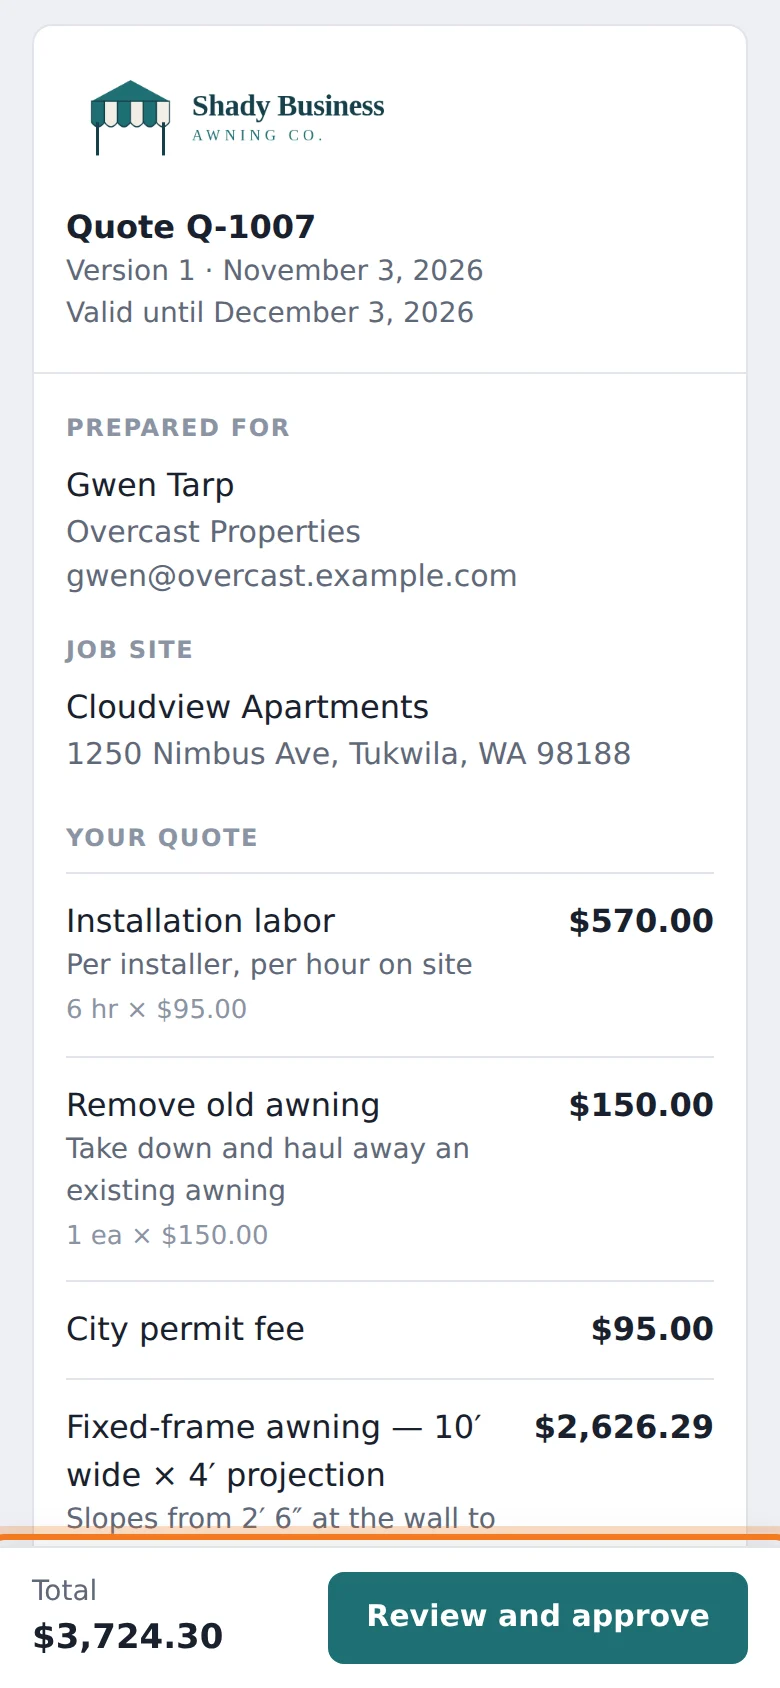
On a computer: your logo, the quote number, who it's for, the job site and each item with its price.
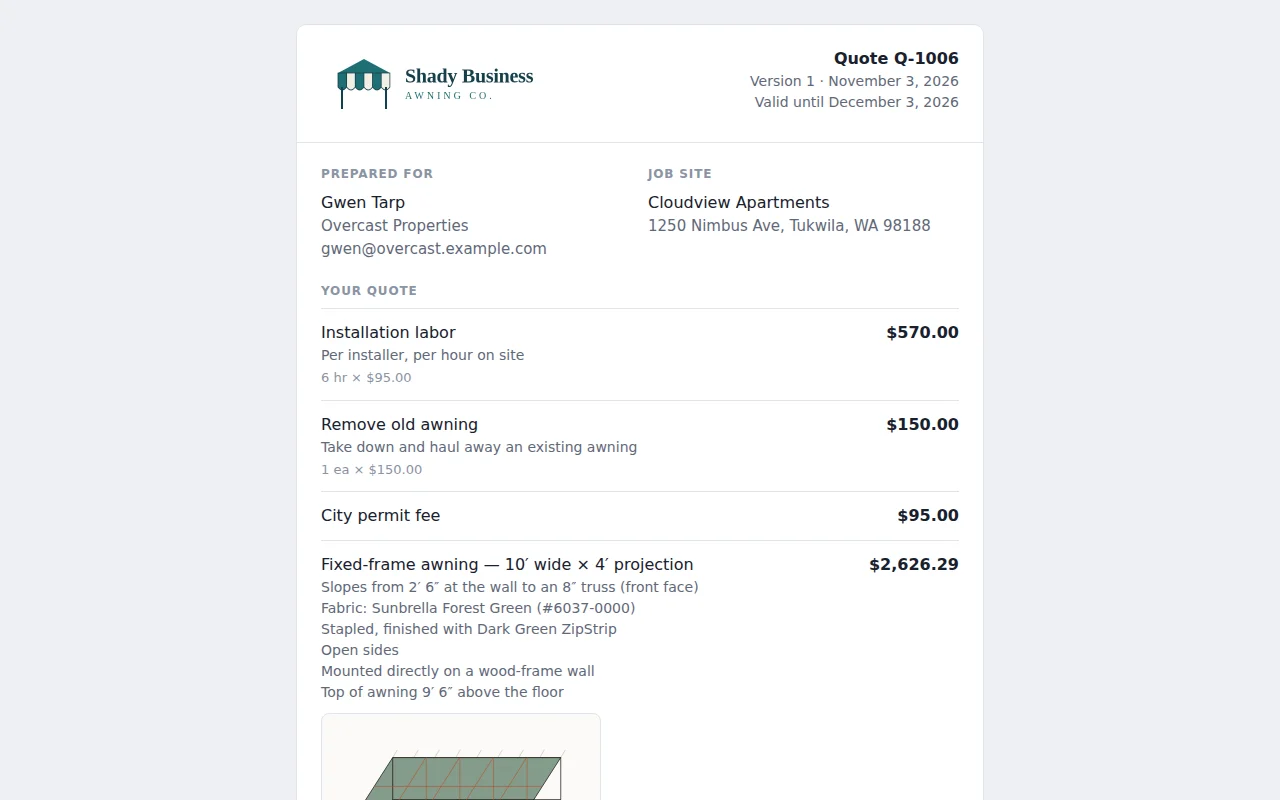
The awning is described in plain words: its size, how it slopes, the fabric, how it's attached and its sides, with a drawing in your fabric color. Mounting details show only if the rep set them.
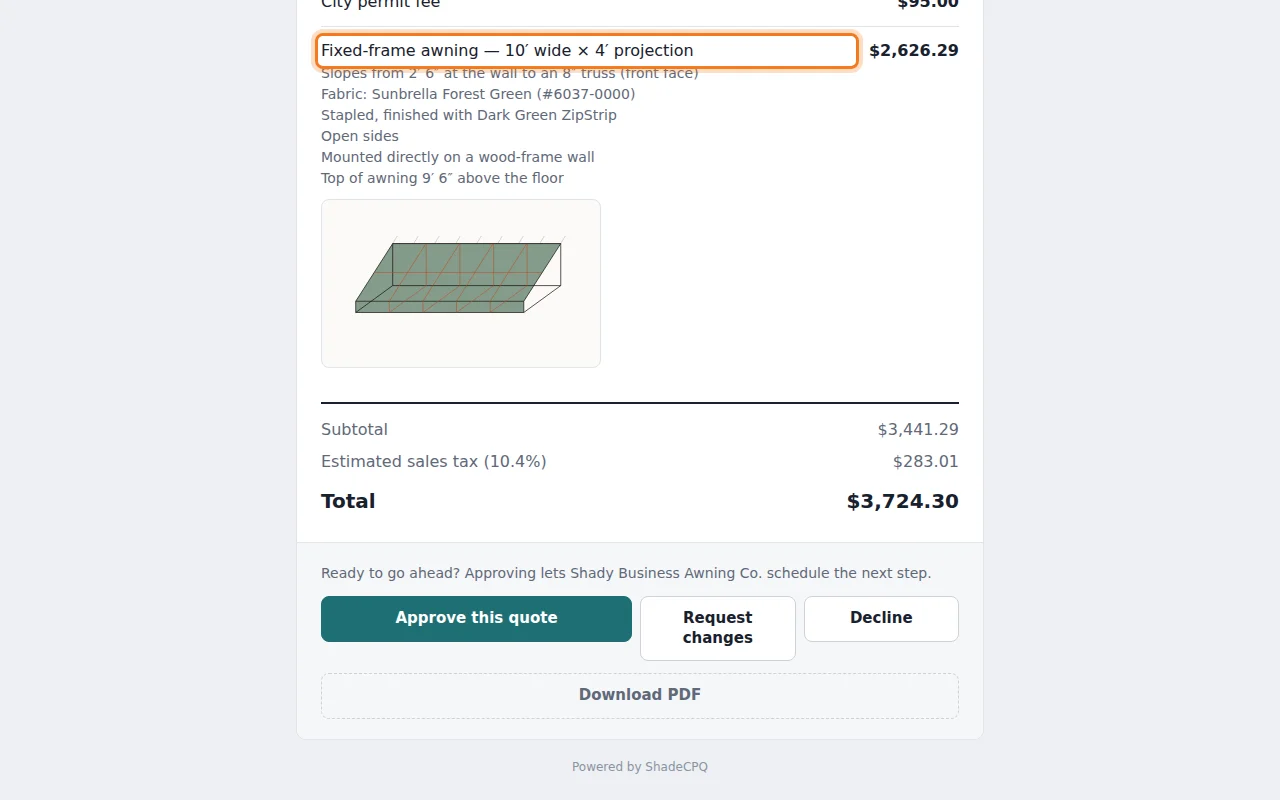
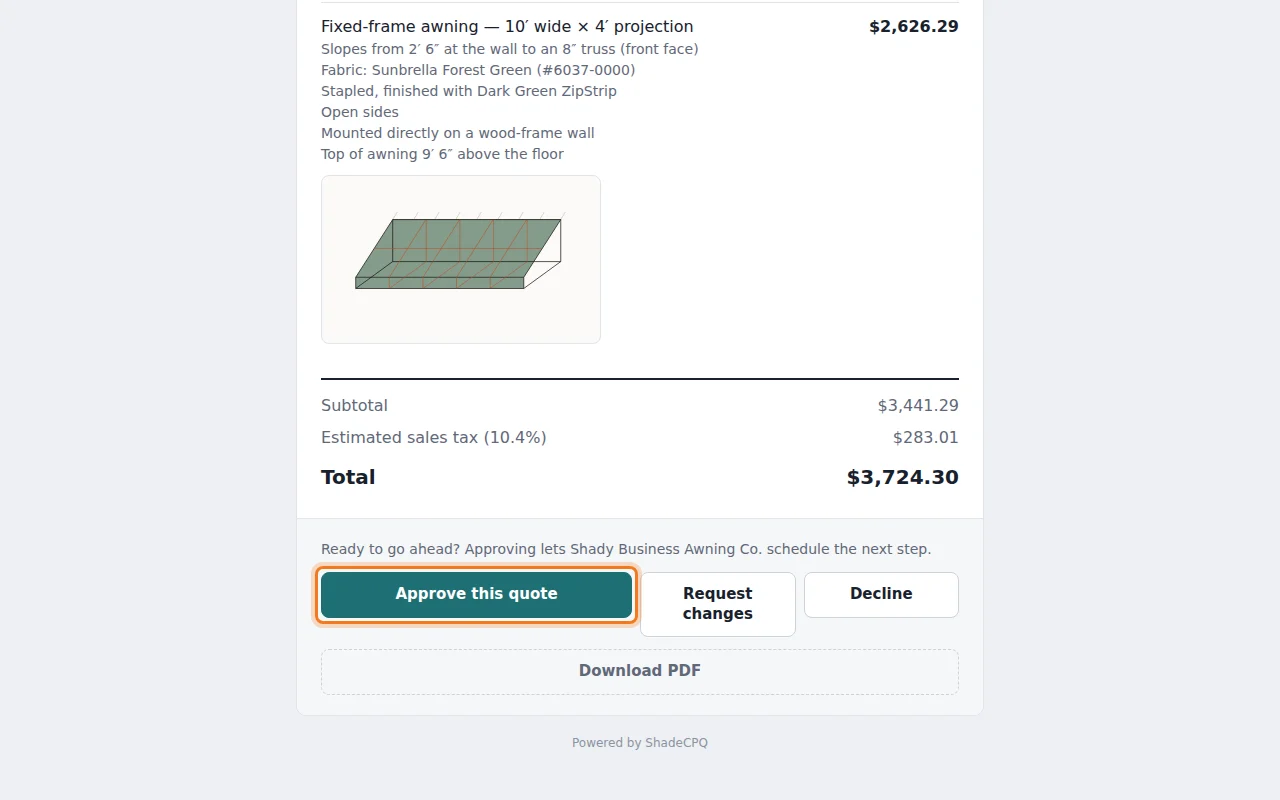
At the bottom: the totals, then Approve this quote, Request changes, Decline and Download PDF.
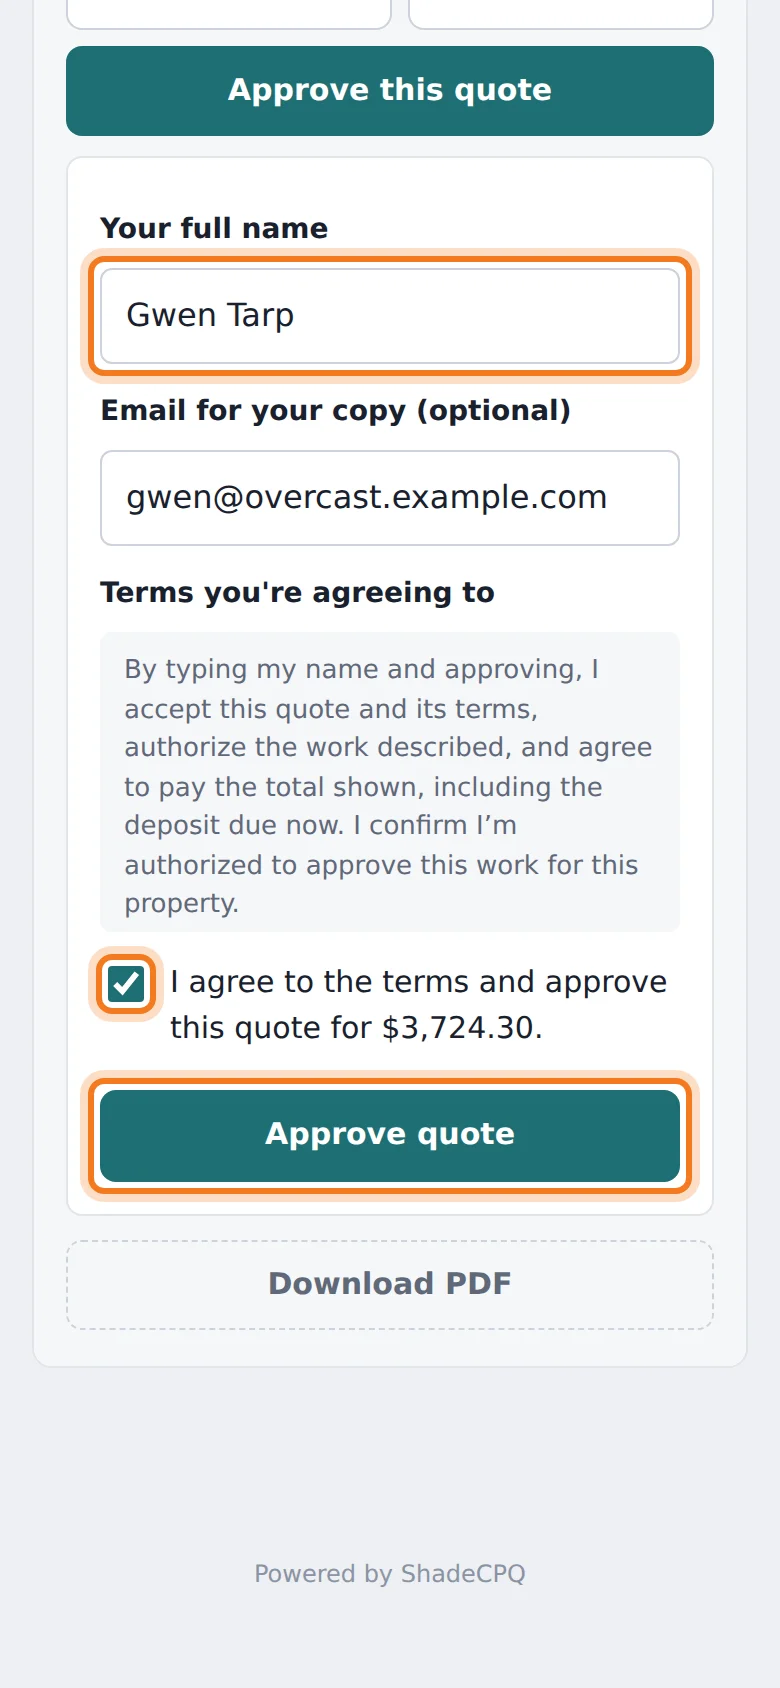
On a phone, the same page fits the screen. A bar at the bottom shows the total and Review and approve, which takes them straight past your terms to the buttons.
To approve, they tap Approve this quote, type their name, read your approval terms, tick the box and tap Approve quote.
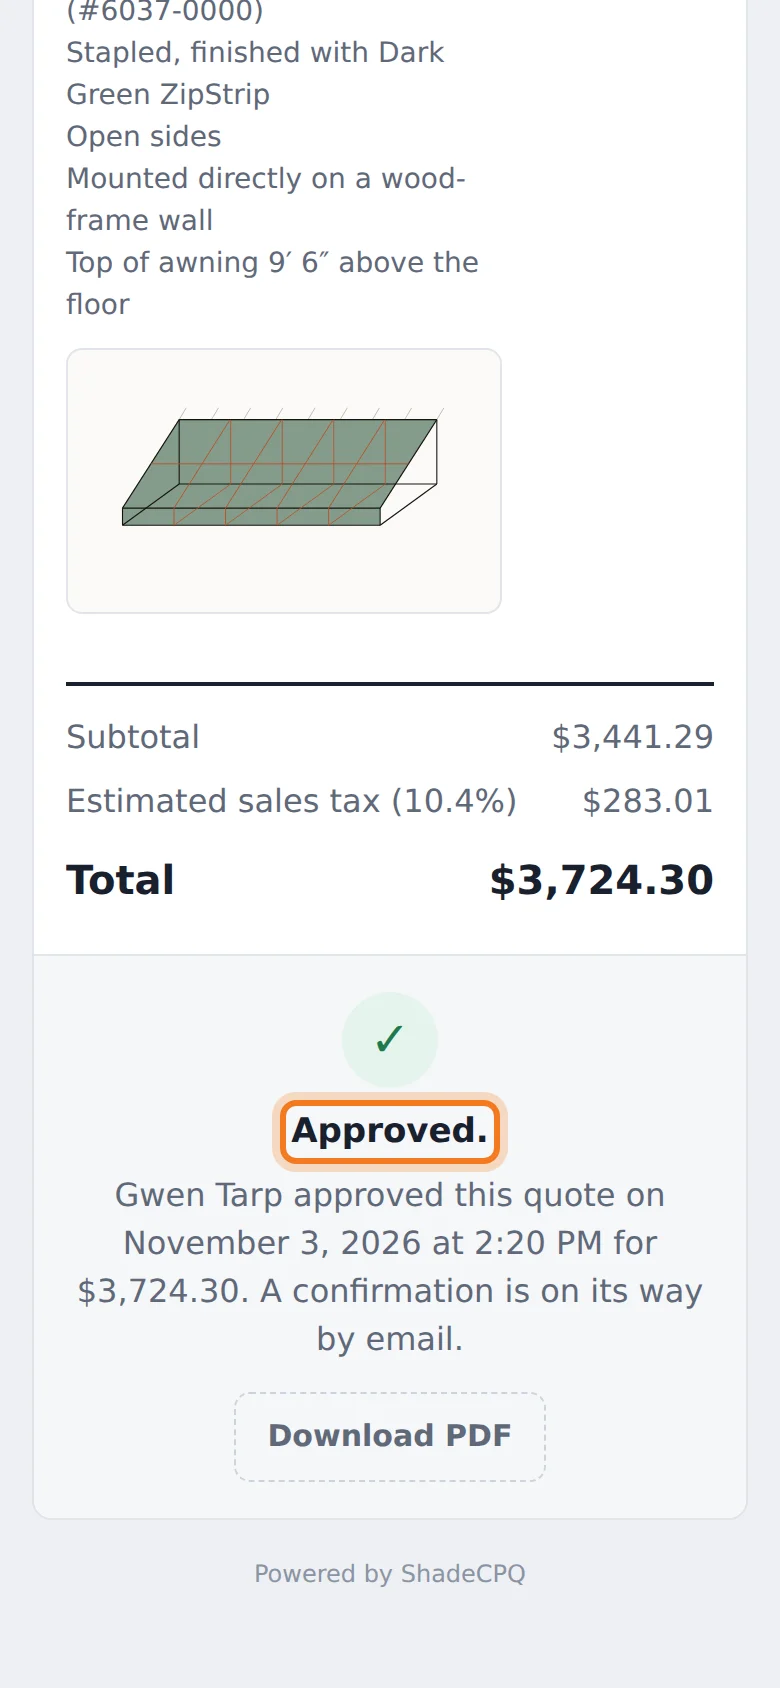
They see that the quote is approved, with the date and amount.
Back in ShadeCPQ
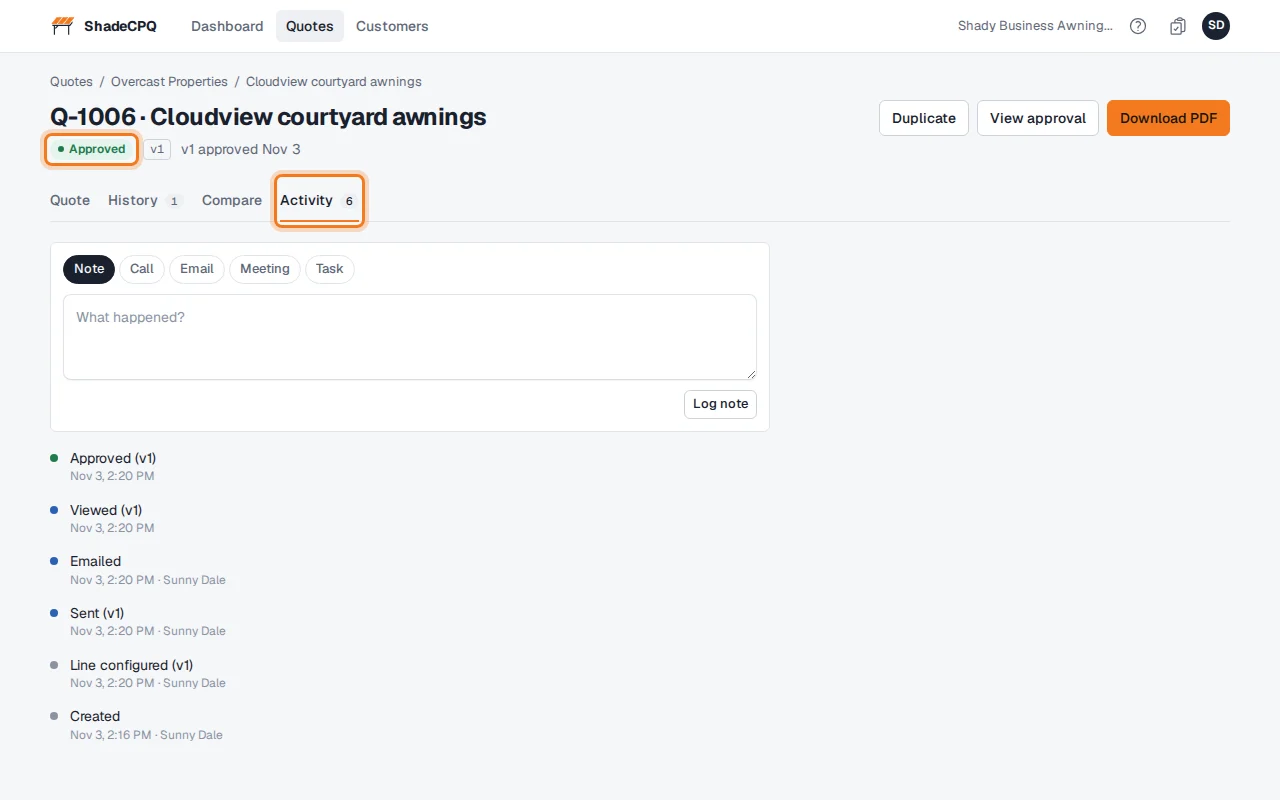
The quote now shows Approved. The Activity tab shows each step: sent, emailed, viewed and approved, with times.
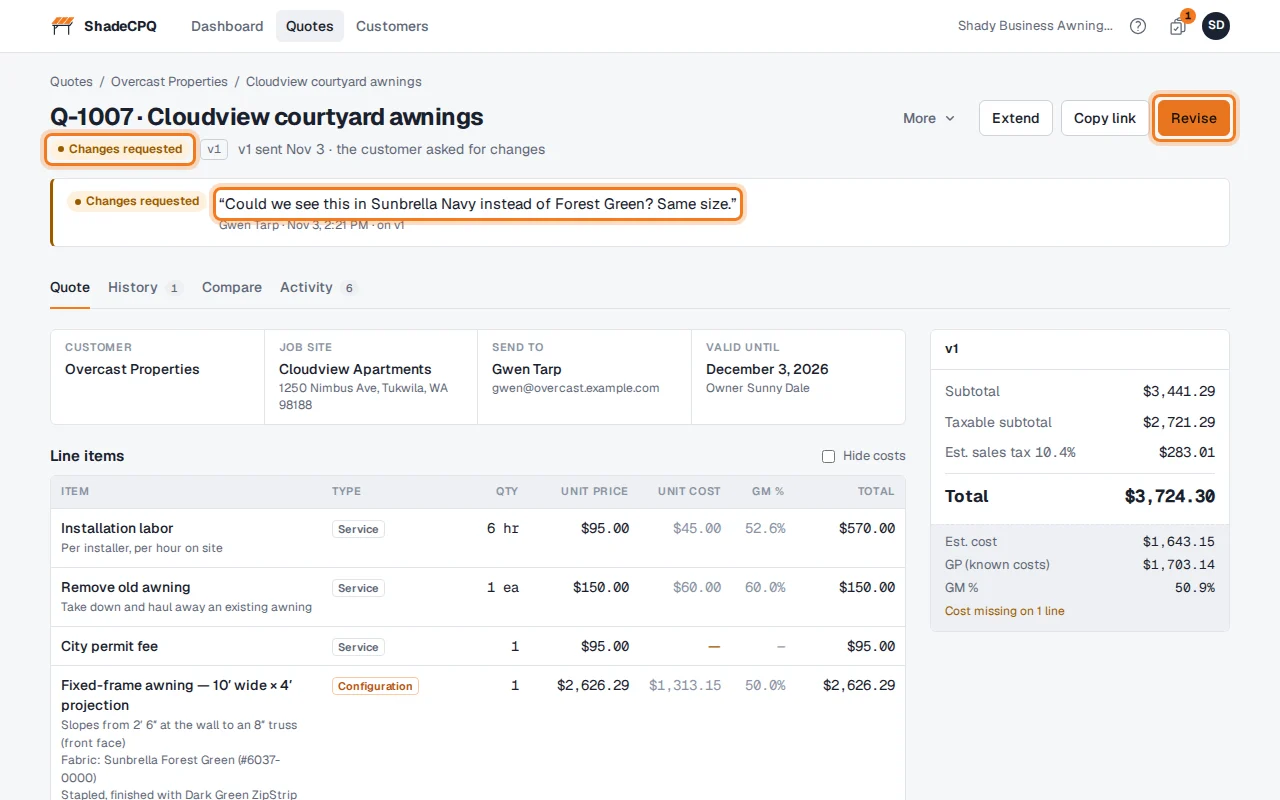
If they click Request changes instead, you're emailed their message, and the quote shows Changes requested with their note and a follow-up for you. Click Revise, make the changes and click Send again. They keep seeing the old version until you send the new one.
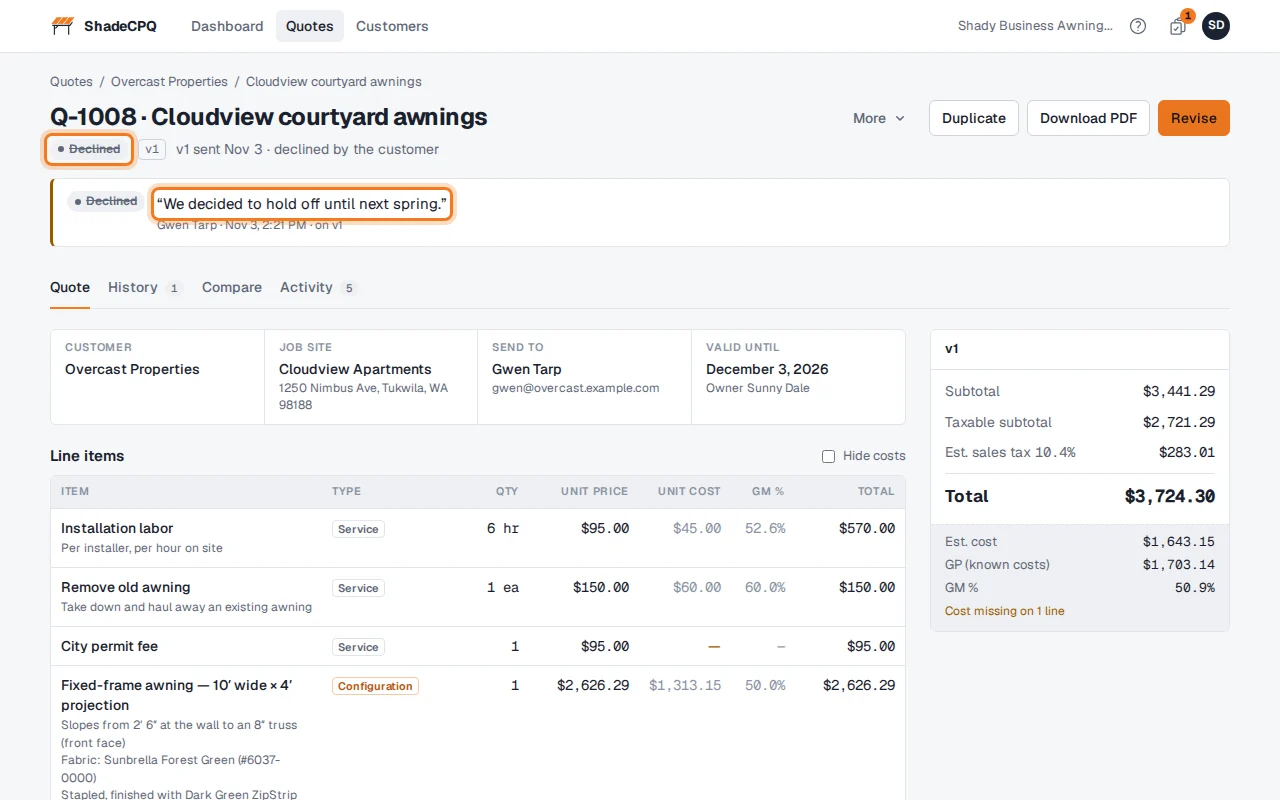
If they click Decline, the quote shows Declined with their reason, if they gave one. You can Revise it and send a new version, or Duplicate it to start over.
Who gets emailed is set by an Admin in Settings → Quotes → Notifications.
What your customer never sees
Your costs, gross profit and GM %, labor times, the build sheet and cut list, the awning's shop spec
(roll width, ZipStrip footage, bars and seams), and internal notes. Part numbers only if you turn them on in
Settings › Quotes.
Good to know
- A quote is valid for the days set in Settings (30 to start). Use Extend to give an expired quote more time.
- On the customer's page, they're now Active, and the Quotes tab shows the approved quote.
Next: Build sheets
Build sheets
The shop's copy of a fixed-frame awning: cut list, fabric pieces and drawings, with no prices.
Who can do this: Anyone in your shop can open one. It never shows prices.
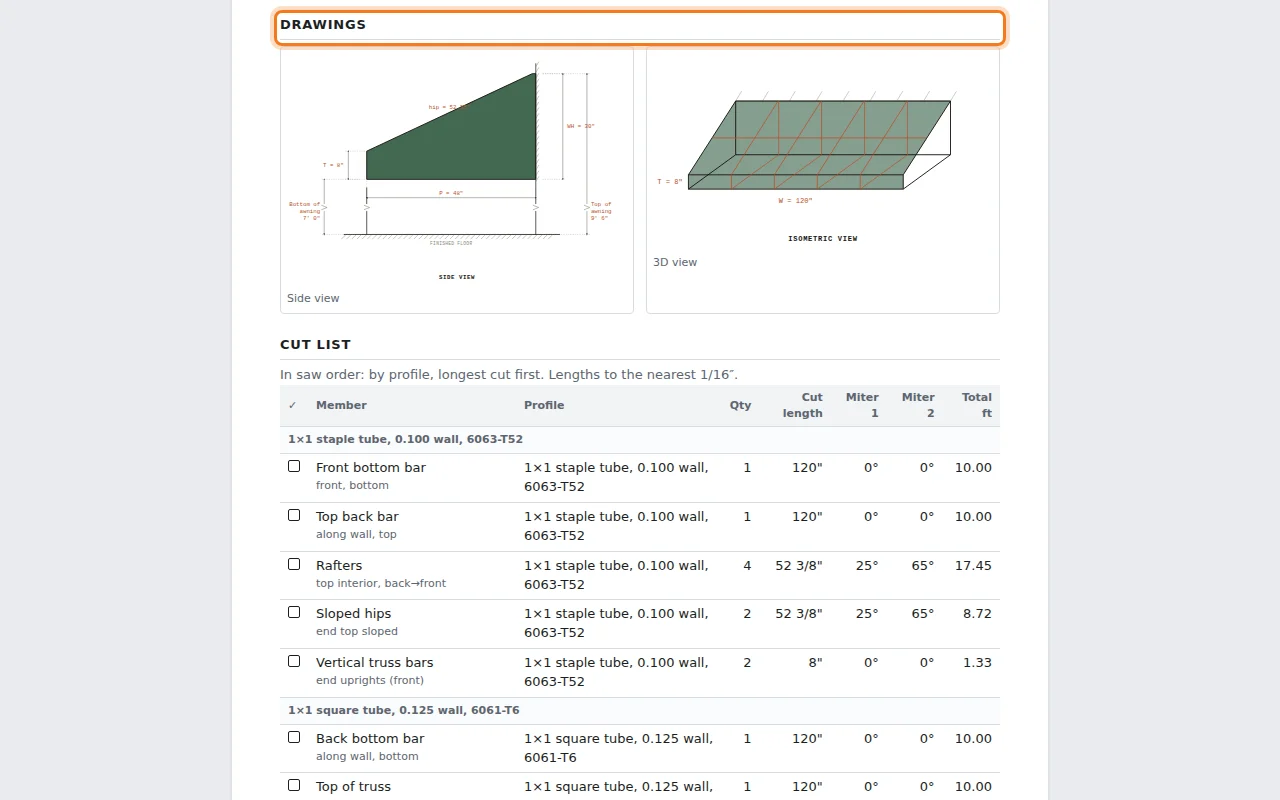
Every fixed-frame awning has a build sheet: a printable page for the people making it. It shows the
awning exactly as it was quoted, so the shop builds what the customer approved.
Open a build sheet
On a quote, click Build sheet on the awning's line. It opens in a new tab.
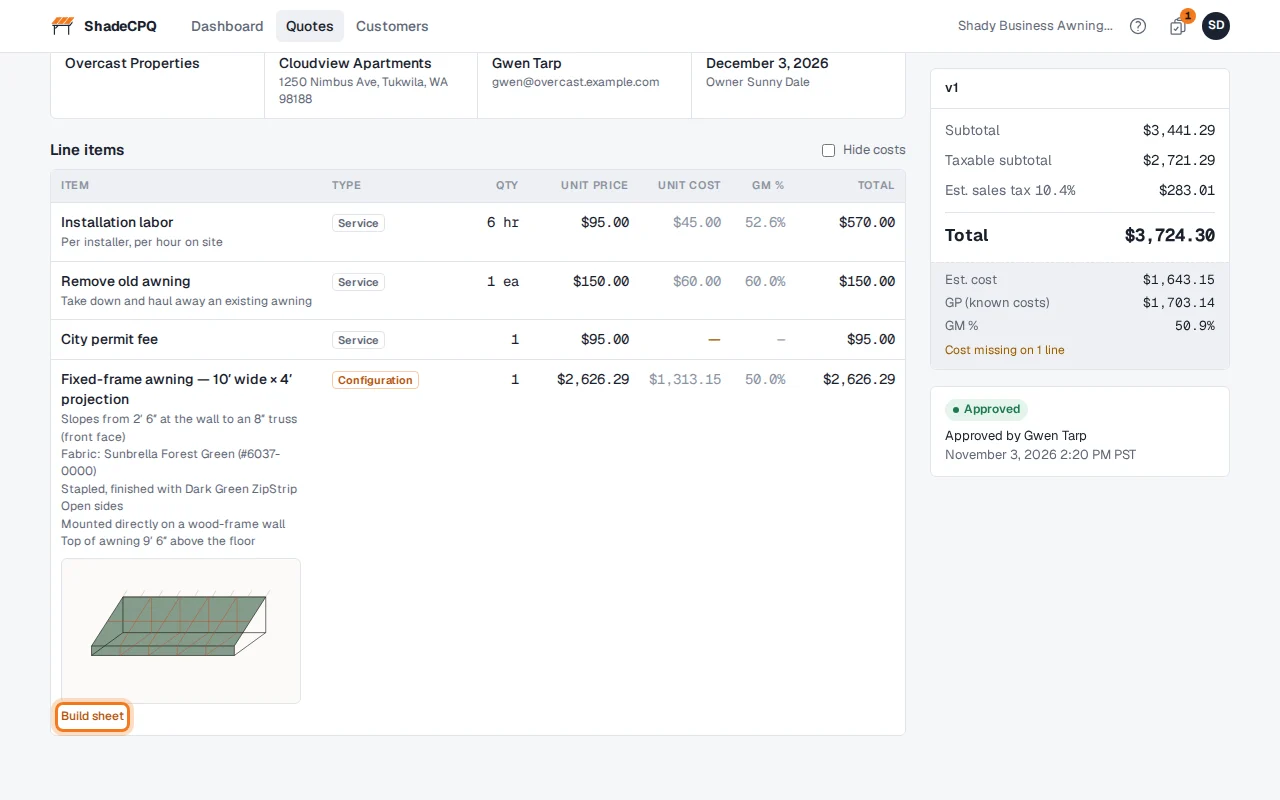
You can also open it from the configuration's page under Saved configurations, and from the link in the note when a quote is pushed to Jobber.
What's on it
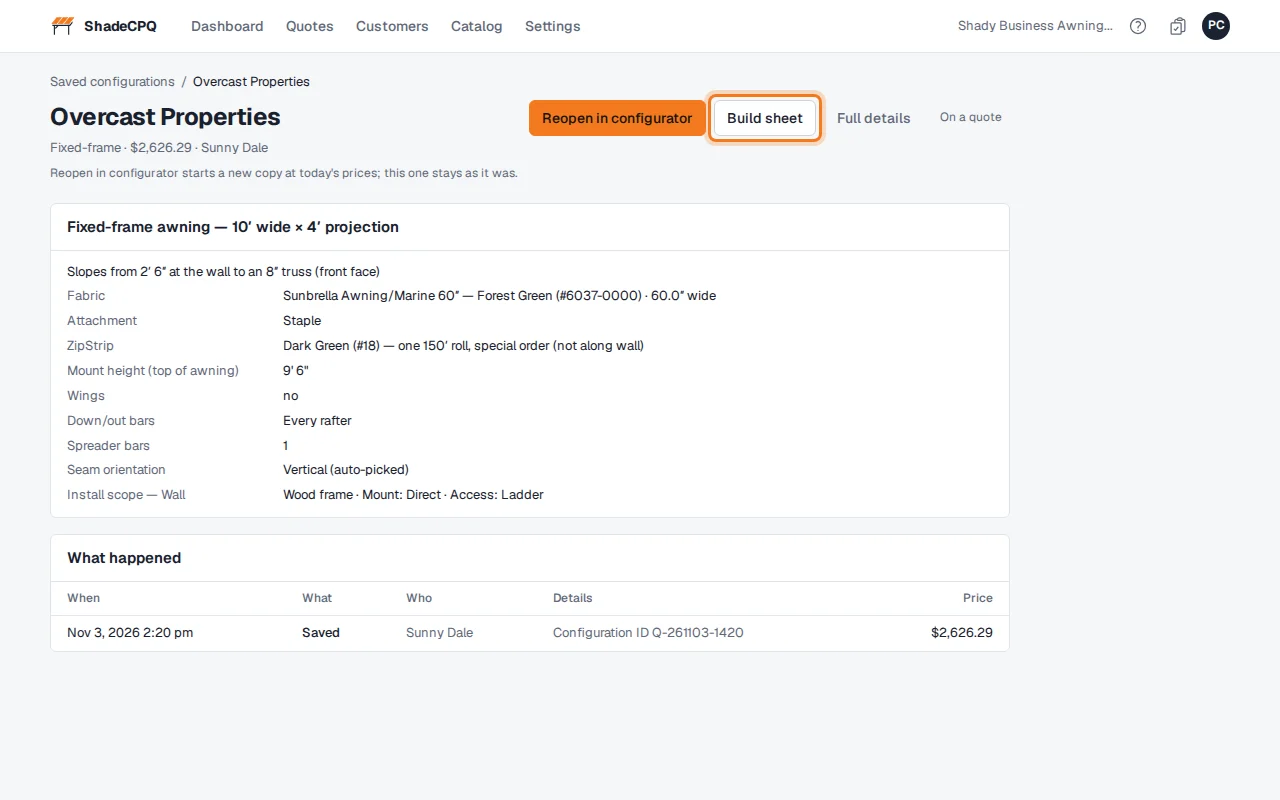
The top shows the quote number, version and status, and a QR code that opens the quote.
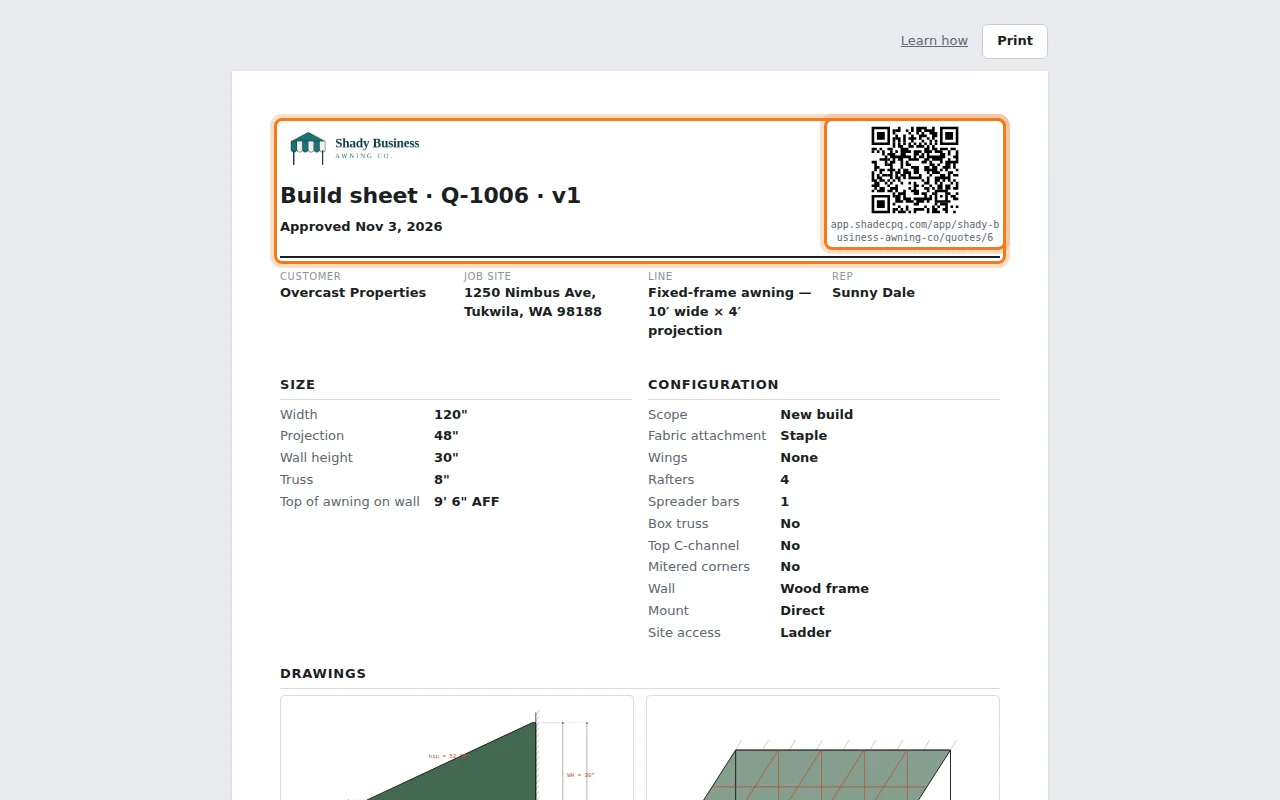
The cut list is in saw order: grouped by tube, longest first, with each length to 1/16″, how many and the miter angles.
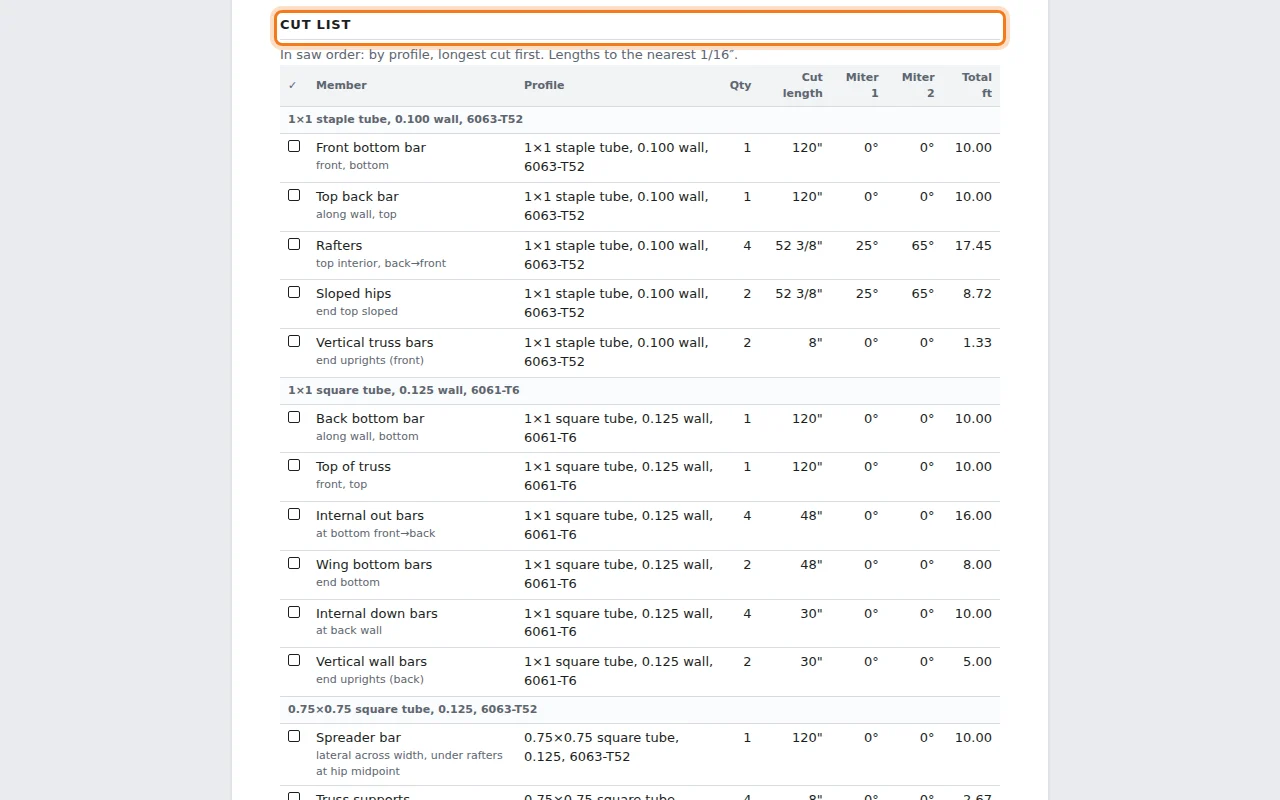
Under Fabric, each piece is listed with its finished size (before hem and seam allowance). ZipStrip says whether to cut it from stock or order a roll ("Order one 150′ roll"). When awnings on the quote share a special-order roll, each of their build sheets says to order it once for the whole quote. Hardware lists the brackets.
The side view and 3D drawings show the awning as quoted. Print it from your browser.
Good to know
- A draft, an older version, or a void quote prints with a large watermark on every page, so nobody builds from the wrong one.
- The build sheet never changes after the quote is sent, even if your rates change. Reconfiguring an awning on a new version gives that version its own sheet.
Next: Adding your team
Adding your team
Give each rep their own login and the right access.
Who can do this: Admins only.
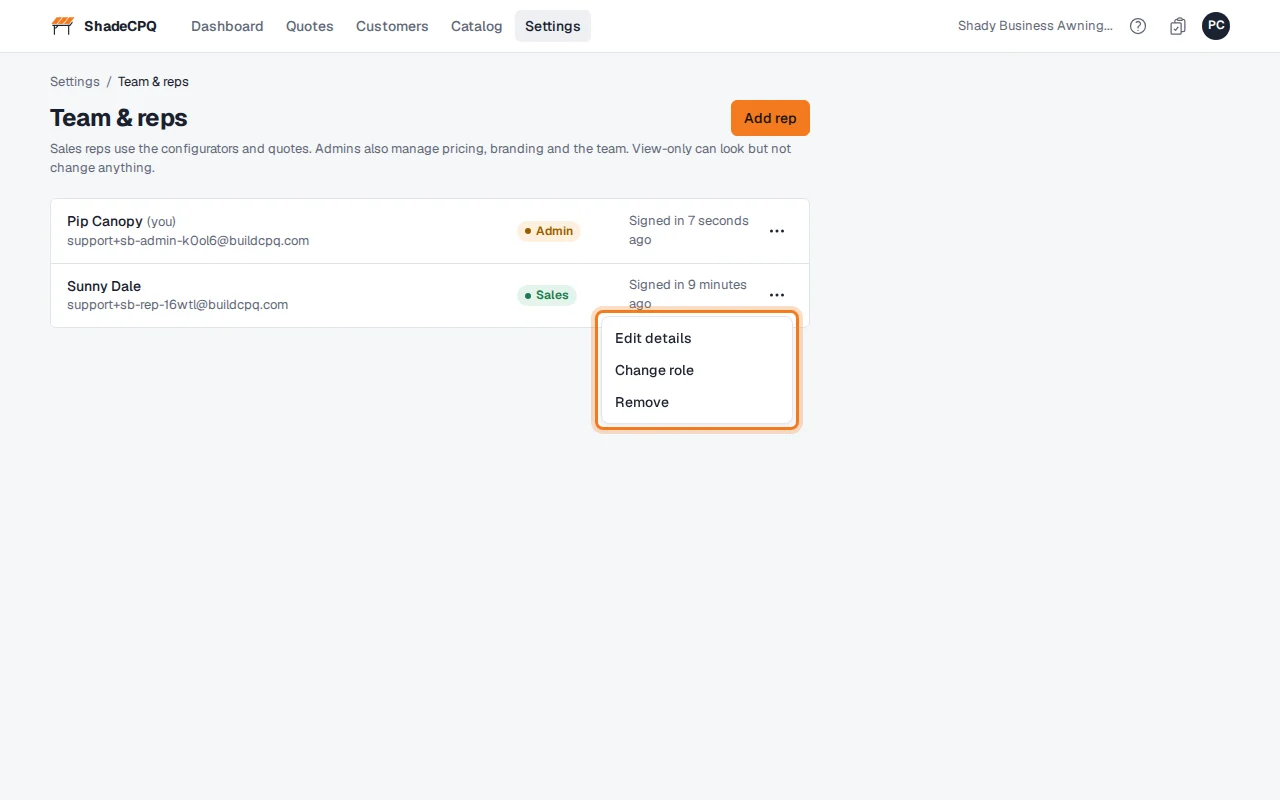
Each person gets their own login, so quotes and follow-ups show who did what. There are three roles:
| Role | What they can do |
|---|
| Sales | Use the configurators, create customers and quotes, and send them. |
| Admin | Everything Sales can, plus the catalog, pricing, settings and the team. |
| View-only | Look at customers and quotes, but not change anything. |
Add a rep
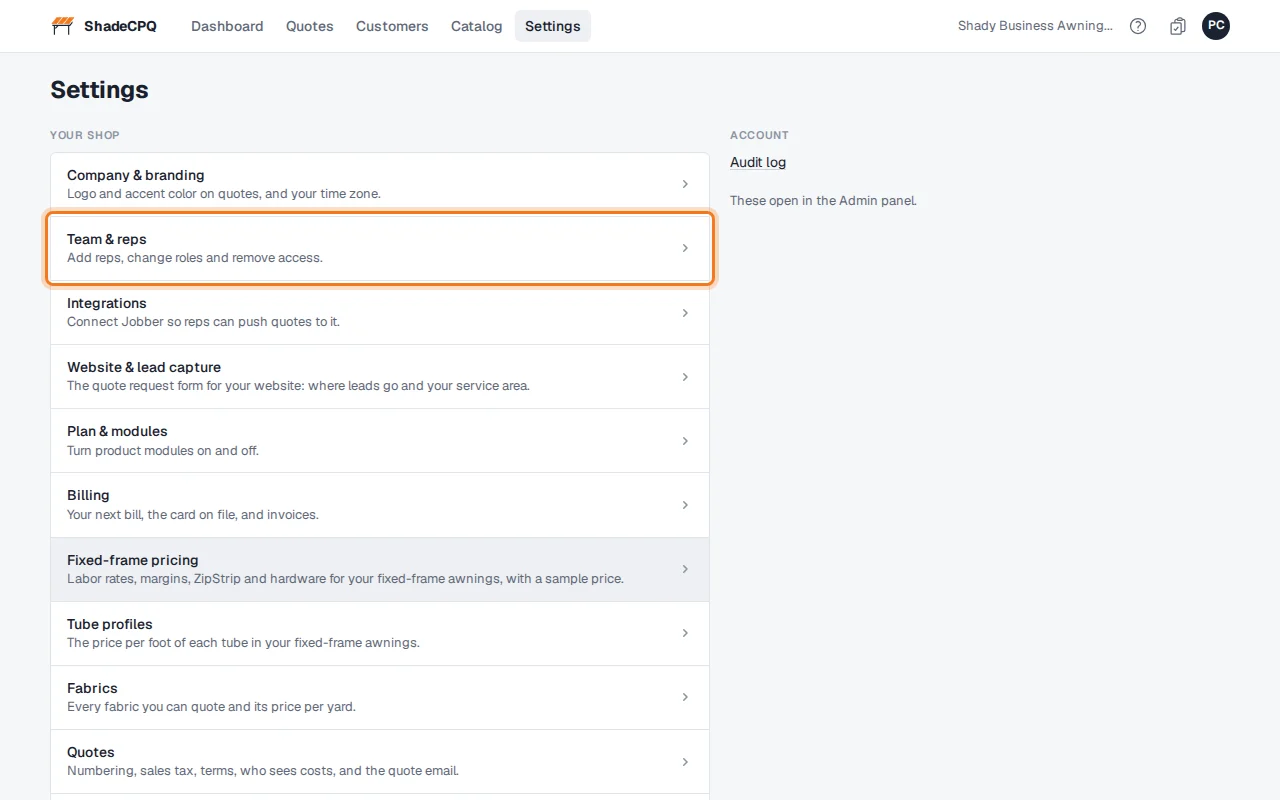
Click Settings, then Team & reps.
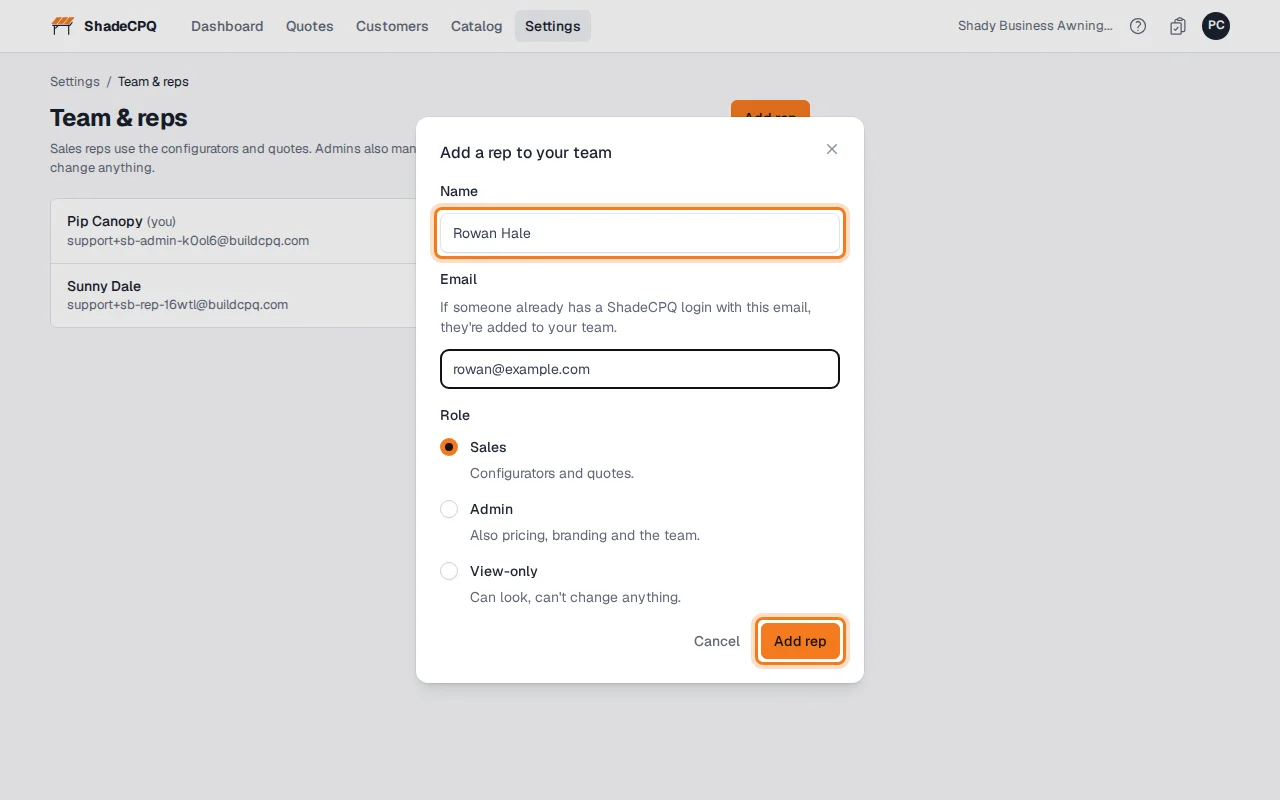
Click Add rep. Type their Name and Email, choose a Role and click Add rep.
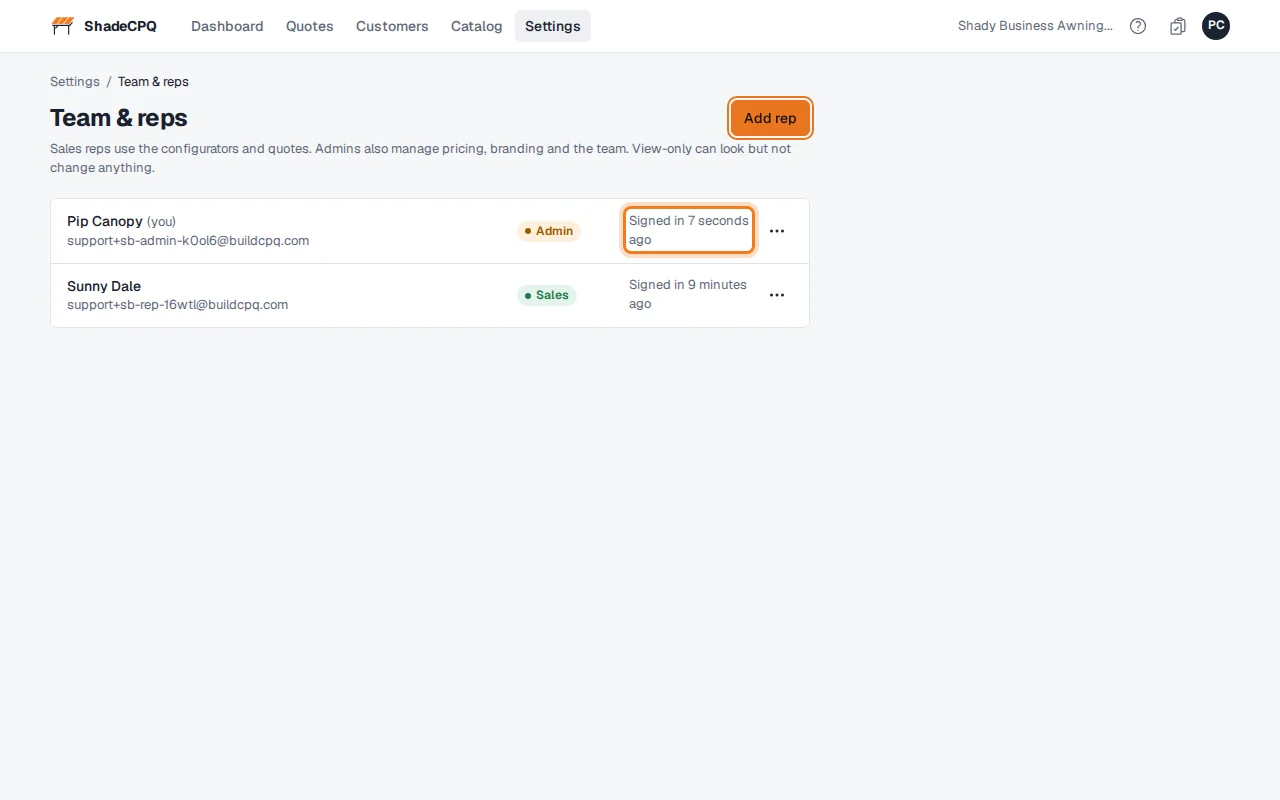
Once added, they appear in this list and get an email to set their password. Signed in shows when each person last signed in.
Change a role or remove someone
Click ⋯ next to the person. Edit details fixes their name or email, Change role changes what they can do, and Remove takes away their access to your shop.
Good to know
- Your shop always keeps at least one Admin: the last Admin can't be removed or changed to another role.
- You can't remove yourself. Ask another Admin.
- Removing someone keeps the quotes and configurations they made.
- Who can see costs and margin is set in Settings → Quotes → Costs and margin.
Frequently asked questions
Why doesn't my awning price match what I expected?
Tick Show internal pricing on the configurator's Quote tab to see how it's built. The usual causes: a labor rate, tube or fabric still at $0 (see Fabrics, tubing and labor rates); the fabric waste allowance; the target margin (50% doubles your cost); or a special-order ZipStrip color charged by the whole roll (on a quote, awnings in the same color share it, so adding or removing one changes the others). Pricing walks through an example.
Does ShadeCPQ quote retractable awnings and screens?
Yes, if your shop sells them: retractable awnings and screens have their own configurators, turned on in Settings → Plan & modules. Anything else you buy in can go on a quote from your catalog.
What's a recover?
A new cover on a customer's existing frame. Choose Recover under Scope in the configurator: the frame isn't charged, and your recover target margin is used if you've set one.
How do I quote something that isn't in my catalog?
On the draft, click + Product or + Service for a blank line and type the description and price.
What does my customer see, and what's hidden?
They see each line's description and price, the tax and total, your terms and logo. They never see costs, margin, labor, the build sheet or internal notes. See Getting started.
How do I get a cut list for the shop?
Click Build sheet on the awning's line in the quote. See Build sheets.
How do I add a second job site for the same customer?
Open the customer, click the Sites tab and add the site. On a quote, pick it as the Job site.
Can I put a discount on a quote?
Yes: click + Discount on the draft and type the amount. In Settings → Quotes you choose whether discounts lower the taxed amount.
The configurator says a fabric "has no price per yard yet". What do I do?
An Admin needs to set that fabric's Price per yard in Fabric catalog (see Fabrics, tubing and labor rates). If the customer is supplying their own fabric, switch on Customer-Supplied Fabric on the Fabric tab instead.
My customer didn't get the email.
Check the Send to address on the quote. You can also click Copy link on the quote and send the link yourself by text or email.
How do I change a quote I've already sent?
Open it and click Revise. You get a new draft version to edit; the customer keeps seeing the version they have until you click Send again.
A quote expired before the customer answered.
Open it and click Extend to give it more time. The customer can approve it again.
If I change a price or rate, do my old quotes change?
No. A quote keeps the prices it had when its lines were added. On a draft, Check prices shows whether its awnings would price differently today.
Who can see costs and margin?
Admins always can. An Admin chooses whether Sales and View-only users can, in Settings → Quotes → Costs and margin. Customers never see them. Click Hide costs on a quote before you show your screen to a customer.
Can I change the sales tax rate on one quote?
Yes. Type a different rate in the totals on the draft. Refresh rate looks the rate up again for the job site.
Does my customer need an account to approve?
No. They open the link in their email, type their name, tick the box and click Approve quote.
Where do I find all of a customer's quotes?
Open the customer and click the Quotes tab, or go to Quotes and search by name.